Introduction to Hitomezashi SashikoOffset Running Stitch and Offset Crosses If you've spent any time around our social media feeds or classes, you know we've been obsessed with sashiko. The history, the applications for strengthening and mending fabrics. Even quilting! Sashiko is now a permanent part of our creative lives. Lately, folx have asked us for an introduction tutorial for sashiko… we can't blame y'all for being as excited to explore this fascinating Japanese mending and reinforcement technique as we are. So, to get y'all started, we've created a short video to introduce you to the basics of the sashiko Offset Running Stitch and Offset Crosses. The offset running stitch and offset crosses are the basis for a profusion of other hitomezashi sashiko patterns and it makes a great stand-alone stitch for reinforcing or embellishing fabrics. Both stitches are perfect for fastening down patches and for layered patchwork and visible mending patches (like on Jason's jeans in the photo above). After all, sashiko IS visible mending! These two sashiko stitches are the first stitches all of our students learn in our live classes and now you can give them a try! Links To The Tools We Use In The Video Sashiko Needles Adjustable Ring Thimble with Plate Thread Snips Shannon & Jason FAB Sashiko Essentials Thread: We recommend stitching with Aurifil 12 weight cotton thread instead of the "sashiko thread" you can find online and in some craft stores. And this particular thread in this video is our very own FAB Sashiko Essentials Collection from Aurifil thread! Come find us on social media! FAB Sashiko Essentials Aurifil Thread Collection
$79.95
FAB Sashiko Essentials by Shannon and Jason Includes 6 large spools of Aurifil Cotton 12wt thread with 356 yds/325 m per spool Colors Included 2024 – White 2740 – Dark Cobalt 2265 – Lobster Red 1240 – Very Dark Eggplant 1147 – Light Leaf Green 4657 – Tramanto a Zoagli (variegated) Our FAB Sashiko Essentials thread collection for Aurifil is the perfect starter pack of colors to set you on the right path for your sashiko projects. We use these thread in our classes and our book and personal sashiko and handsewing projects. However, we’ve also used these same threads for hand quilting, embroidery, and even cross stitcha nd machine embroidery. We picked the colors for this collection specifically to work across a wide range of projects and fabrics whether you want your threads to stand out for sashiko or blend in more for shading in embroidery and quilting. If you’ve never worked with Aurifil thread before in your hand sewing and sashiko, do yourself a favor and try this essentials collection. You’ll find out very quickly why we only work with Aurifil thread: smooth thread that doesn't easily tangle or snag. Aurifil thread produces virtually no lint or thread dust to clog up your machines. We were hooked from the first samples we used and are now Aurifil Ambassadors and designers. From the Aurifil Website Aurifil’s 100% Cotton 12wt thread is the heaviest weight thread we offer and is perfect for hand applique, hand embroidery, hand quilting, cross stitch, embellishment, handmade lace, machine applique, blanket stitch, machine embroidery (especially for designs that use a longer stitch length), machine art quilting, Sashiko, redwork, lower looper serging, and longarm quilting. Uses Hand applique, hand embroidery, hand quilting, cross stitch, embellishment and lace, machine applique, blanket stitch, buttonhole stitch, machine embroidery, machine art quilting, sashiko, redwork, lower looper serging, longarm quilting. Needle Recommendations · Sashiko Needle (hand stitching) · 100/16 or 90/14 Topstitch Needle (40wt in the bobbin) · 4.5 Longarm Needle (28wt in the bobbin) Tips · When using 12wt thread by machine, we recommend using a much thinner thread in the bobbin, like our 40wt. · When using in a Longarm machine, quilt slowly, using a longer stitch and silicone conditioner where necessary. Kogin Essentials Thread Collection
$41.50
KOGIN ESSENTIALS COLLECTION BY SHANNON & JASON 10 SMALL SPOOLS (5-floss and 5-12 weight) Colors: Floss– 2250 - Red 2145 - Yellow-Orange 2135 - Yellow 1147 - Light Leaf Green 5018 - Dark Grass Green 12wt– 2784 - Dark Navy 2730 - Delft Blue 2710 - Light Robin's Egg 2545 - Medium Purple 3660 - Bubblegum Our third collection of thread is inspired by ourr latest book, Contemporary Kogin-zashi: Modern Sashiko Beyond Filling in the Gaps (available for pre-order now) and features the colors we reached for most often when creating the projects for the book. The mix of floss and 12 wt in vibrant hues perfectly compliment the intricate thread work of kogin-zashi, allowing makers the versatility of working with different counts of evenweave fabric. Use the colors as solo features in your projects or match shades for colorblocking or thread blending for dramatically different effect. Either way, this collection is an essential collection to start your kogin-zashi journey. Sashiko Vest #1 Digital Pattern
$15.00
Literally meaning "little stabs" or "little pierce", Sashiko is a form of decorative reinforcement stitching (or functional embroidery) from Japan. We added Sashiko stitching elements to a vest based on Japanese patching technique, Boro to complete this design. Boro came to predominately signify clothing worn by the peasant farming classes in the Edo era of Japan who mended their garments with spare fabric scraps out of economic necessity. A boro garment would most likely be handed down over generations, eventually resembling a patchwork after decades of mending. Only in the modern era are we beginning to see the care and beauty of these textiles. Sashiko Vest #1 is a long vest sewn using Cherrywood Hand Dyed Fabric cotton cloth, then hand stitched in various Sashiko patterns using The Shibaguyz FAB Sashiko Essentials thread collection from Aurifil Thread. Fabric: Body - Cherrywood Hand Dyed Fabric in Indigo. Patches - Cherrywood Hand Dyed Fabric from fat quarters in various colors. Sashiko Stitching - Shannon and Jason Mullett-Bowlsby hand stitched Hitomezashi Sashiko patterns (where the pattern emerges from the alignment of single stitches made on a grid) then the garment pieces are machine sewn. Pattern includes: Instructions for making the vest in Sizes Small through 5X and doing the sashiko stitching. Fabric amounts for all sizes Detailed schematics, stitching instructions for the vest and for the sashiko embellishments SIZES Small (M, L, XL, 2X, 3X, 4X, 5X) To Fit Measured Bust: 32 (36, 40, 44, 48, 52, 56, 60)" / 81.3 (91.4, 101.6, 111.8, 121.9, 132.1, 142.2, 152.4)cm To Fit Finished Bust: 34 (38, 42, 46, 50, 54, 58, 62)" / 86.4 (96.5, 106.7, 116.8, 127.0, 137.2, 147.3, 157.5)cm SKILL LEVEL Intermediate MATERIALS Cherrywood Hand Dyed Fabric 2 YDs (3 YD for XL, 2X, 3X, 4X, and 5X) -Back Panel -Front Panels -Collar Panels -Sides Panels 10 fat quarters in various colors for patches PLUS Two more fat quarters in the same color for the F Patch 1 (left and right) Sewing Machine Sashiko Notions Sashiko Needle and Thimble Sashiko Pattern Templates Not Required, but will make it easier Plastic grid Circular plastic grid Washable or heat removable White Marking Pen from Clover Washable Blue fabric marking pen(s) Serger/Overlock Complete Crochet Course - Autographed Copy
$29.95
From renowned crochet designs Shannon & Jason comes the ultimate reference manual for the absolute beginner to experienced pro. Filled with step-by-step photography throughout for an easy-to-follow and fully visual experience, this unparalleled guide teaches you how to crochet from the very first stitch—and will keep you crocheting as you gain experience! The Complete Crochet Course explains all the tools, materials, and techniques you need, from choosing a hook and yarn to seaming, working in the round, handling specialty crochet stitches, and adding details. We've included ten patterns, perfectly designed for novices eager to complete their first projects, while intermediate crocheters can enjoy mastering even more advanced skills. New Tutorial and Easy Sewing Project
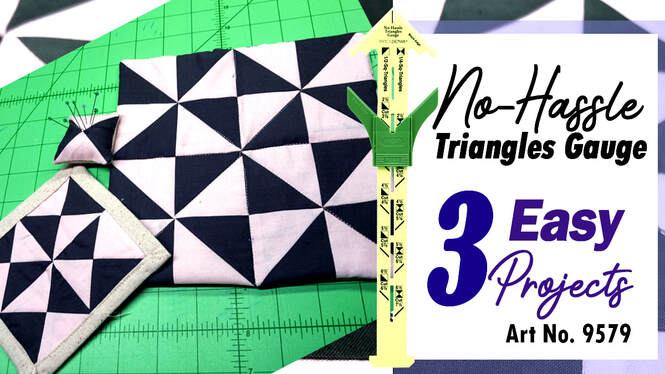
Many of you have been following our Clover Tool School Extra Credit series where we review Clover products and show you how to use those products in projects. Well, now there's even more to play along with in our STITCH ON! tutorial and projects series. To kick things off, we used the No-Hassle Triangles Gauge to create 3 Easy Projects. Even if you've never sewn or quilted before, this tool will have you looking like a pro in no time. And, with the three different projects, you can progress through the tutorials to up your skills as you go.
Tool School Extra Credit Tutorial and Project Sheet
It's time for another Tool School Extra Credit with the Shibaguyz! This time, we used the Clover Quick Yo-Yo Maker to create a pillow top. As always, the video includes both a tutorial on how to use the product followed by a step-by-step project walk through.
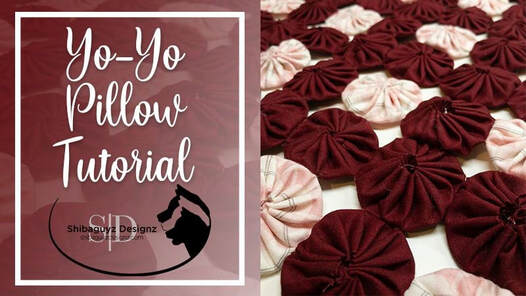
We have to admit, we've not been big fans of the original method we were familiar with for making yo-yo projects. Between fussing to keep the fabric on the circular template and trying to make the stitches just so to make a perfect little yo-yo, we just couldn't bring ourselves to make more than a few. But, by locking the fabric in place and with guides for how to place the stitches, this little tool makes is so quick and easy… we got a little carried away making these while watching a movie one night. Yup… it's that simple with this clever little tool.
Big News From The Shibaguyz We LOVE good tools. Being crafters, the difference between a good tool and a bad one is the same as getting the job done, and getting it done right! From yarn, to hooks, to lighting we look for the highest quality tools to use in our studio. They are an essential part of our studio as much as any other crocheter, knitter, sewer, weaver... maker in general. It is in that light that we want to share with you some THRILLING news. We have just signed on to be national ambassadors for Clover-USA. Through the years we've had the good fortune to be able to work with some of the best names in the crafting world. We're obviously suckers for a well designed craft tool, and have been working with Clover tools for many years now; not just their crochet hooks, which we use exclusively here in the studio as well as in our classrooms, but all their tools. Clover is a brand that covers everything we do... from crochet and knitting, to hand sewing, to quilting and appliqué. It's always a pleasure to find a company that produces great products for something we do... hooks, needles, sewing supplies, etc. But finding one with ALL those tools, and having that all those tools easily available to the masses is rare. We were overjoyed to be able to join forces with Clover. Our friends at Clover put it this way: "If you have one plutonium rod you have one plutonium rod. If you have two plutonium rods you have nuclear fusion. If you have Clover you just have Clover. If you have Clover and the Shibaguyz you have magic. Clover is so happy to have joined into a creative, even magic, partnership with the Shibaguyz."  Coming soon on our website as well as social media channels we will be showcasing some of our favorite products and showing you how to use them in your daily lives. Stay tuned for that!  Complete Crochet Course - Autographed Copy
* indicates a required field From renowned crochet designer Shannon Mullett-Bowlsby comes the ultimate reference manual for the absolute beginner to experienced pro. Filled with step-by-step photography throughout for an easy-to-follow and fully visual experience, this unparalleled guide teaches you how to crochet from the very first stitch—and will keep you crocheting as you gain experience! The Complete Crochet Course explains all the tools, materials, and techniques you need, from choosing a hook and yarn to seaming, working in the round, handling specialty stitches, and adding details. We've included ten patterns, perfectly designed for novices eager to complete their first projects, while intermediates can enjoy mastering even more advanced skills. Filigree Leaf Tunic Crochet Pattern
$7.50
The Filigree Leaf Tunic has been a favorite of ours for for years. The easy fit and versatility of this tunic makes it a FAB piece for any body type and just about any occasion. We've made versions of this design for clients who wore them as wedding dresses, holiday party cocktail dresses, and even beach cover-ups. However, the most popular use for this light and lacy piece is just as a comfortable top to throw over jeans and a tee or tank. Add a belt for a little flattering shaping and you're all set!
This digital download includes the written pattern sized Small through 5X and a chart of the lace stitch pattern. This digital pattern is a PDF and is compatible with all computers and mobile devices. SKILLS USED Foundation Half Double Crochet First Double Crochet Back Post Stitches Front Post Stitches Working in the Side of Stitches Blocking End Cap Finishing Stitch Locking Mattress Stitch SIZES To Fit Bust Circumference: 30 (34, 38, 42, 46, 50, 54, 58, 62)” FINISHED MEASUREMENTS To Fit Bust Circumference: 30 (34, 38, 42, 46, 50, 54, 58, 62)" Finished Bust Circumference: 38 (41, 44, 50, 53.5, 57, 63, 66, 69)" Finished Length From Shoulder : 30.7 (30.7, 30.7, 30.7, 30.7, 35, 35, 35, 35)" Top Line, Cuff-to-Cuff: 38 (39.25, 41, 44, 45.5, 47, 50, 51.75, 53.5)" Main Body Width: 19 (20.5, 22, 25, 26.75, 28.5, 31.5, 33, 34.5)" YARN CYC-1 Super Fine 1746(1748, 2185, 2185, 2622, 2622, 3059, 3059)yds/1600(1600, 2000, 2000, 2400, 2400, 2800, 2800)m MATERIALS Sample shown in Hand Maiden, Sea Silk; 100g/400m/437yd per skein; (70% Silk, 30% Seacell®); 4 (4, 5, 5, 6, 6, 7, 7) skeins; color Pewter. CROCHET HOOK Size D–3/3.25mm crochet hook NOTIONS Yarn needle BLOCKED HANGING GAUGE 5.12 sts and 1.4 rows = 1" with D–3/3.25mm hook Hanging Length for 49 rows = 35" hanging = 1.4 rows per inch 12 Shells, 2 Half Shells (105 sts) = 20.5" hanging = 5.12 sts per inch Men's Hooded Vest - Digital Crochet Pattern
$7.50
Designed for comfort as well as style, the Men's Hooded Vest promises to be an item that will be worn often by even the pickiest guy. Comfortable and stylish to wear, this crochet vest will help keep the chill off while looking polished. It will dress up the simplest t-shirt and jeans into a casual and sophisticated look.
This digital download includes the written crochet pattern sized Small through 3X and a full schematic. This digital pattern is a PDF and is compatible with all computers and mobile devices. SKILLS USED Foundation Single Crochet End Cap Finishing Stitch Locking Mattress Stitch Blocking SIZES To Fit Chest Circumference: 34 (38, 42, 46, 50, 54)”/86.5 (96.5, 106.5, 117, 127, 137)cm Sample Size Small, to fit 34”/86.5cm chest FINISHED MEASUREMENTS To Fit Chest Circumference: 34 (38, 42, 46, 50, 54)”/86.5 (96.5, 106.5, 117, 127, 137)cm Finished Chest Circumference: 38 (42, 46, 50, 54, 56)”/96.5 (106.5, 117, 127, 137, 142)cm Finished Length From Shoulder: 26.5 (27.5, 28, 29, 29.5)”/67.5 (70, 71, 73.5, 75, 76)cm YARN CYCA 3 Light / DK Weight Yarn Sample Shown In: Bijou Basin Ranch Himalayan Trail (75% Pure Yak/25% Merino; 2oz/56gr, 200yds) 9 (10, 11, 12, 13, 14) hanks Natural Brown Alternate Yarn Suggestions:
HOOK F-5/3.75mm crochet hook NOTIONS Zipper Yarn needle BLOCKED GAUGE 31 sts and 26 rows = 5.5 x 5”/14 x 12.5cm in pattern st. Spring Fling Top Crochet Pattern
$7.50
You know that one piece in your closet you reach for when you can’t decide what you want to wear, but you know it’s going to be a FAB day...? Yea, this is that piece.
Designed for crocheters that are ready to give garment making a try, this easy-going top will be a great addition to any wardrobe. Constructed in two stitch patterns, a main flat stitch and a simple lace panel in the frontwith no shaping the Spring Fling Top allows the stitch patterns take center stage This digital pattern is a PDF and is compatible with all computers and mobile devices. SKILLS USED Foundation Single Crochet Linked First Double Crochet End Cap Finishing Stitch Locking Mattress Stitch Blocking SIZES To Fit Bust Circumference: 30 (34, 38, 42, 46, 50, 54)”//96.5 (96.5, 106.75, 117, 127) cm Sample shown in size to fit 34” bust circumference with 4” ease FINISHED MEASUREMENTS To Fit Bust Circumference: 30 (34, 38, 42, 46, 50, 54)”/96.5 (96.5, 106.75, 117, 127) cm Finished Bust Circumference: 34 (38, 42, 46, 50, 54, 58)”/96.5 (106.75, 117, 127, 137.25) cm Finished length from shoulder: 25.5 (26, 26.5, 27, 27.5, 28, 28.5, 29)”/64.75 (66, 67.3, 68.5, 69.75, 71, 72.3, 73.5) cm YARN CYC-3 Light/DK Weight Yarn MATERIALS Sample uses: Cascade Yarns, Longwood Sport (100% Superwash Extrafine Merino Wool; 3.5 ounces/100g = 273 yards/250 m): in color #18 green spruce (Color A), 2 (2, 3, 3, 4, 4, 5) balls—546 (546, 819, 819, 1092, 1092, 1365) yards/500 (500, 750, 750, 1000, 1000, 1250) m of light weight yarn Cascade Yarns, Longwood Sport Stripe (100% Superwash Extrafine Merino Wool; 3.5 ounces/100g = 273 yards/250 m): in color #510 citrus (Color B), 1 (1, 1, 1, 1, 2, 2) balls— 273 (273, 273, 273, 273, 546, 546) yards/250 (250, 250, 250, 250, 500, 500) m of light weight yarn CROCHET HOOK Size US E-4/3.5mm hook NOTIONS yarn needle BLOCKED GAUGE Solid Fabric: 4.67 sts = 1”/2.5 cm; 42 sts = 9”/23 cm; 2.93 rows = 1”/2.5 cm; 22 rows = 7.5”/19 cm Combo V-Stitch: 4.67 sts = 1”/2.5 cm; 32 sts = 6.75”/17.25 cm; 2.93 rows = 1”/2.5 cm; 22 rows = 7.5”/19 cm  Standing First-Stitches This week we are wrapping up our series of tutorials about cleaning up those first stitches of your crochet rows. We all know what happens when we use those instructions that say "chain 3, count as first stitch of row." Yeah… the result is a wonky edge that looks like it's been gnawed on by a rabid wombat… or two. Not a good look… just sayin'… This week is all about Standing First-Stitches. Standing stitches are appropriately named because they can stand on their own without being attached to a chain-up at the beginning of a row or to a previous stitch in the middle of a row of stitches. Because of the unique way they are constructed, standing stitches are invaluable when used as first stitches when you are starting a new ball of yarn, a new color, or when you are starting a new section of a garment that is not attached to the section next to it. Anywhere you need to start a new stitch that isn’t attached to your current yarn or work, use a standing stitch! The key to making a successful standing stitch is the way you wrap the yarn around your hook to make the head of the stitch… so let's start there.
 Crochet Wrapped First-Stitches
This week, we're giving you all another option for the first stitches of a crochet row: the Wrapped First-Stitch. Wrapped first stitches start by using chain-ups to achieve the height needed for the next row of stitches then you work a slick little wrap around and a yarn under to put the loops on your hook. Yup… a yarn UNDER… more on that below. The result is a little thicker than a linked first-stitch and is definitely thicker than a regular double crochet stitch. But, with the right weight of yarn and hook size, this could be a viable option for you in a future project. As with all of these techniques, be sure to use your practice swatch to determine what works best for the crochet fabric you are making for your project. One more reason to swatch that keeps you from having an unfortunate mess later on.
In the end, you will have a sturdy stitch that stands up well to sewing and adding on a border and it certainly eliminates the gaps from those chained first stitches… ACK! After you try this one, leave a comment and let us know what you think. And, if you like this one, share it with your friends and on social media… just tag us with @Shibaguyz so we know you like it! Alrighty then… here we go! 
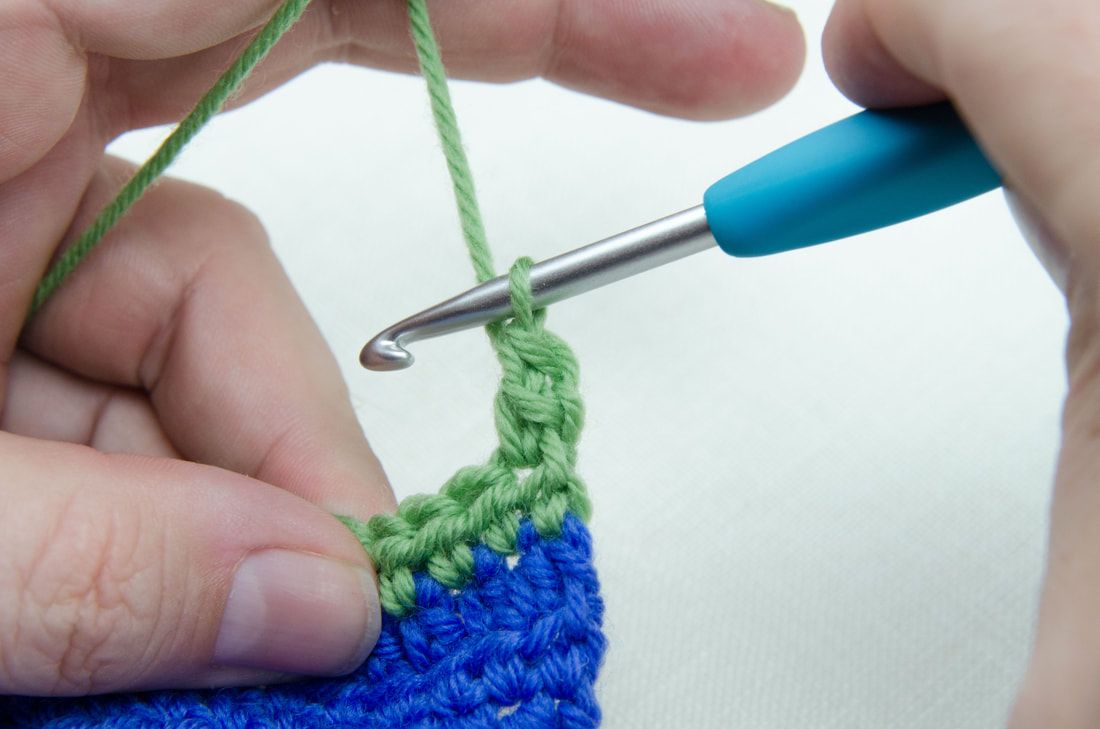
Crochet Linked First-Stitches
The Steps To Making A Linked First-dc:
Pull loop on hook up to slightly taller than a normal loop, ch 1, insert hook in first chain from hook, yo and draw up a loop (2 loops on hook), insert hook into first st, yo and draw up a loop (3 loops on hook), [yo and draw through 2 loops on hook] 2 times.
Now, we did say that all four of the first-stitch techniques have their use and that you should use them where fit best as determined by your practice swatch you make before starting a project. That said… linked first-stitches is the technique we go to more often that the others when it comes to making a neat, clean, tidy border on your crochet fabric. Not only does it look FAB when left as a raw edge, but is is SOOOOO easy to work into when sewing seams or picking up stitches for an edging or an accent band of stitches. In addition, linked first-stitches work WAY better than other first-stitch techniques when it comes to taller stitches… more on that at the end of this tutorial.
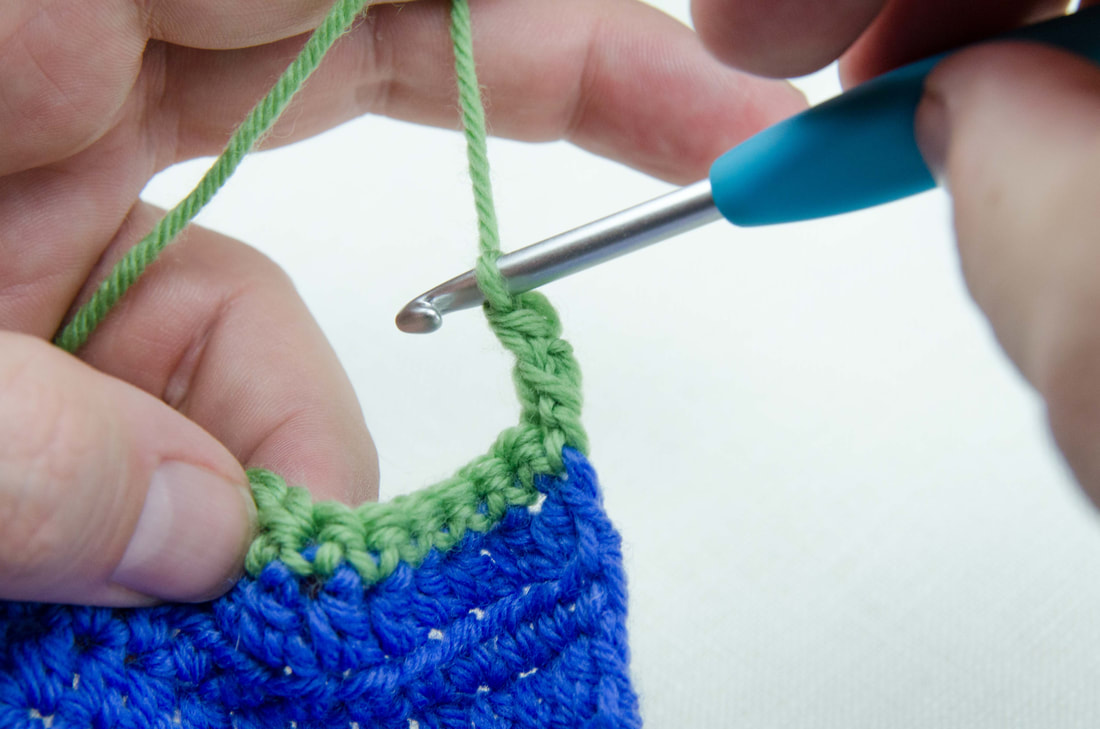
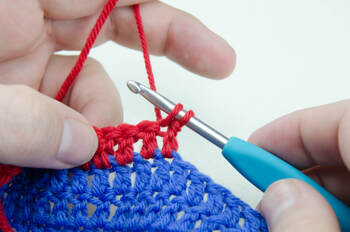
So, without further ado, here is the step-by-step tutorial for making the Linked First-Double Crochet stitch.  Stacked First-Stitches - Your gateway to crochet First-StitchesRather than pulling out large clumps of hair or screaming and ranting so that the Shibakidz go running for the hills, we set out on a quest of experimentation that lead us to a happy place full of unicorns, rainbows, cheesecake, chocolate, puppies... and straight edges (mmmm… chocolate cheesecake). We call this land, The Land of First-Stitches. (But let's get back to the chocolate and cheesecake thing soon…) In order to reach this blissful place of non-wonkiness, we’ve developed a series of stitches we call First-Stitches designed to clean up those edges by replacing the chain ups at the beginnings of rows. In fact, we’ve come up with FOUR different options for first-stitches that we will be sharing with you over the next few weeks starting today! WOOHOO!! In today’s tutorial we'll focus on the first of these 4 First-Stitch techniques: The Stacked First-Stitch.
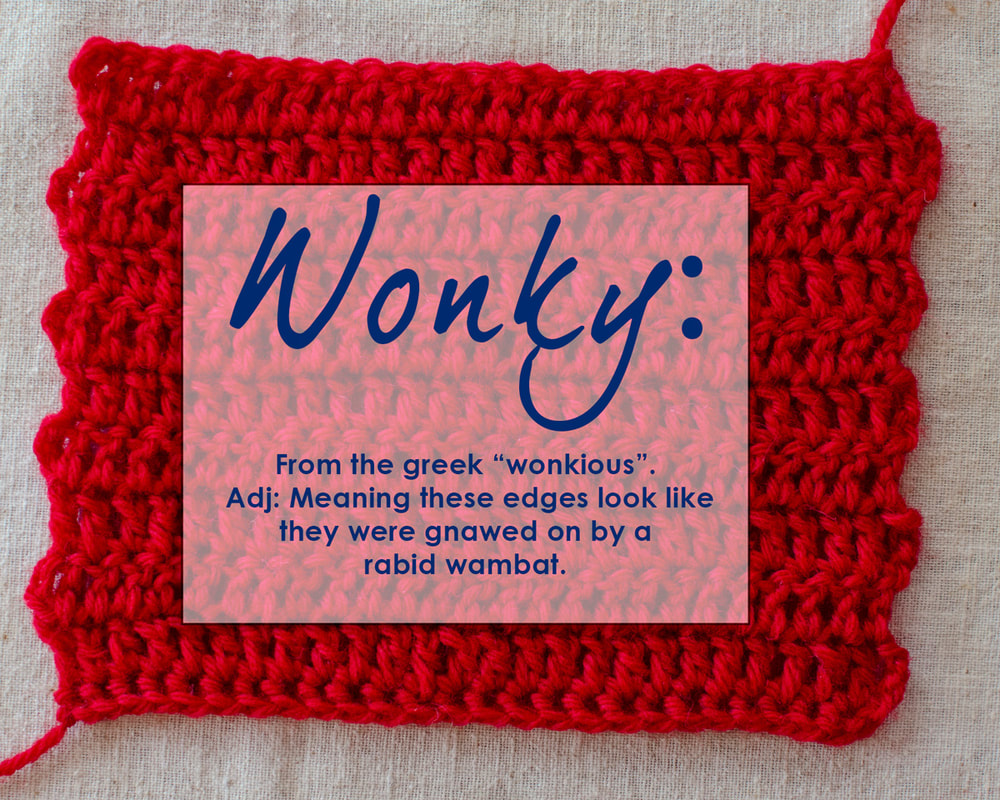
Wonky edges occur when a row of pattern instruction starts with a chain-up that is meant to be counted as the first stitch of the row: Chain 3, count as first double crochet of row. Because of how chain stitches sit on the outside of the fabric, these chain substitutes for the first stitch of a row create an unsightly gap where the first stitch should be. We hate that... I mean, REALLY hate that. And, from your emails and questions in classes, we know you're not particularly fond of wonky edges either. The outrage is totally understandable! We spend days/weeks/months working on the perfect crochet fabric; only to have the edges betray us. And don't even get us started on the difficulties these wonky edges create when sewing garment components together. Nope… not gonna go there right now because we're watching our blood pressure.
Breathe in… breathe out… No More Wonky Crochet Edges! |


| Natural light has made a comeback, not only for amateurs but for pros as well. I love it. It’s warm, it’s easy to manipulate, and it’s free! Natural light is the new look for portraits of newborns to seniors, and it’s popping up more and more in fashion photography. With minimal equipment anyone with a basic camera (even a camera phone) can take exceptional indoor images utilizing nothing more than a window. So, how do you nail it? The key to great fiber photography with window light is as simple as using your eyes. Look at what’s in front of you, decide if you like it. If not adjust it to suit your taste. It’s that easy! Let's do it. | 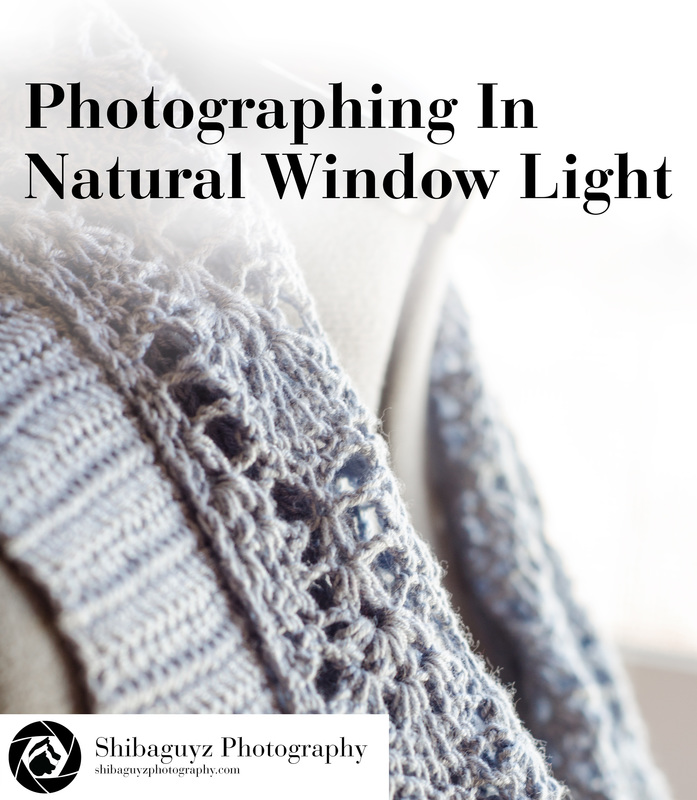 |
 | The direction of it does not matter. Many photographers insist on having a northern or eastern exposure, but I find any direction will work. The trick is you have to wait for the moment when the light is right. You should have bright light without direct light hitting your subject. For my living room shots, this generally happens between 11:00am and 3:00pm. Because I live in Seattle where we have a lot of cloudy days, my shooting schedule can be augmented depending on if the clouds keep the sun in check. One important note… I recommend you turn off all interior lights if possible. They may cause a color balance shift making your garment’s color look off. |
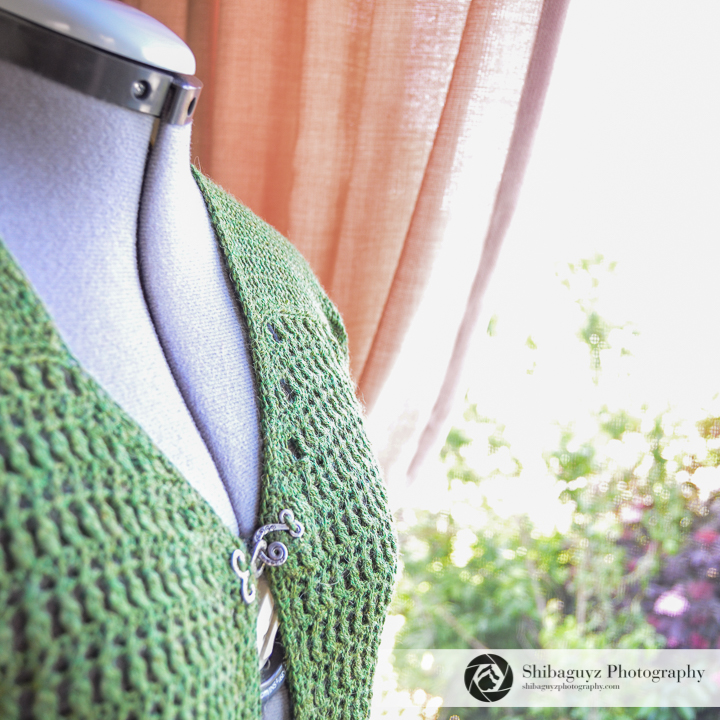
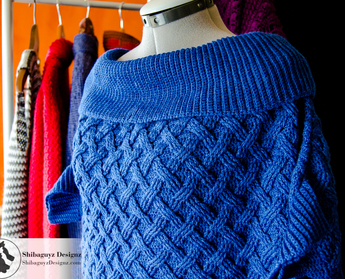 This Cabled Top from Designer Crochet was photographed in my living room directly in front of a large window. See how it's slightly angled allowing some shadows to fall? | It should be obvious, but I’ll say it nonetheless, you can’t move the window, so you’ll need to move your subject to control where the light hits. Positioning your subject directly in front of the window will give you’ll get flat, even light with little shadow, but you can run into problems if the shadow from you or your camera falls on the subject, and sometimes because the light is flat you lose texture. A better option is to position your subject so that the window is just to one side of it on an angle. This is called Side Lighting |
What did you see? The massive majority of images show side lighting. It's flattering to almost every subject. This kind of side lighting set-up will help accentuate any soft lighting streaming across the fabric of your subject which is perfect for enhancing the texture in crochet and knit items. Side lighting is also ideal if you decide to use any kind of a light modifier like bounces and diffusers. Bounces are positioned on the opposite side of the light source, (i.e. further inside the room) bouncing light back to the shadowed side of your subject. They help lighten any strong shadows, acting like a miniature light source.
You don’t need to go broke buying professional bounces to get the “perfect shot”. You can easily get impressive results with a few of sheets of basic card stock, aka "poster board" (available from an office supply store or any store with a craft section). I always carry one plain white piece and another covered in aluminum foil for bouncing light where I want more. Occasionally I’ll use a black piece for intensifying shadows. That’s it… just pieces of thick paper.
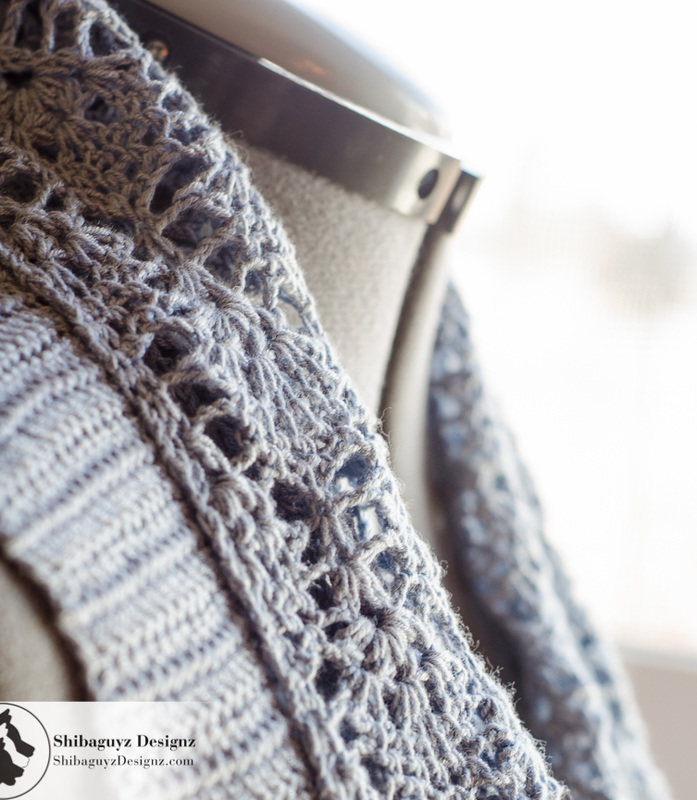 Bringing the dress form closer to the window increased the highlights in this lace helping it to stand out more. | Moving your subject closer to or further away from the window is going to change the “contrast” in the lighting. Contrast is the difference between the dark and light portions of your photo. Being closer to the window increases contrast, thus increasing the difference between the lit side and the shadow side of the subject. Moving it away is going to reduce the effect. Be careful here. If you move too far away there is a chance your subject will look dull and flat. The sweet spot is usually a couple feet away depending on how bright it is outside. |
| NOTE: Pay attention to the sun. Just because we’re inside doesn’t mean we can ignore it. Remember as the sun moves the positive effects of window light will go down the tubes if harsh sunlight starts pouring in. You want light, but not at a direct angle. If the sun is raging in you’re going to have over-exposed highlights and hard ugly shadows on your subject. It’s easy to see when that occurs. If that happens, you have three options: 1. Place a soft curtain or otherwise gauzy piece of fabric over the window to lessen the effect of the hard light (this is called diffusing). Diffusers are placed between the light and the subject to help scatter harsh direct light into softer light with reduced shadows. Think of how sheer curtains in a window soften hard light scattering it. 2. Wait for the hard light to move out of the window. 3. Go to another window that faces another direction. The sun can’t be on all four sides of the house at once! |  I used a simple curtain to block the worst of the harsh summer afternoon light coming in this window. It allowed softer light to wrap around the dress form and made a nice background too! |
 | Focus on your subject and adjust the exposure and focus on the garment. Placing yourself so the window is in your photo will sometimes over-expose that part of the photo, which is a justifiable style choice. I recommend you move around taking your photo from different placements. If you don’t like the composition, move yourself again or move your subject until it looks perfect. Be sure to check your photos in your camera and on a computer before you break down your set. |
Want to see more of Jason's work? Check out his website at ShibaguyzPhotography.com.
Want more training with Jason? You got it! He has two webinars available online from F&W Media and the Interweave Store. Together these two webinars are a FAB starter pack for anyone wanting to take better photos of their projects… or just better photos in general! Here are the links:
How to Create a DIY Photo Studio: Get Professional Results at Home!
and
Photographing Your Projects Like a Pro
All the details about the classes are at the links.
Thanks for stopping by another Technique Tuesday Tutorial! We love sharing the skillz with our community and hope you all enjoy adding new skillz to your toolbox.
Drop us a line and let us know what you'd like to see in future tutorials and you might see your idea right here in a future Technique Tuesday Tutorial!
talk to you soon…
S&J
Come look us up on Facebook, Twitter, and Pinterest by clicking on one of these icons.

3 Easy Tips For Taking Better Photos - a guest post by Jason Mullett-Bowlsby, owner of Shibaguyz Photography
| It is no secret that fiber folks and, indeed, folks who make handmade items in general, like to take photos of our handy work. In fact, if you have a handmade business, it is a VITAL part of that business to be able to take FAB photos of our work in order to present that work in a way that will appeal to your clients. If your product photos aren't good, it doesn't matter how gorgeous your pottery, yarn, or garment designs are. People just aren't going to see that beauty and craftsmanship shine through. To that end, today we're placing a different spin on our Technique Tuesday Tutorials and we're going to focus (see what I did there? Focus. Photography. *ahem* moving on…) on another aspect of the Shibaguyz. Specifically, Jason, the other half of the Shibaguyz is going to put on his Shibaguyz Photography hat and give us his 3 Tips for Taking Better Photos. Take it away, Jason! |  |
 Jason Mullett-Bowlsby Shibaguyz Photography
 As a professional photographer I get asked questions… lots of questions. People ask me about my camera, my lens, and my equipment. Conversations sound something like this:
“So, I’ve been thinking of upgrading to a new body. What one do you like?”
“Do you like prime lenses?”
“Is that a ‘nifty-fifty’ you have on there?”
“I once read that Cannon’s are better than Nikon for shooting Mountain Sasquatch in their natural habitat…”
While all of these questions have merit, the answers will not necessarily make anyone a great photographer. Buying an expensive camera with big fancy lenses will not allow you to take professional quality photos any more than buying a professional-grade Viking gas range and new All-Clad Stainless Steel pans will let you cook like a five-star chef. It just doesn't work that way.
However, there are tricks to make your photos (regardless of what camera you use) look more professional.

One loop… two loop… front loop… back loop… (OR) Where to put your crochet hook!
(There might have been a LITTLE Dr. Seuss influence in that title…)
Making different fabrics by inserting your crochet hook into different loops.
| What is it? The question of "where to insert your crochet hook when making your crochet stitches" has been sitting in the top five search terms for our website since we started posting crochet and knitting tutorials. Knowing exactly where to insert your crochet hook when you are making stitches is a common question for beginners who are faced with a confusing row of loops that all look the same after a while. Even experienced crocheters find that the way they learned to make basic crochet fabric involved inserting their hook under either of one or under both loops and it never once occurred to them that they might have been doing something "different" at all! | 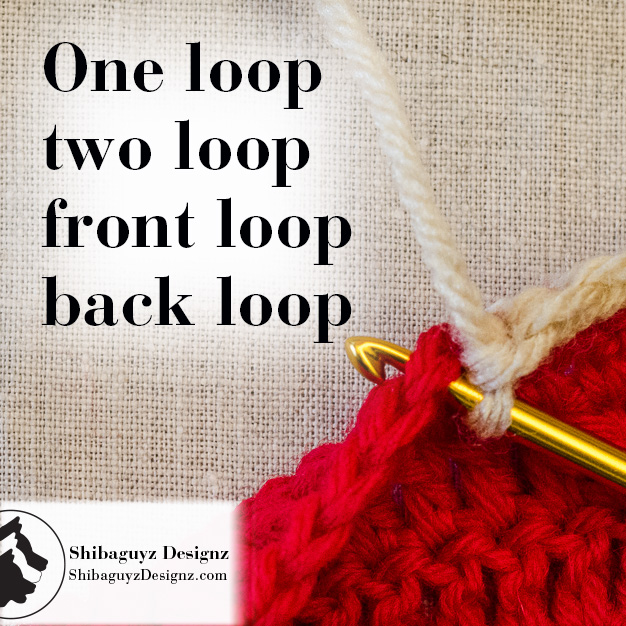
|
Knowing where to insert your crochet hook when you make your crochet stitches and how different loops affects your final fabric is a vital piece of information that will change how you look at your stitching forever.
Read on…
Technique Tuesday Crochet Tutorial – Introduction to Crochet Charts, Part 2: Uncommon Stitches
3/3/2015

Introduction to Crochet Charts, Part 2: Uncommon Stitches
How To Read Crochet Charts – Uncommon Stitches
| What is it? As we said in last week's Technique Tuesday Crochet Tutorial Introduction to Crochet Stitch Charts, Crochet Stitch Charts are the visual representation of the physical stitches you make with your hook and yarn. Further, Crochet Stitch Charts are also a visual representation of the written crochet pattern. This week, we are going to be covering types of stitches and their corresponding symbols that you might not see in every Crochet Stitch Chart you come across. Even though these stitches weren't used as often in the past, they are now being used with greater frequency and, if you are reading any of the patterns we publish either in books, magazines, or the Shibaguyz Designz pattern line, you will DEFINITELY see these stitches and symbols. | 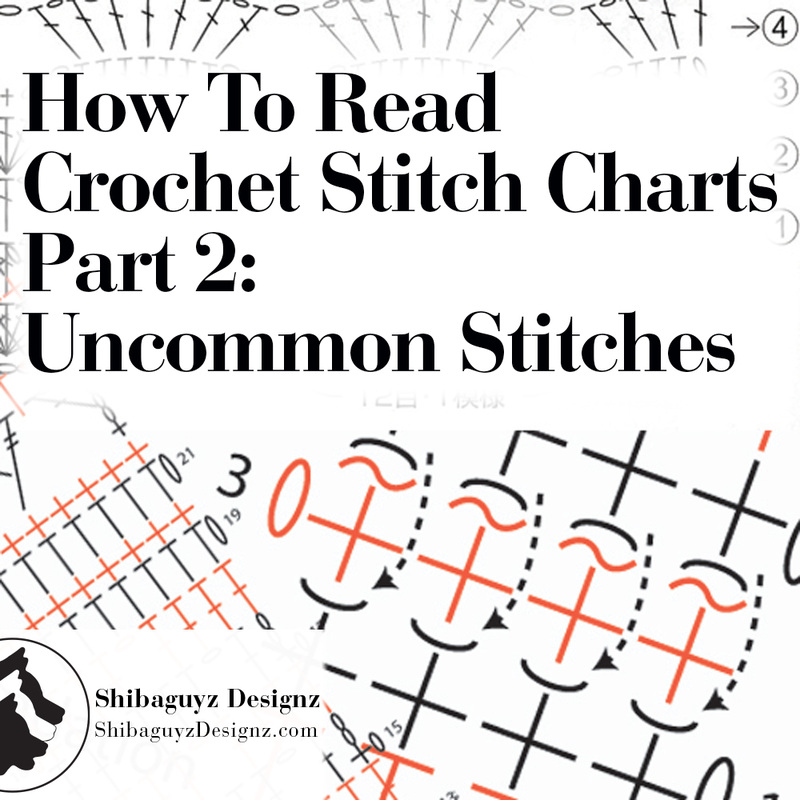
|
Introduction to Crochet Stitch Charts
Introduction to
Crochet Stitch Charts
How To Read Crochet Charts – Introduction
| What is it? Crochet Stitch Charts are a visual representation of the physical stitches you make with your hook and yarn. Think of the Written Crochet Pattern and the Crochet Stitch Chart as two complimentary pieces to your work. The Written Crochet Pattern describes the stitches and the Crochet Stitch Chart shows you the stitches. Each physical and written stitch has a corresponding symbol that represents that stitch. To read a Crochet Stitch Chart, all you have to remember is: See a symbol, make a stitch! |  |

How To Make the End Cap Finishing Stitch
End Cap Finishing Stitch
The End Cap Finishing Stitch is a technique for weaving in that last stitch in a row of crochet.
| Why Use It? The End Cap Finishing Stitch creates a tidy corner on the end of a row of crochet. This weaves in the yarn tail at the end of the row but does it with style! In our never-ending quest to fine tune our stitching and finishing techniques, we wanted a way to both weave in the tail from that last stitch but do it in a way that didn't look all wonky. |  |
Why use it? Because you are proud of your work and want every stitch to look as good as it possibly can. And, when a technique is this easy, who NOT use it?
NOTE: The End Cap Finishing Stitch works equally well on the last stitch of a knitting row. The technique for knitting will be similar to the single crochet example we show below.

How To Make the Crochet Knotless Starting Chain
The Knotless Starting Chain
| What is it? The Knotless Starting Chain is an alternate technique for starting that first stitch off your crochet hook. As the name indicates, the Knotless Starting Chain eliminates the slipknot usually made around the crochet hook before pulling through the first loop. |  |
In our quest to create perfect finishes on our crochet designs, that little bump at the beginning of every project has been a nuisance that just won't go away. Sure, we could hide it when we woven in the starting tail, but it was still there… taunting us… the evil little bump.

Six Ways To Make the Double Crochet 2 Together Decrease – Part 2: Three MORE Compound Stitch Techniques
Double Crochet 2 Together Decreases
| What is it? The instruction for Double Crochet 2 Together, also written as (dc2tog), is used to decrease the number of stitches made in a row by one stitch. One stitch is made in place of two stitches and is generally for the purpose of shaping but can also be used to make different lace patterns. |  |
More accurately, one Compound Double Crochet Stitch is made in place of two Double Crochet stitches. Compound Crochet Stitches are those stitches that are made up of two or more elements of other crochet stitches. When making a Compound Crochet Stitch, we combine the elements of two or more crochet stitches to make one NEW crochet stitch. In this tutorial and in Part 1, we explore the use of these Compound Crochet Stitches to combine the elements of two Double Crochet stitches to create one Double Crochet 2 Together (dc2tog) stitch.
As we said in the title of this tutorial, this is the second of a two part tutorial and contains techniques 4–6 of the SIX techniques we use for making the Double Crochet 2 Together (dc2tog) decrease. Yup… six…
To catch up on the techniques 1–3, go to our post from a couple of weeks ago at the link below:
Six Ways To Make the Double Crochet 2 Together Decrease – Part 1: The First Three Techniques
Don't worry… we'll wait for you to go and come back…
Oh good! You're back…
Now on with today's tutorial!

How to Wet Block Crochet and Knit Fabrics by Soaking
| What is it? Generally, blocking is the method for shaping and setting the stitches of crochet and knit fabrics. During blocking, the fibers of the fabric are relaxed and allowed to bloom through the introduction of water in the form of steam, spritzing, washing, or soaking. | 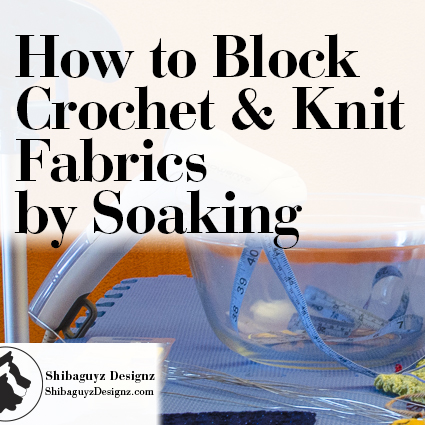 |
Specifically, for today's tutorial, we are going to be covering the steps for soaking your fabrics for blocking.

Six Ways To Make the Double Crochet 2 Together Decrease – Part 1: The First Three Techniques
Double Crochet 2 Together Decreases
| What is it? The instruction for Double Crochet 2 Together, also written as (dc2tog), is used to decrease the number of stitches made in a row by one stitch. One stitch is made in place of two stitches and is generally for the purpose of shaping but can also be used to make different lace patterns. | 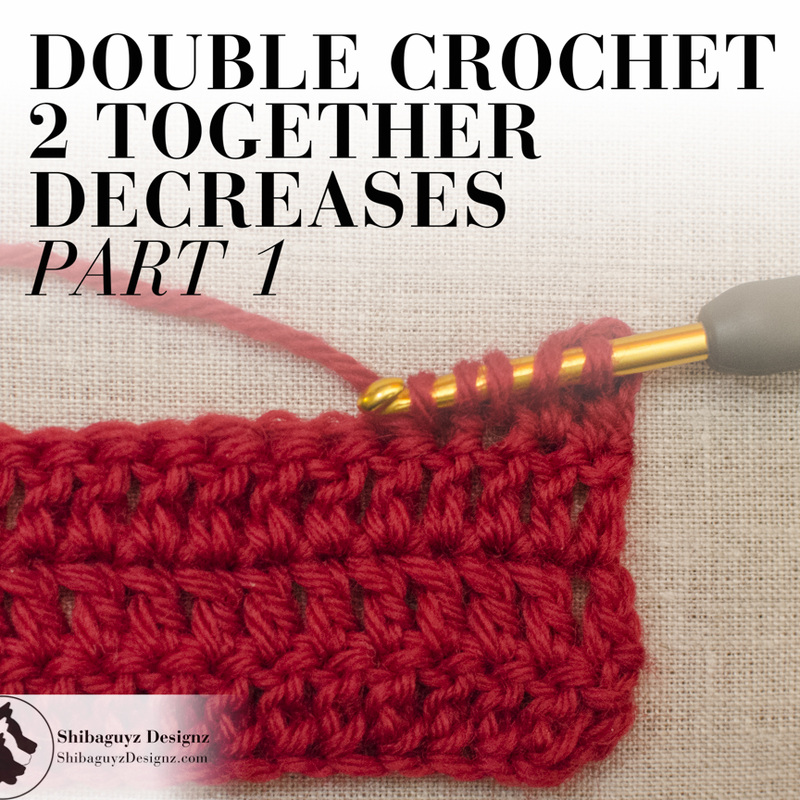 |
More accurately, one Compound Double Crochet Stitch is made in place of two Double Crochet stitches. That is, the elements of two Double Crochet stitches are combined to create one compound stitch. Therefore, we are using Compound Crochet Stitches to decrease in Double Crochet stitches.
As we said in the title of this tutorial, this is Part 1 of 2 and contains the first three of SIX techniques we use for making the Double Crochet 2 Together (dc2tog) decrease. Yup… six…

Technique Tuesday – How To Make the Foundation Double Crochet Stitch
| Technique Foundation Double Crochet (Fdc) Stitch | 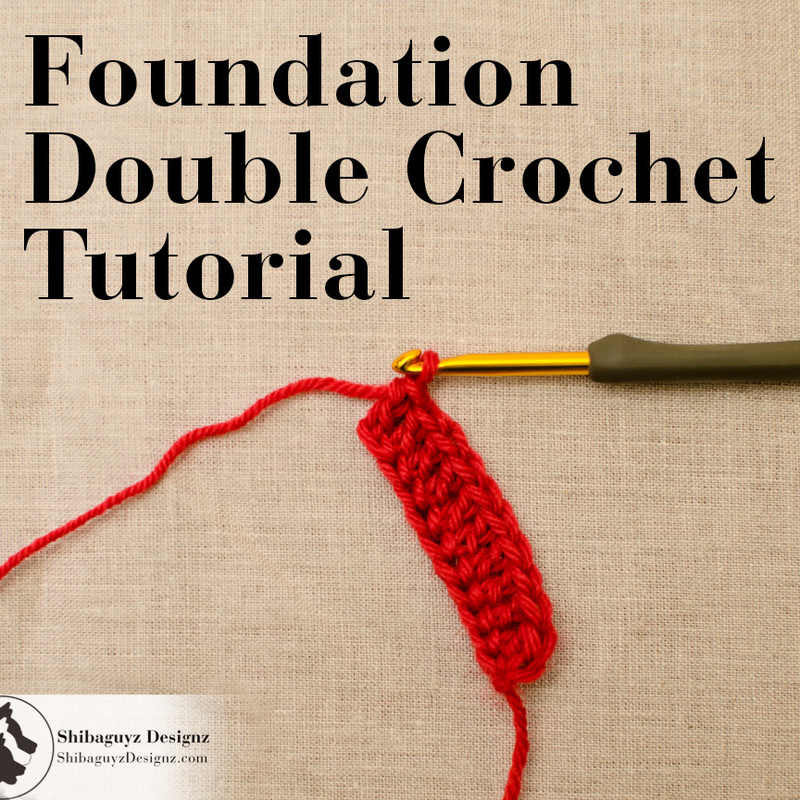 |
The Foundation Double Crochet stitch technique (abbreviated Fdc) is an alternative to the instructions at the beginning of a crochet pattern that tell you to chain a certain number of stitches.
This technique simultaneously creates a row of "chain" stitches AND a row of Double Crochet stitches (abbreviated dc) without making two passes. Basically, it takes the place of two rows of stitches: the "chain" row that makes up the beginning base and the next row of Double Crochet stitches worked into that row of chains.
As with our Foundation Single Crochet and Foundation Half Double Crochet tutorials, we are using " " around the word chain because this isn't REALLY a chain stitch but it LOOKS like a chain stitch when the stitch is completed.
Be sure to go check out our other foundation stitch tutorials:
How To Make the Foundation Single Crochet Stitch
How To Make the Foundation Half Double Crochet Stitch
The primary reason we use foundation stitches like the Foundation Double Crochet stitch in our work is the elasticity or, more accurately, the consistent stitch tension, it provides at a hem, cuff, neckline or any beginning section of crochet stitches.
A crochet chain row tightens up significantly once the next row of stitches is worked into it because the loops of a crochet chain are made by pulling new loops through previously made loops. Since the chain loops are connected to one another this way, pulling on one of the loops by inserting a hook into the chain and making a stitch there tightens the neighboring loops. The result is a chain that is significantly shorter than we probably need and a fabric edge with little or no elasticity at all. And, unfortunately, even the almighty fix-all techniques in blocking will only get you so far… fibers only stretch so much before they are ruined or "killed" zapping them of all bounce and elasticity.
This unfortunate tightening of stitches doesn't happen when using the Foundation Stitch technique since the "chains" we make are connected to the stitch (Single Crochet, Half Double Crochet, Double Crochet, etc…) we create simultaneously on top of the "chain". The next "chain" we make is created by coming through the side of the previous stitch and does not affect the tension of the preceding or following "chains."

How To Weave In the Ends Of Yarn Tails On Your Knitting Projects
Weaving in the ends on your knitting projects.
| What is it? At the end of projects and anywhere a new length of yarn is joined, there is a tail of yarn remaining that must woven in. This instruction is often at the end of a pattern written as: Weave in ends. Weaving in the end of a tail of yarn secures the yarn tail so it does not come unraveled and hides the tail so it cannot be seen. | 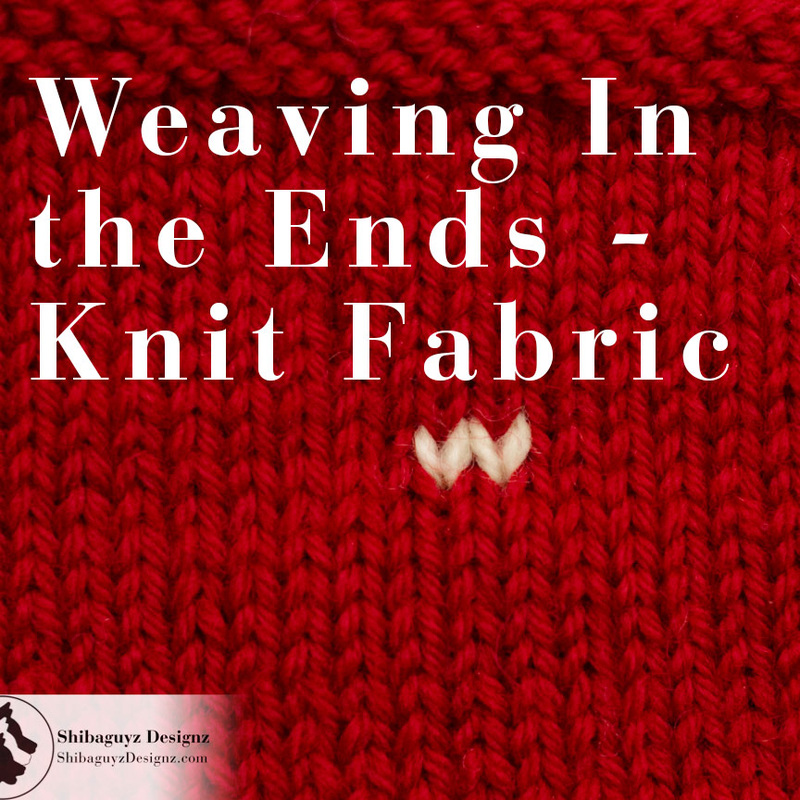 |

How To Weave In the Ends Of Yarn Tails On Your Crochet Projects
Weaving In the Ends On Your Crochet Projects
| What is it? At the end of projects and anywhere a new length of yarn is joined, there is a tail of yarn remaining that must woven in. This instruction is often at the end of a pattern written as: Weave in ends. Weaving in the end of a tail of yarn secures the yarn tail so it does not come unraveled and hides the tail so it can not be seen. | 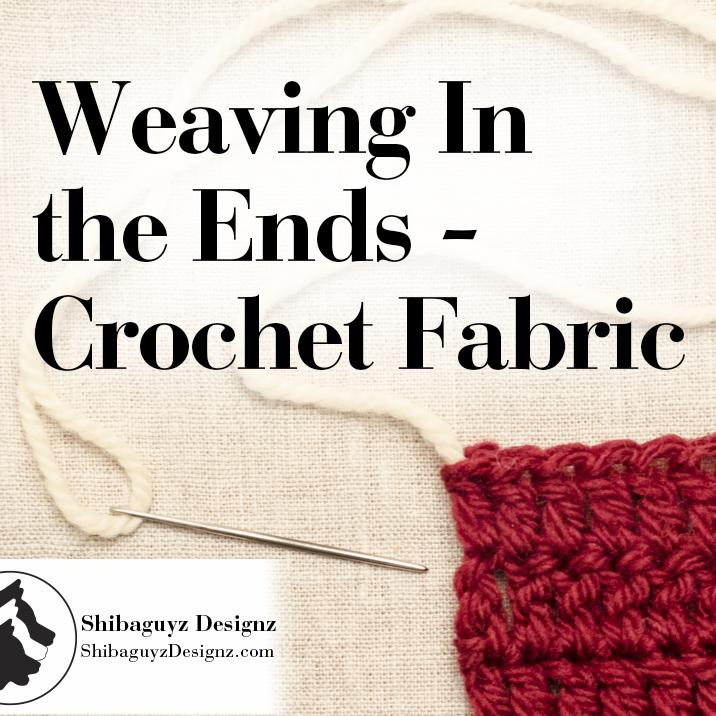 |

Four Techniques for How To Block Your Crochet and Knit Fabrics
Four Ways to Block Crochet and Knit Fabrics
| What is it? Blocking is the process of introducing moisture into a fabric in order to finish that fabric. Blocking allow fabric fibers to bloom and wake up lending their true nature to the finished fabric. Blocking also allows the finished fabric to be shaped and sized according the finished dimensions of a pattern or in order to open up and set a stitch pattern. | 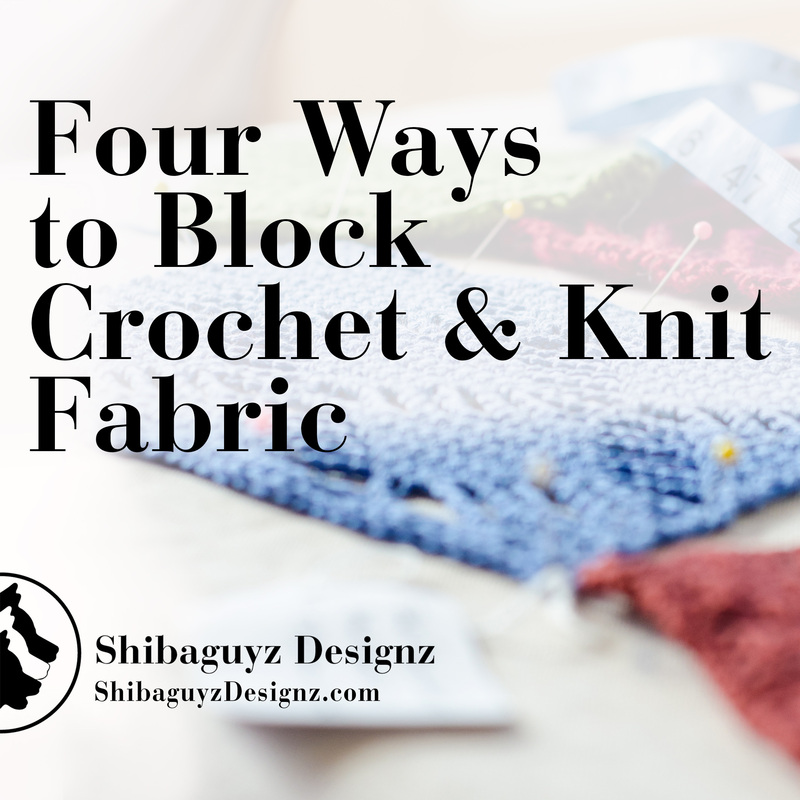 |

Three Ways To Make the Single Crochet 2 Together Decrease (sc2tog)
Single Crochet 2 Together (sc2tog) Decrease
| What is it? The instruction for Single Crochet 2 Together, also written as (sc2tog), is used to decrease the number of stitches made in a row by one stitch. One stitch is made in place of two stitches and is generally for the purpose of shaping but can also be used to make different lace paterns. | 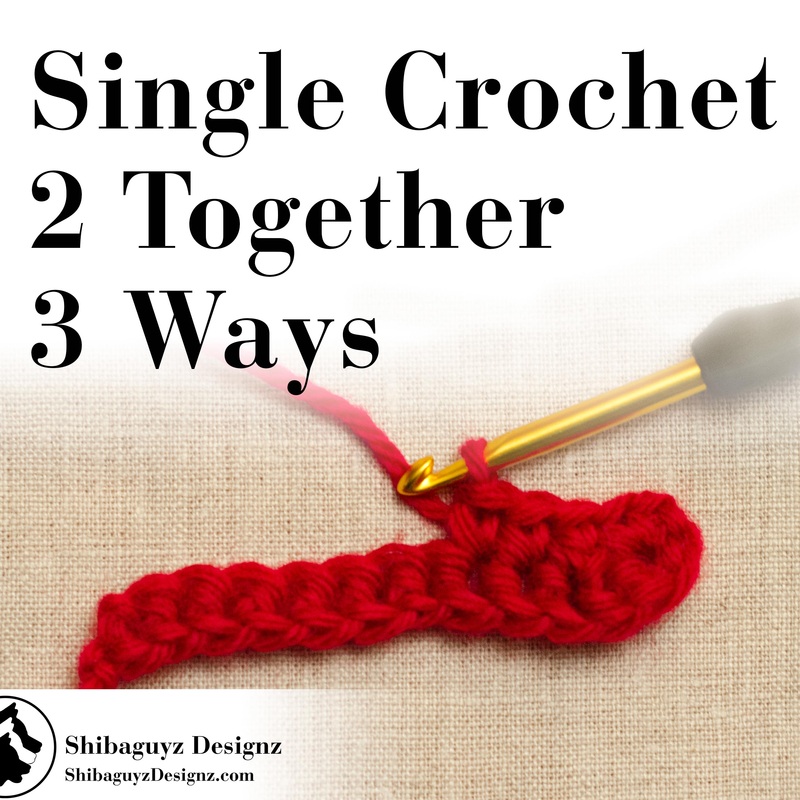 |

Answers To Your Top 3 Questions About the Technique Tuesday Crochet & Knitting Tutorials
| We've been going strong for a few months now with our Technique Tuesday crochet and knitting tutorials and, naturally, y'all have had some questions. Most of the questions have been answerable via a quick email but a few others have stood out as needing a little more attention. In the interest of helping Build Your Skillz, we've picked the three questions asked most often or that provided the best opportunity for teaching a more specific detail of our tutorials. Here is our first ever, Knit & Crochet Q&A! | 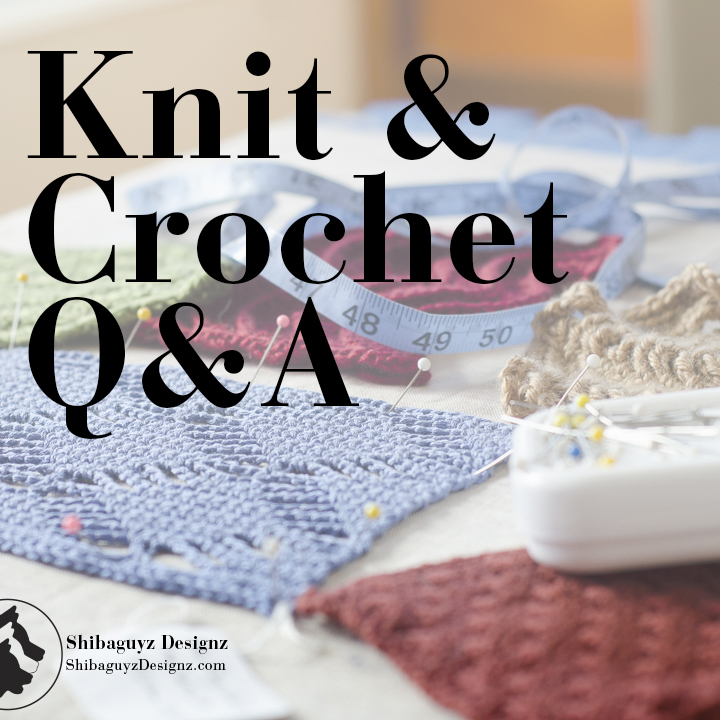 |
Author
Shannon and Jason
 RSS Feed


Archives
May 2024
September 2022
June 2022
February 2022
June 2021
November 2020
September 2020
June 2020
May 2020
April 2020
March 2020
January 2020
February 2019
December 2018
November 2018
August 2018
July 2018
May 2018
April 2018
March 2018
February 2018
January 2018
December 2017
November 2017
October 2017
September 2017
August 2017
July 2017
March 2017
February 2017
January 2017
November 2016
October 2016
September 2016
July 2016
June 2016
May 2016
April 2016
March 2016
February 2016
November 2015
August 2015
July 2015
June 2015
May 2015
April 2015
March 2015
February 2015
January 2015
December 2014
November 2014
October 2014
September 2014
August 2014
July 2014
April 2014
March 2014
January 2014


Categories
All
Afghan
Aurifil
Books
Boro
Camp STITCHES
Classes
Cleaning
Clip On
Clover
Cowl
Craft
Craftsy
CraftU Classes
Crochet
Crochet Geometry
Daylight
Daylight Company
Design
Designer Crochet
Digital Download
Donate
Download
English Paper Piecing
Event
Free
Giveaway
Hand Cream
Hooks
Inspirations
International Crochet Month
Interview
Interweave
Knit
Knitting
Lamp
Marcus
Marcus Fabrics
Men
Menswear
National Craft Month
National Crochet Month
Needles
Online Classes
Ottlite
Pattern
Patterns
Paypal
Photography
Podcast
Prize
Product Review
Project
Quilt
Quilting
Recipe
Rotary Cutter
Sashiko
Season Of Giving Away
Sew Expo
Sewing
Shibaguyz
Shibaguyz Designz
Shibaguyz Designz Indie Maker Pattern
Shibaguyz LIVE
Shibaguyz Photography
Shop
Soak
STITCHES Events
Sweater
Thread
Tool School
Tools Of The Trade
Travel Lamp
Tutorials
Vogue Knitting LIVE
Walkthrough
Warm Up America
Wash
Weaving
Women
Yarn
Zoom Loom


