SHANNON & JASON
  • Home
  • Blog
    • Tips
    • tutorials
  • Our Books
    • Contemporary Kogin-zashi
    • Boro & Sashiko, Harmonious Imperfection: The Art of Japanese Mending & Stitching
    • Complete Crochet Course
    • Designer Crochet
    • Crochet Geometry
  • All Shopping
    • Books and Digital Patterns
    • Sashiko Shop
    • Thread
    • Fabric
    • Stitchips
  • Classes
  • Sashiko
  • About
  • Contact and Subscribe
  • Sponsors

 Shannon & Jason's Blog 

Technique Tuesday Crochet Tutorial – Double Crochet Decreases Part 1

1/6/2015

1 Comment

 
Technique Tuesday - Step-by-step crochet and knitting photo tutorials by Shibaguyz Designz

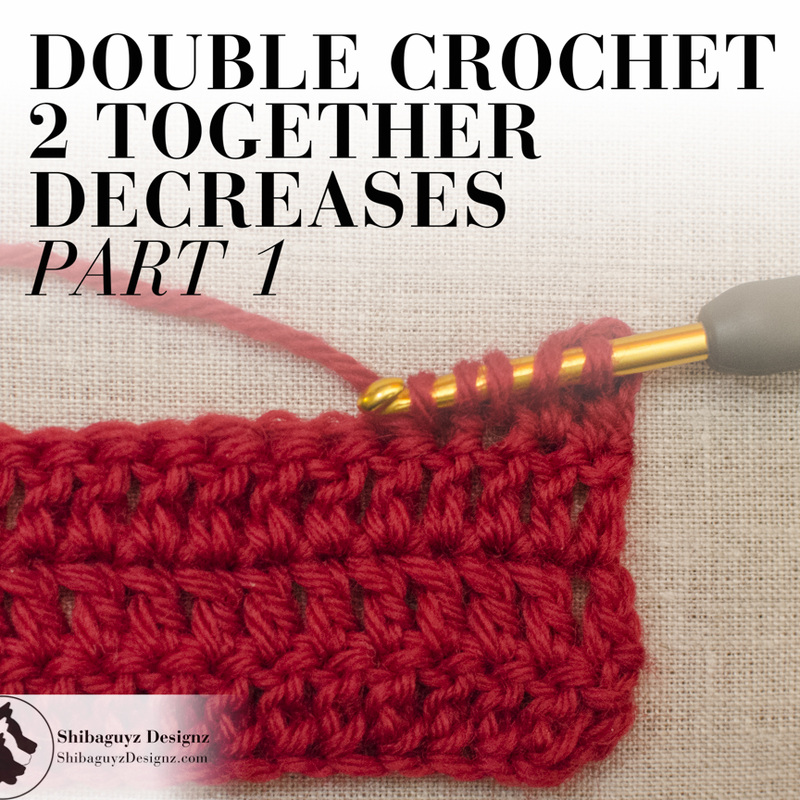
Six Ways To Make the Double Crochet 2 Together Decrease – Part 1: The First Three Techniques


Technique
Double Crochet 2 Together Decreases


What is it?
The instruction for Double Crochet 2 Together, also written as (dc2tog), is used to decrease the number of stitches made in a row by one stitch. One stitch is made in place of two stitches and is generally for the purpose of shaping but can also be used to make different lace patterns.
Six Ways To Make the Double Crochet 2 Together Decrease – Part 1: The first three techniques. A free step-by-step photo crochet tutorial by Shibaguyz Designz

More accurately, one Compound Double Crochet Stitch is made in place of two Double Crochet stitches. That is, the elements of two Double Crochet stitches are combined to create one compound stitch. Therefore, we are using Compound Crochet Stitches to decrease in Double Crochet stitches.

As we said in the title of this tutorial, this is Part 1 of 2 and contains the first three of SIX techniques we use for making the Double Crochet 2 Together (dc2tog) decrease. Yup… six…

Why Use It?
As with our tutorial for Three Ways To Make the Single Crochet 2 Together Decrease, the question here is really about why to have so many different ways to make the Double Crochet 2 Together (dc2tog) decrease. And, expectedly, the answer is the same: Options!

There are a nearly innumerable number of fabric variations possible when one combines different hook sizes, yarns, and stitch patterns. With each of these fabric variations, it is often necessary to have options for making Double Crochet 2 Together decreases that look esthetically pleasing in the overall crochet fabric.

It is HIGHLY unlikely that your pattern instructions will give you specifics for how to make the Double Crochet 2 Together decrease beyond the abbreviation (dc2tog). So, it is up to YOU to decide if one of these four techniques for making the Double Crochet 2 Together decrease will fit your project better than the others. The best way to make this decision is to read your pattern ahead of time to determine what types of decreases (if any) you will be making then make them in your swatch.

To Work Today's Tutorial
Here's a list of materials we used to make today's Double Crochet 2 Together (dc2tog) tutorial. While you can, of course, use any materials you have on hand, these materials listed are what we recommend you use while you are learning.


Yarn Used
CYCA 4
Worsted Weight, 100% Pure Wool

Hook Used
H-8/5.00mm Crochet Hook

Skillz Used
Foundation Double Crochet (Fdc) – See our crochet tutorial here: How To Make The Foundation Double Crochet Stitch

First Double Crochet – See our crochet tutorial here: How To Make The First Double Crochet Stitch

The Swatch
The swatch we've made to start today's Double Crochet 2 Together tutorial is as follows.

Row 1: 15 Fdc, turn.
Row 2: First-dc, dc in each st to end of row, turn.
Row 3: Repeat Row 2.

NOTE: We are making our First-dc with 2 chains rather than just one. It fit better with the fabric of this swatch. Again, see our crochet tutorial for How To Make The First Double Crochet Stitch if you need a refresher or haven't made this FAB stitch before.

Six Ways To Make the Double Crochet 2 Together Decrease – Part 1: The first three techniques. A free step-by-step photo crochet tutorial by Shibaguyz Designz

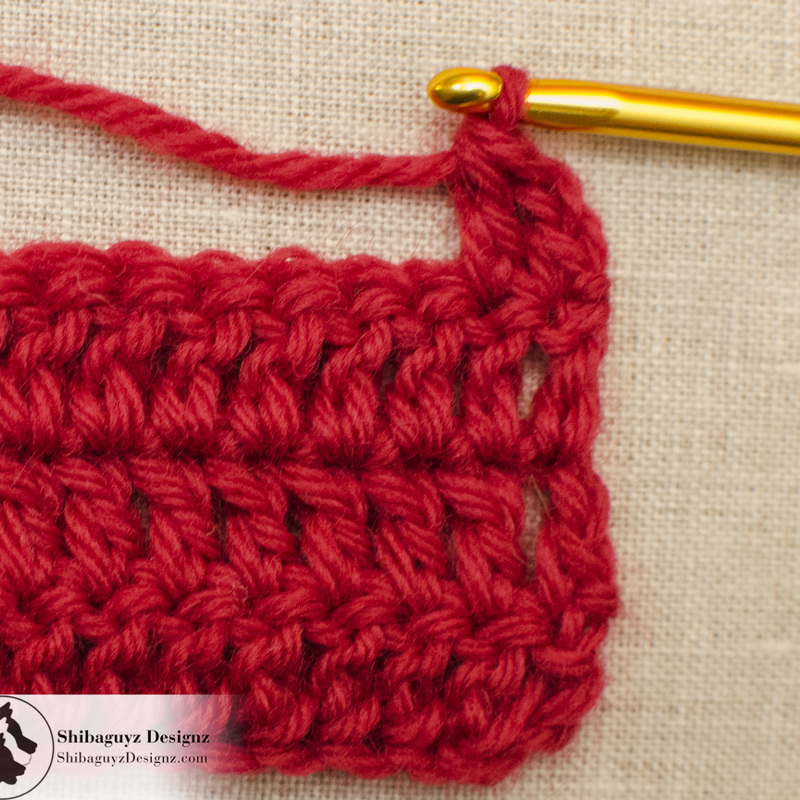
Break It Down

Compound Double Crochet Decrease Stitch #1
First Double Crochet 2 Together (First-dc2tog): Sc in first st, ch 1 (shortened First-dc made), yo, insert hook in next st, yo and draw up a loop, (yo and draw through 2 loops on hook) twice.

This first Double Crochet 2 Together (dc2tog) is for working at the beginning of a row where the pattern calls for a decrease in the very first two stitches. In this case, we are using the First Double Crochet (First-dc) as the first stitch of the row so we are decreasing using the same stitch.

For a brush up on making the First Double Crochet (First-dc) stitch, check out our tutorial here: How To Make the First Double Crochet (First-dc) Stitch.
1. Here we are prepped to make our First-dc. Note that I have my working yarn wrapped around the back of my work. If you notice such things, you know that I normally wrap my working yarn around the front of my work then hide the wrap in my chain 1 and first stitch. In the case of a First-dc, I wrap my working yarn around the back of my work because it completely hides the wrap when I make my single crochet stitch.

Remember: No chain 1 at the beginning of a row where we are making a First-dc stitch!

Six Ways To Make the Double Crochet 2 Together Decrease – Part 1: The first three techniques. A free step-by-step photo crochet tutorial by Shibaguyz Designz

Six Ways To Make the Double Crochet 2 Together Decrease – Part 1: The first three techniques. A free step-by-step photo crochet tutorial by Shibaguyz Designz
2. Single Crochet in the first stitch…

3. …and chain 1. You've made a shortened First-dc stitch.

Six Ways To Make the Double Crochet 2 Together Decrease – Part 1: The first three techniques. A free step-by-step photo crochet tutorial by Shibaguyz Designz

Six Ways To Make the Double Crochet 2 Together Decrease – Part 1: The first three techniques. A free step-by-step photo crochet tutorial by Shibaguyz Designz
4. Yarn over…


5. …and insert your hook in the next stitch.

Six Ways To Make the Double Crochet 2 Together Decrease – Part 1: The first three techniques. A free step-by-step photo crochet tutorial by Shibaguyz Designz

Six Ways To Make the Double Crochet 2 Together Decrease – Part 1: The first three techniques. A free step-by-step photo crochet tutorial by Shibaguyz Designz
6. Yarn over and draw up a loop…


7. Yarn over and draw through 2 loops on your hook.

Six Ways To Make the Double Crochet 2 Together Decrease – Part 1: The first three techniques. A free step-by-step photo crochet tutorial by Shibaguyz Designz

Six Ways To Make the Double Crochet 2 Together Decrease – Part 1: The first three techniques. A free step-by-step photo crochet tutorial by Shibaguyz Designz
8. And, again, yarn over and draw through 2 loops on hook.


Take a close look at the photo and at your stitches right here and you will see how we have created a very simple Compound Double Crochet Stitch. The First-dc stitch base is made up of the slightly sideways Single Crochet with only one bottom-head loop (the chain 1) and no cap loop (the missing 2nd chain) which means it shares a head with the following Double Crochet stitch. Thus, a Compound Double Crochet Stitch and our First Double Crochet 2 Together (First-dc2tog) decrease.


9. We went ahead and made four more Double Crochet stitches so you can see how the decrease looks on the end of the row.


You can see how the First-dc leans into the next Double Crochet it is sitting next to. This makes a very smooth left leaning decrease with no jogs or gaps on the end of your rows. Neat, clean, and tidy!

Six Ways To Make the Double Crochet 2 Together Decrease – Part 1: The first three techniques. A free step-by-step photo crochet tutorial by Shibaguyz Designz


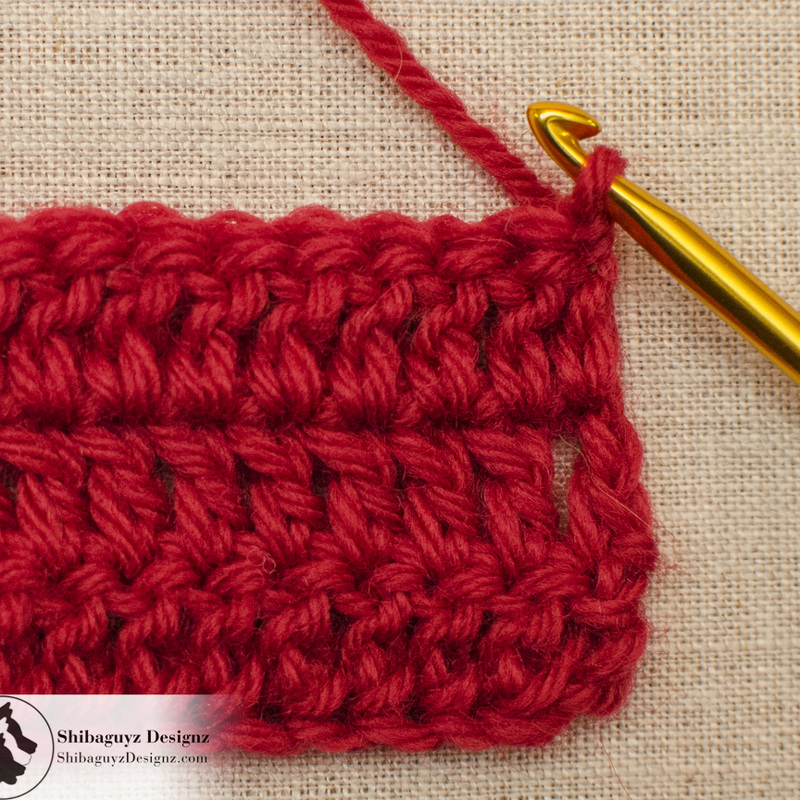
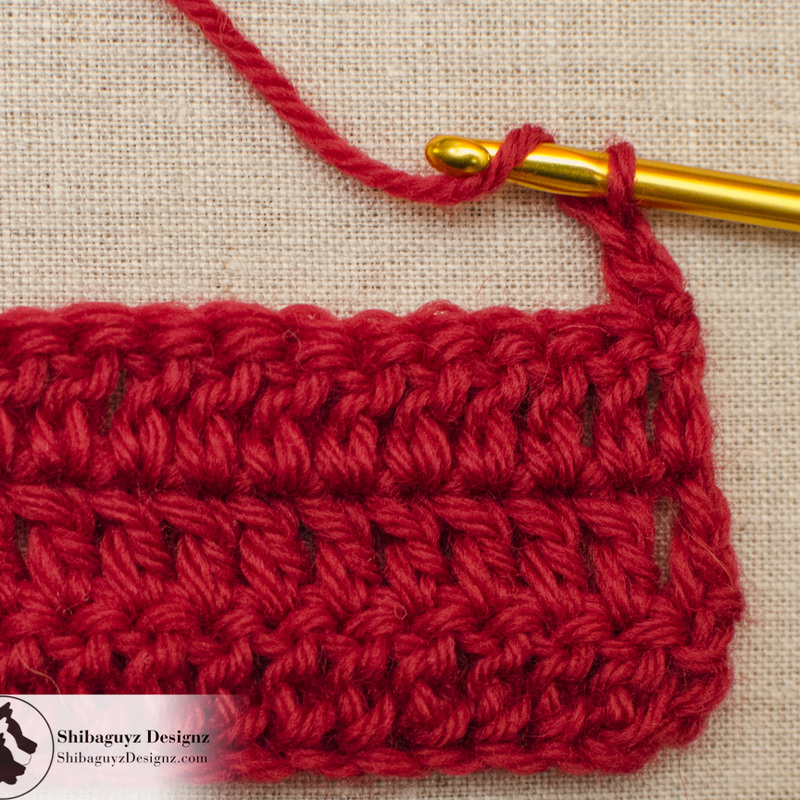
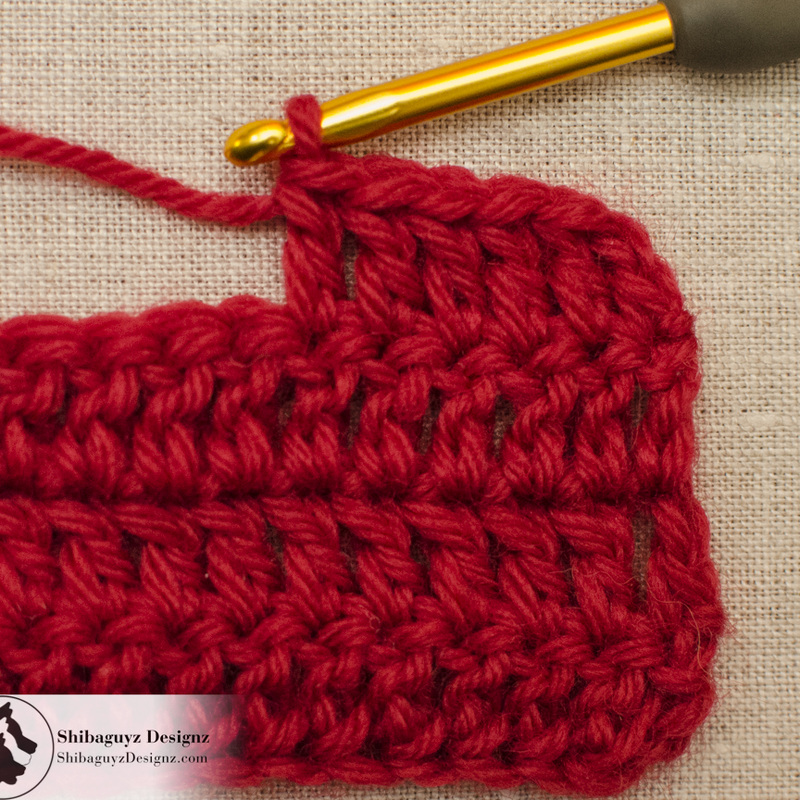
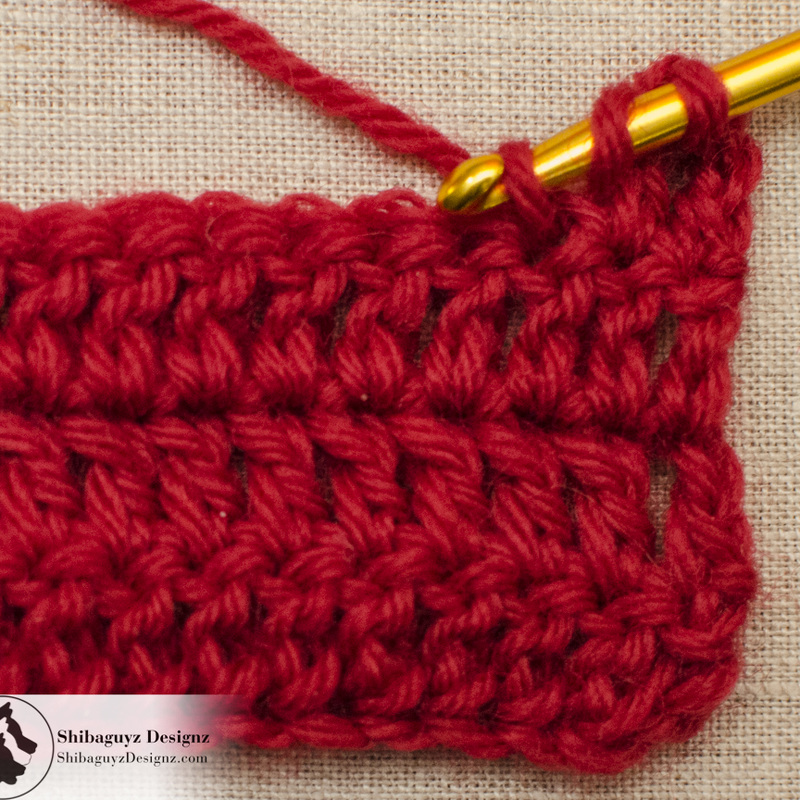
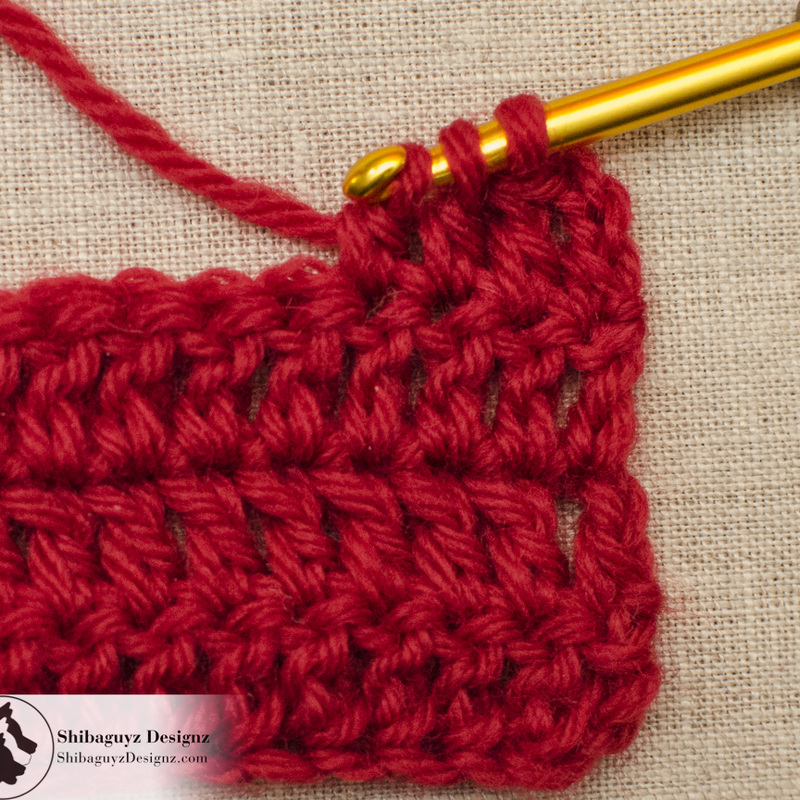
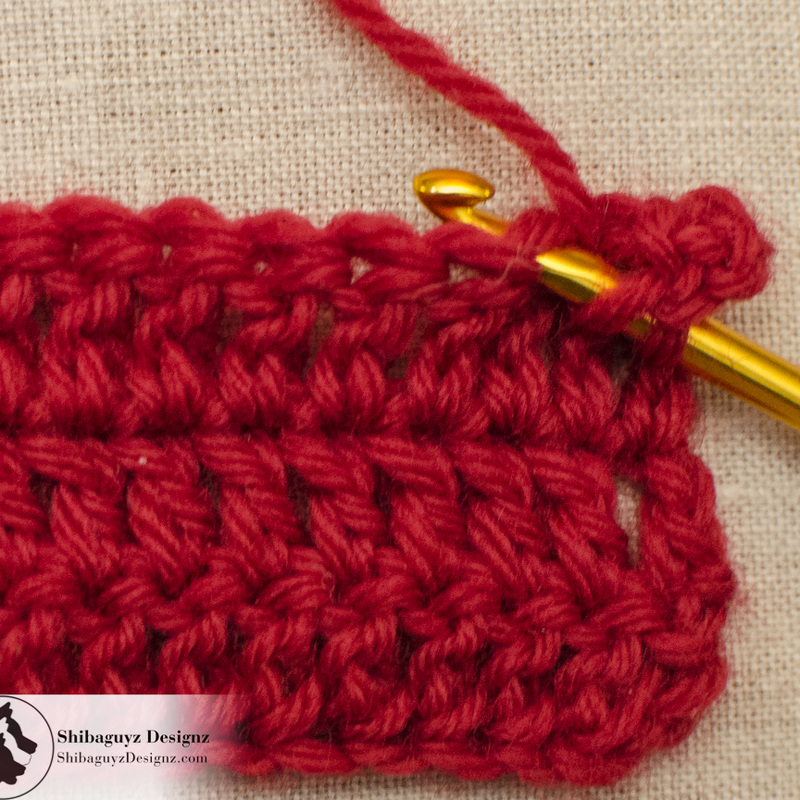
Compound Double Crochet Decrease Stitch #2
Common Double Crochet 2 Together (common-dc2tog): Yarn over, insert hook in indicated stitch or space, yarn over and draw up a loop, yarn over and draw through 2 loops on hook, yarn over, insert hook in next st, yarn over and draw up a loop, yarn over and draw through 2 loops on hook, yarn over and draw through all 3 loops on hook.

This is probably the technique MOST stitchers are used to using as this is the first Double Crochet 2 Together (dc2tog) decrease we are all taught. We name it the Common Double Crochet 2 Together (common-dc2tog) not as a sleight on the technique itself but because it is the technique most commonly used when the instruction dc2tog is encountered.

We have also referred to this as the High-dc2tog decrease since the actual decrease is made at the top of the two stitches.

1. For this one we started our row with a First-dc made with a Single Crochet in the first stitch then chain 2. Remember, we said we are using a chain 2 for our First-dc in this swatch because it fits better in our overall fabric.


Next there is a Double Crochet and now we are ready to work our Double Crochet 2 Together decrease.

Six Ways To Make the Double Crochet 2 Together Decrease – Part 1: The first three techniques. A free step-by-step photo crochet tutorial by Shibaguyz Designz
NOTE: Whenever possible, we work our decreases one or two stitches in from the edge of the fabric. This gives a smoother edge to the fabric and the decrease stitch is almost unnoticeable. That said… experiment with your particular fabric and see if working on the edge or a stitch or two in from the edge gives you the results you want. YES, it IS okay to go off pattern if moving the decrease in from the edge looks better to you and it doesn't change the integrity of the designer's original fabric! Again… experiment with a swatch before you start to see what works best.

Six Ways To Make the Double Crochet 2 Together Decrease – Part 1: The first three techniques. A free step-by-step photo crochet tutorial by Shibaguyz Designz
2. Now… on with the decrease…


Yarn over and insert your hook in the next stitch.


3. Yarn over and draw up a loop.

Six Ways To Make the Double Crochet 2 Together Decrease – Part 1: The first three techniques. A free step-by-step photo crochet tutorial by Shibaguyz Designz

Six Ways To Make the Double Crochet 2 Together Decrease – Part 1: The first three techniques. A free step-by-step photo crochet tutorial by Shibaguyz Designz
4. Yarn over and draw through 2 loops on your hook.


You can see in the photo (and your own work) that you now have the base for the bottom of a Double Crochet stitch. We're going to leave the last two loops on the hook since those are the two loops that make up the head of the stitch and we're not ready to finish off the head yet.


5. Yarn over and insert your hook in the next stitch.

Six Ways To Make the Double Crochet 2 Together Decrease – Part 1: The first three techniques. A free step-by-step photo crochet tutorial by Shibaguyz Designz

Six Ways To Make the Double Crochet 2 Together Decrease – Part 1: The first three techniques. A free step-by-step photo crochet tutorial by Shibaguyz Designz
6. Yarn over and draw up a loop.


7. Yarn over and draw through 2 loops on your hook.


Now you can see you have two Double Crochet bases sitting next to each other with three loops remaining on your hook. Those three loops are going to make up the head of our decreased stitch: One bottom-head loop for each stitch and one cap loop for both stitches together.

Six Ways To Make the Double Crochet 2 Together Decrease – Part 1: The first three techniques. A free step-by-step photo crochet tutorial by Shibaguyz Designz

Six Ways To Make the Double Crochet 2 Together Decrease – Part 1: The first three techniques. A free step-by-step photo crochet tutorial by Shibaguyz Designz
8. Yarn over and draw through all 3 loops on your hook.


Take a close look at the photo and at your stitches and you will be able to see the bases of the two Double Crochet stitches sitting side by side with the two bottom-head loops pulled together and the one cap loop sitting on top.


Clearly, this version of the Double Crochet 2 Together (dc2tog) decrease creates two complete Double Crochet bases with one compound head on top. Thus… the name we sometimes give it: the High-dc2tog decrease.


9. And here we've worked five more Double Crochet stitches so you can see how this decrease affects the overall fabric.


Six Ways To Make the Double Crochet 2 Together Decrease – Part 1: The first three techniques. A free step-by-step photo crochet tutorial by Shibaguyz Designz
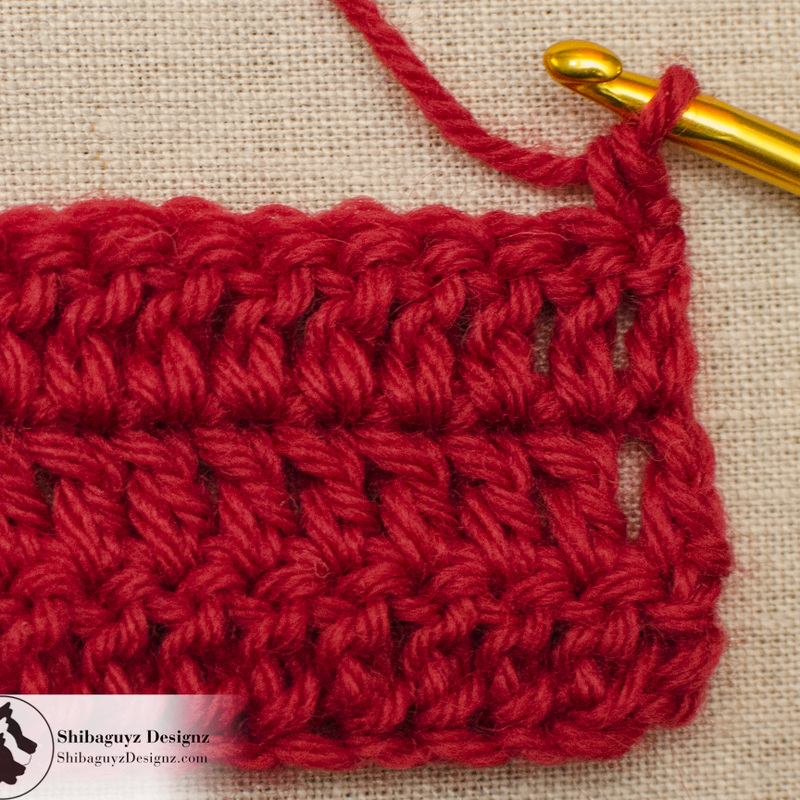
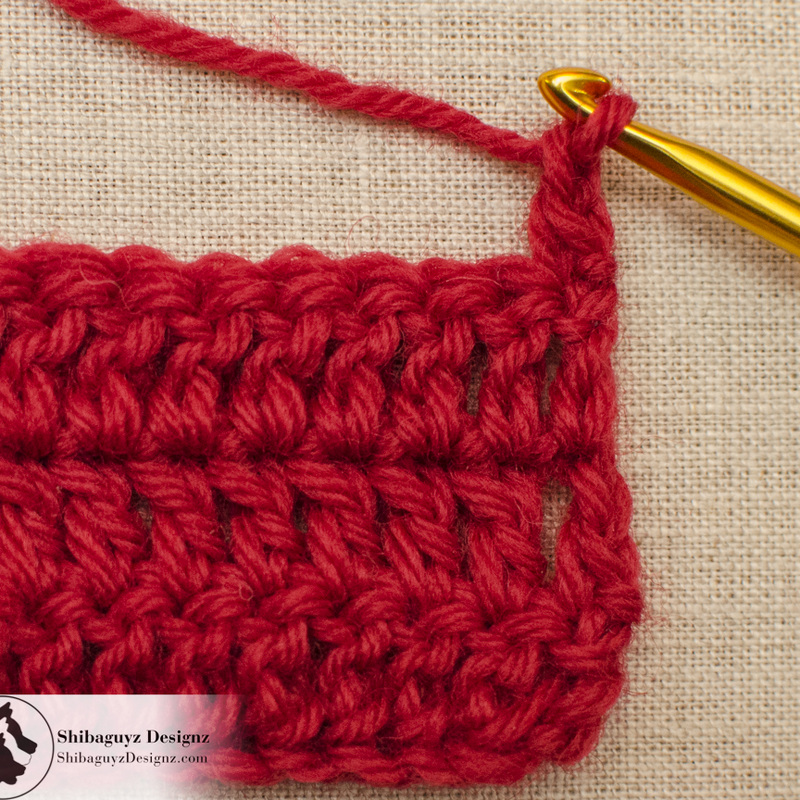
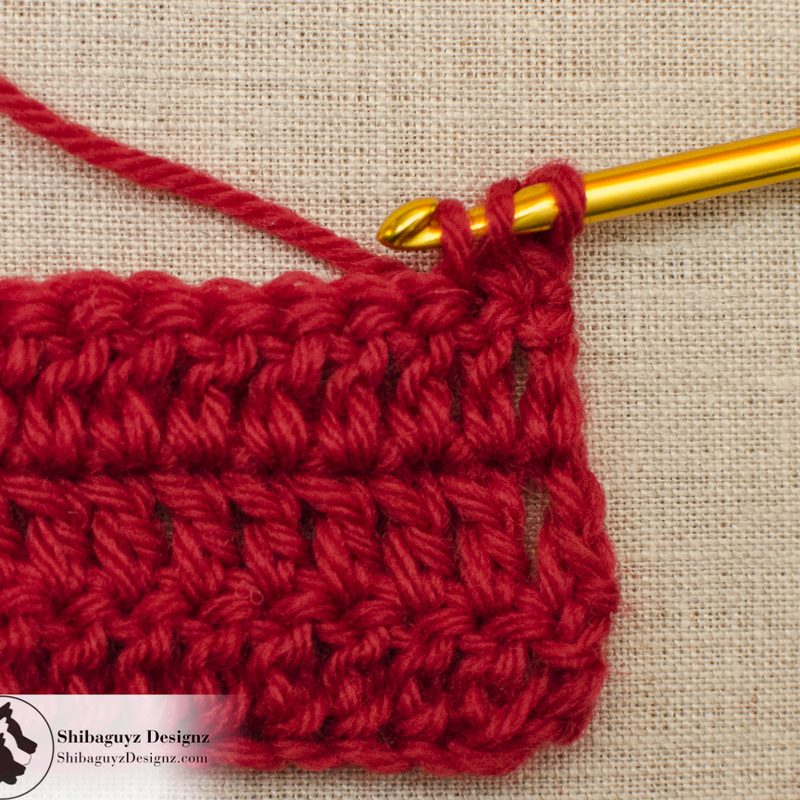
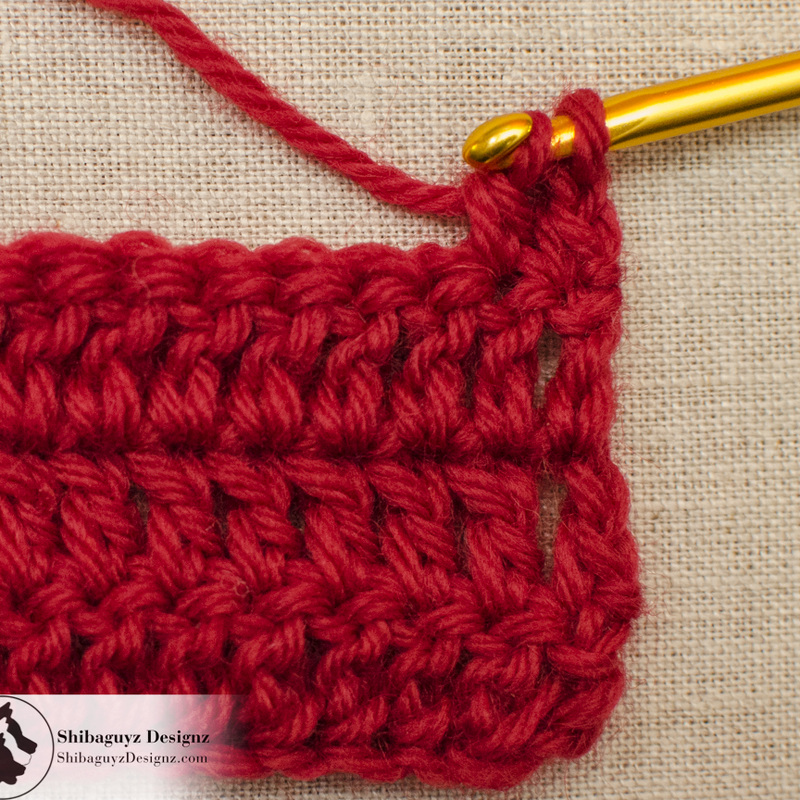
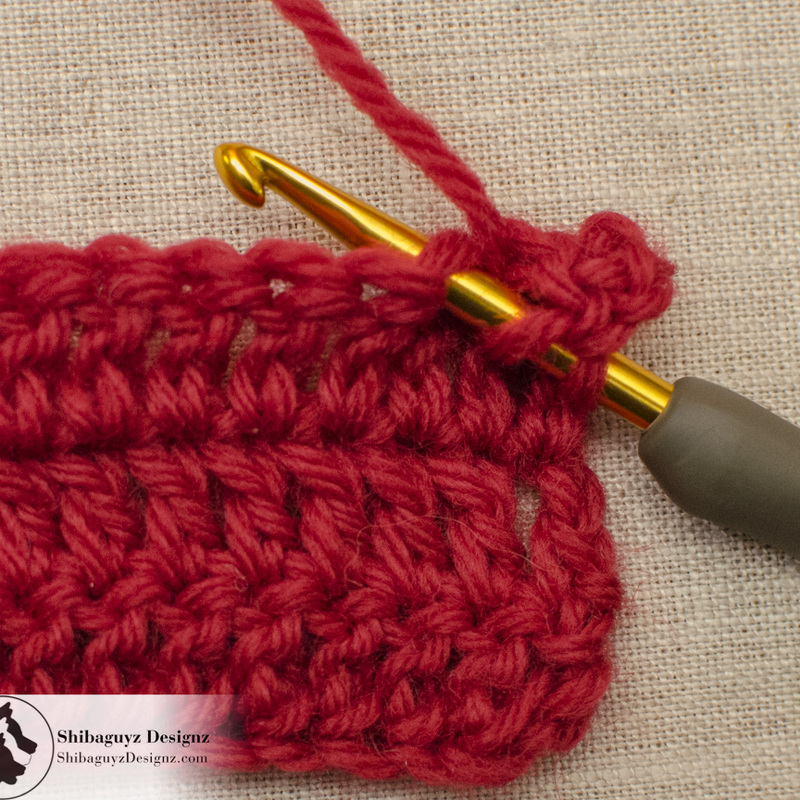
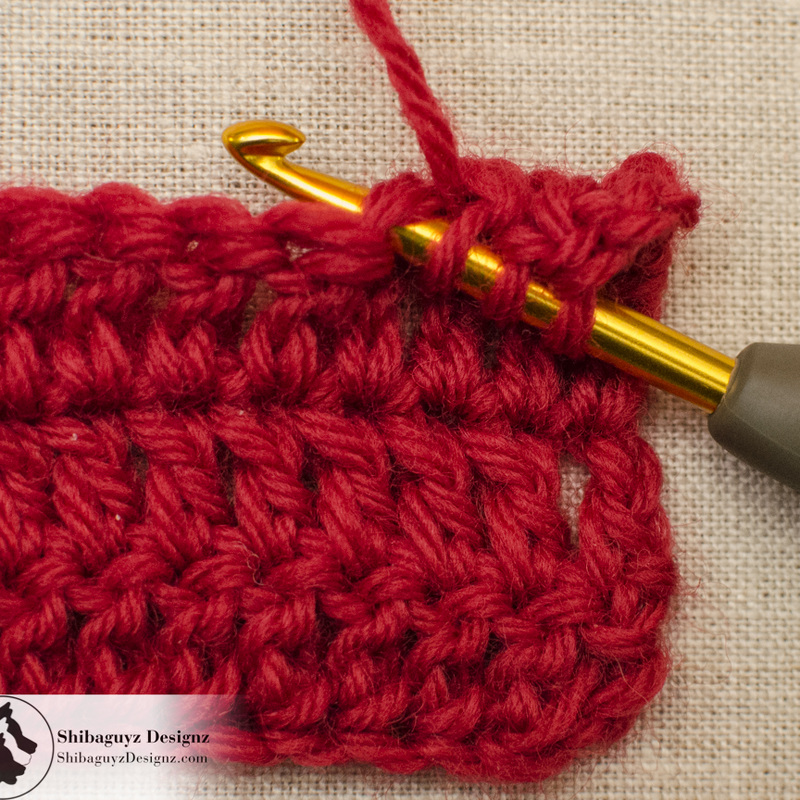
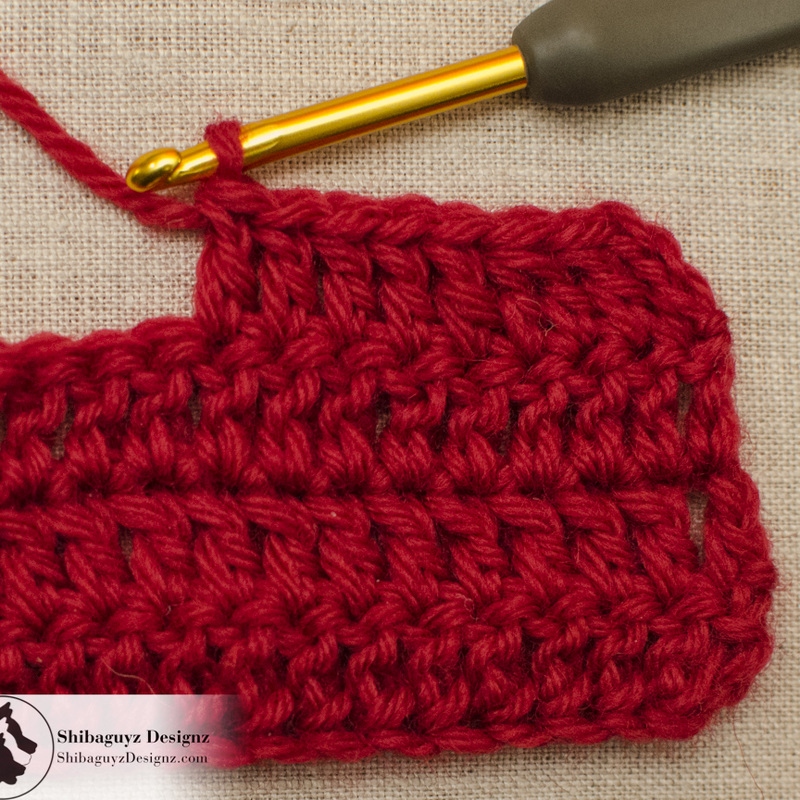
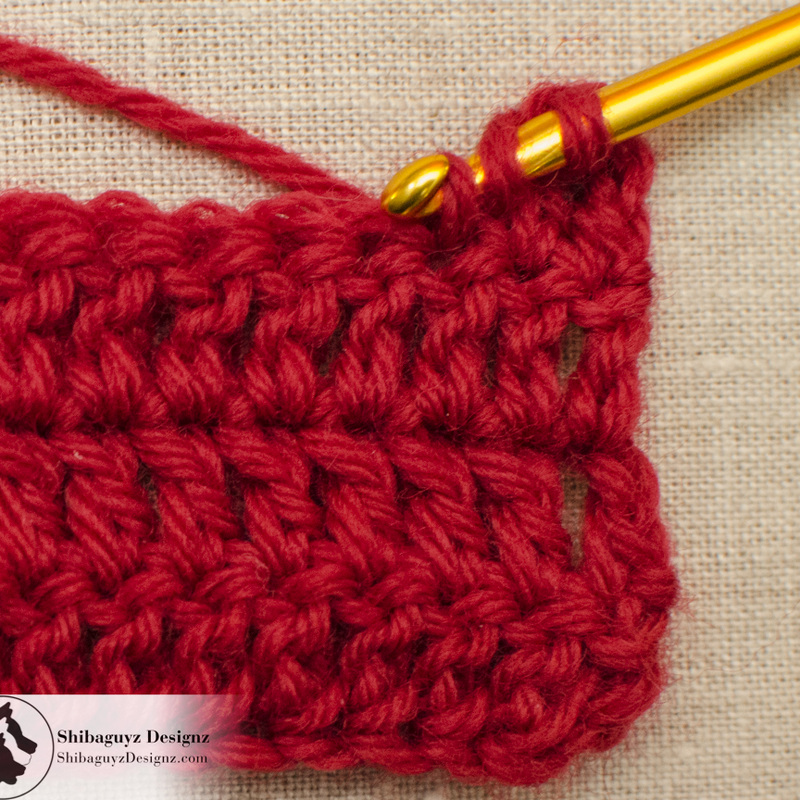
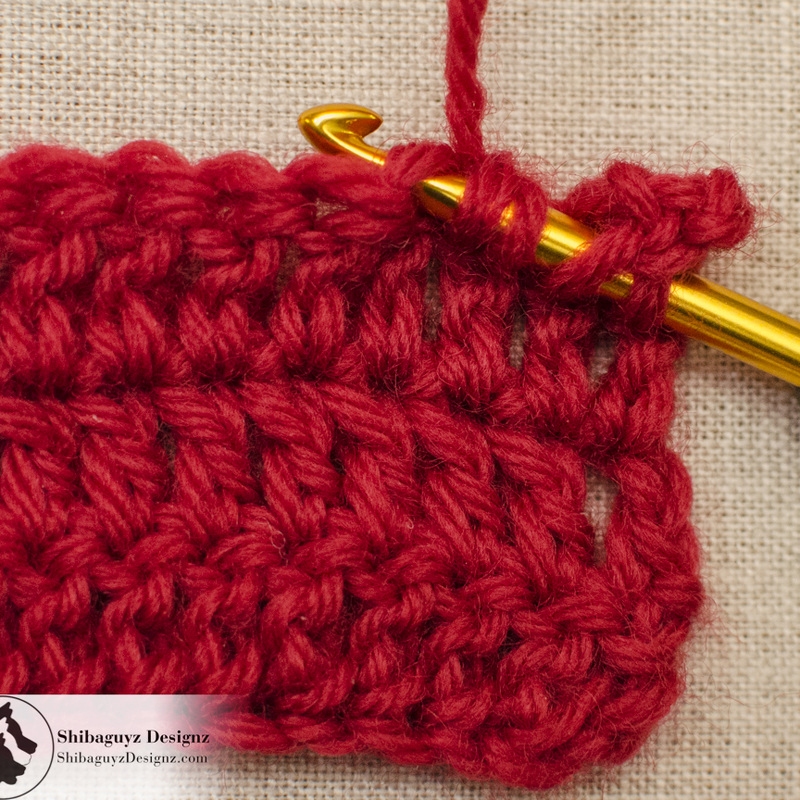
While this is not the Center Double Crochet 2 Together decrease we will get to in our Part 2 of our tutorial, you can see how the Common-dc2tog or the High-dc2tog pulls the stitches on both sides of it slightly inward toward itself. This makes it a great decrease for working in the middle of rows or rounds since it blends in well (the two full Double Crochet bases make it almost completely disappear into the fabric) and it is more subtle in that it doesn't bend the fabric dramatically.

Since we worked this Common-dc2tog or the High-dc2tog decrease closer to the starting edge of our row, you can see how it pulls the stitches of the end of the row toward it creating a subtle, clean, and neat decrease.

NOTE: Since this decrease is fairly neutral in that it doesn't lean heavily to one direction or the other but, rather, pulls stitches toward it from both directions, blocking your final fabric will determine which direction the decrease you want to create leans in. Since we worked the decrease at the BEGINNING of our row, we finger blocked it to make the starting edge of the row lean left toward the decrease. If we had made the same decrease at the END of the same row, we would have gotten a decrease that leaned right toward the decrease. It is the versatility of this decrease technique that makes it the first one we all learn when we first learn to crochet and the reason why we refer to it as the Common-dc2tog decrease.


Compound Double Crochet Decrease Stitch #3
Low Double Crochet 2 Together (low-dc2tog): Yarn over, insert hook in next st, yarn over and draw up a loop, yarn over and insert hook in next st, yarn over and draw up a loop (5 loops on hook), yarn over and draw through 4 loops on hook, yarn over and draw through 2 loops on hook.

This is the Low Double Crochet 2 Together (low-dc2tog) in that the decrease is made at the base of the two stitches; this one does tend to pull to the left a bit… not enough to call it left leaning but it definitely pulls the other stitches leftward-ish (yes, that's a new word… use it in a sentence today).

The Common Double Crochet 2 Together (common-dc2tog) is a little bulky sometimes so we use this as an alternative. Again, it's all about having options for experimenting to see what works best with your crochet fabric.

1. Again, we have started here with the same First-dc stitch and a Double Crochet stitch in the next stitch.


Six Ways To Make the Double Crochet 2 Together Decrease – Part 1: The first three techniques. A free step-by-step photo crochet tutorial by Shibaguyz Designz

Six Ways To Make the Double Crochet 2 Together Decrease – Part 1: The first three techniques. A free step-by-step photo crochet tutorial by Shibaguyz Designz
2. Yarn over and insert your hook in the next stitch.

3. Yarn over and draw up a loop.

Six Ways To Make the Double Crochet 2 Together Decrease – Part 1: The first three techniques. A free step-by-step photo crochet tutorial by Shibaguyz Designz

Six Ways To Make the Double Crochet 2 Together Decrease – Part 1: The first three techniques. A free step-by-step photo crochet tutorial by Shibaguyz Designz
4. NOW… instead of finishing the base of this Double Crochet stitch as we did in the previous decrease technique, we are going to leave that first base unfinished and move on to making the next Double Crochet stitch base.

Yarn over and insert your hook in the next stitch.


5. Yarn over and draw up a loop.

Now you have FIVE loops on your hook which account for two Double Crochet base stitches and one full Double Crochet cap loop.

Six Ways To Make the Double Crochet 2 Together Decrease – Part 1: The first three techniques. A free step-by-step photo crochet tutorial by Shibaguyz Designz

Six Ways To Make the Double Crochet 2 Together Decrease – Part 1: The first three techniques. A free step-by-step photo crochet tutorial by Shibaguyz Designz
6. Now we will cinch those two Double Crochet stitch bases together with one motion.

Yarn over and draw through 4 loops on your hook.

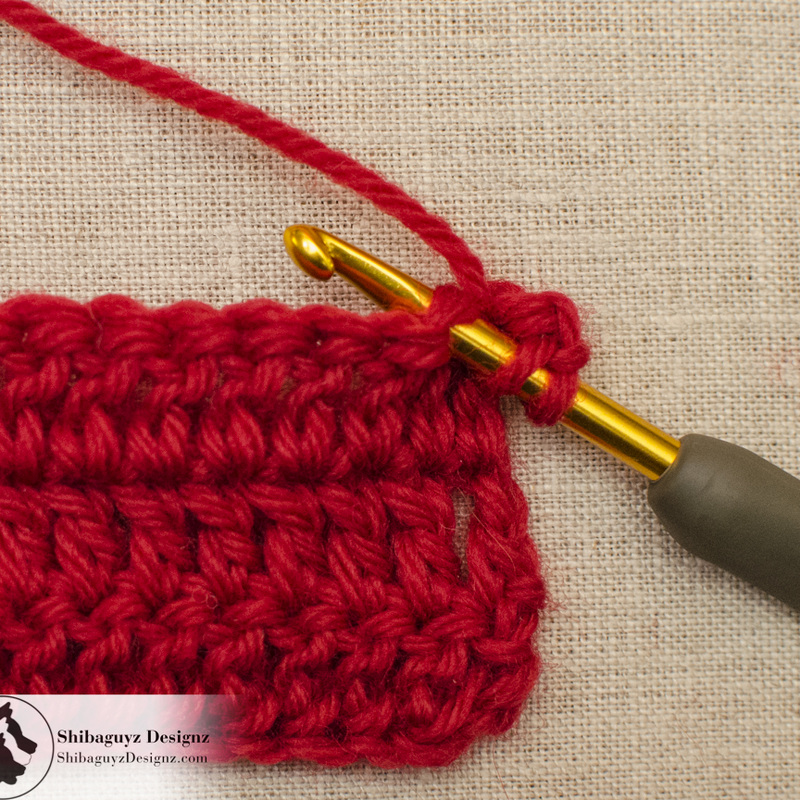
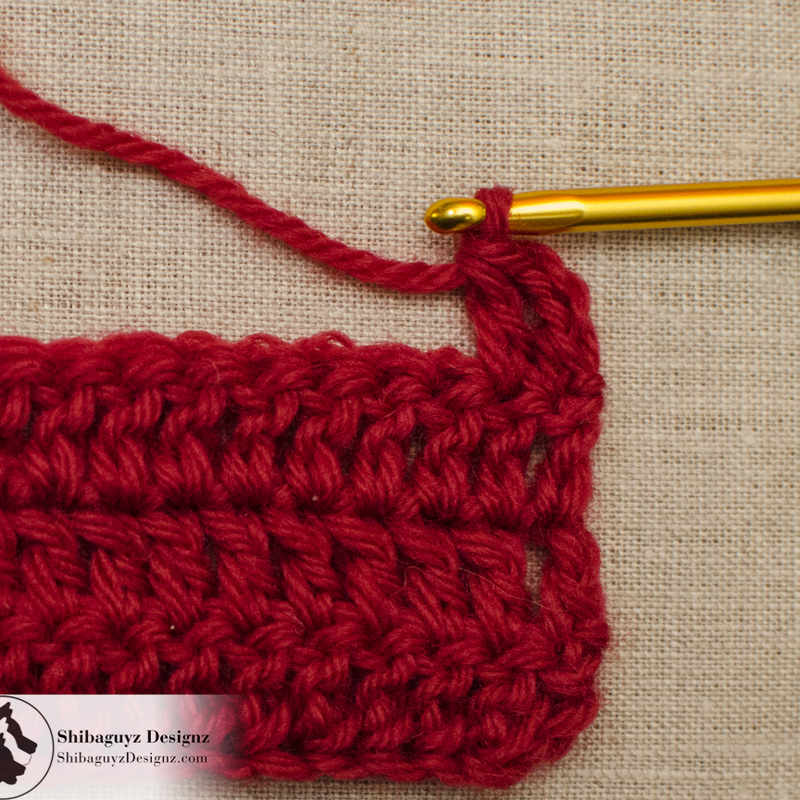
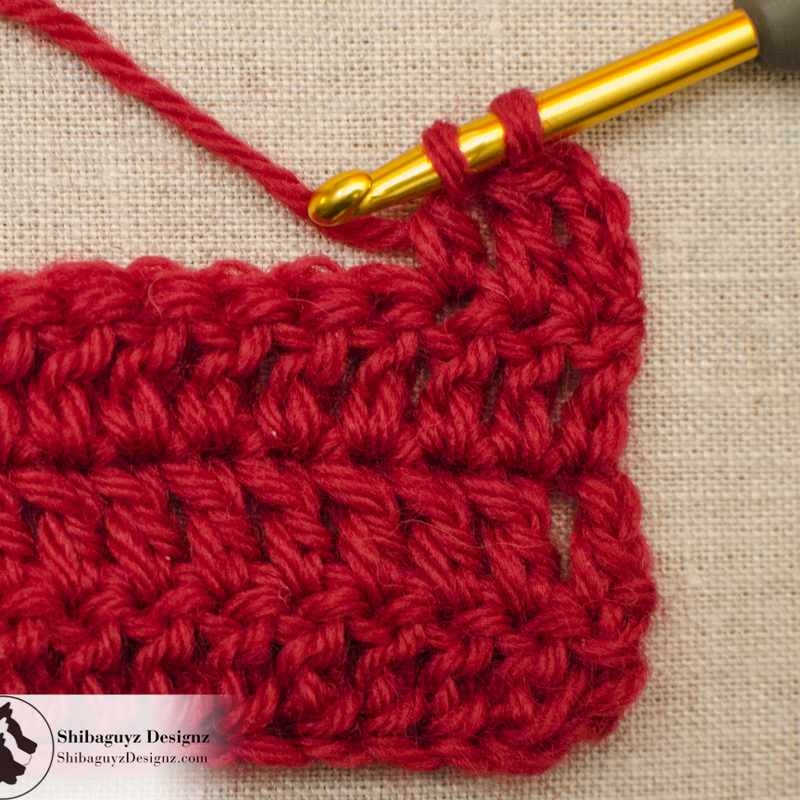
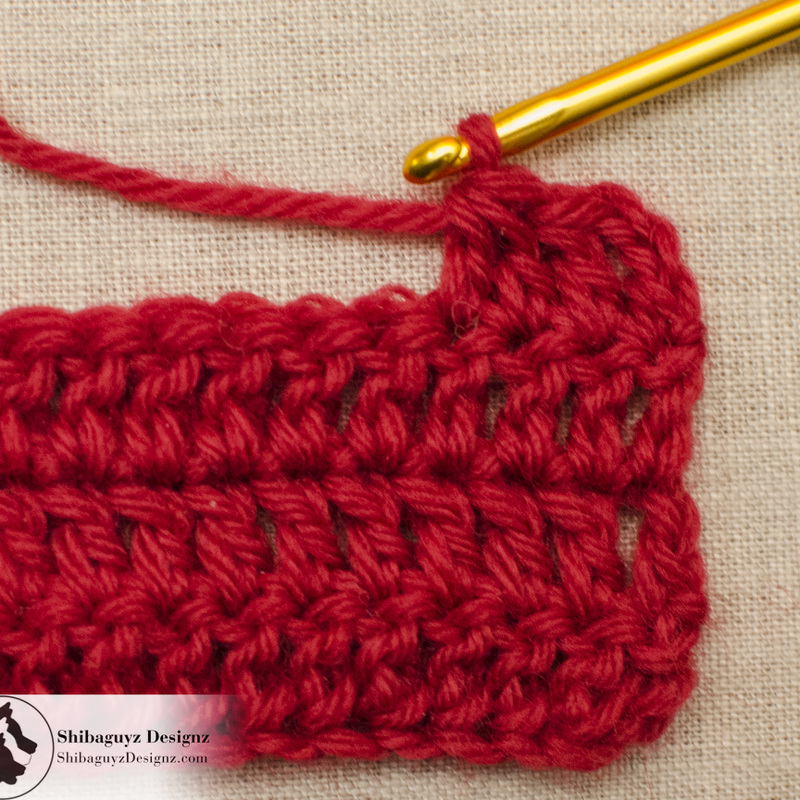
Take a close look at this photo and at your work and you will see the two Double Crochet bases are now one Compound Double Crochet Base. This Compound Base is created when you cinch the four loops of two Double Crochet Base stitches together with one loop… that's a fancy way of saying you decreased two Double Crochet stitches into one stitch or, more accurately, one Compound Double Crochet stitch.

NOTE: Practice with your tension here on the wrap and yarn over loops. You might need to adjust them a bit the first few times you practice this technique… but you'll get it evened out. The key is to keep the tension the same and, as we've always said, let the shaft of the hook do the work of maintaining the tension. If you're loops are too tight here to pull your hook through comfortably, the loops probably tightened up when they slipped into the throat of the hook just below the head of the hook. Again… practice this part a few times and you'll have it!


7. The two loops remaining on your hook are the bottom-head loop and the cap loop for your Double Crochet stitch so finish just as you work for a regular Double Crochet stitch:

Yarn over and draw through 2 loops on your hook.

Six Ways To Make the Double Crochet 2 Together Decrease – Part 1: The first three techniques. A free step-by-step photo crochet tutorial by Shibaguyz Designz
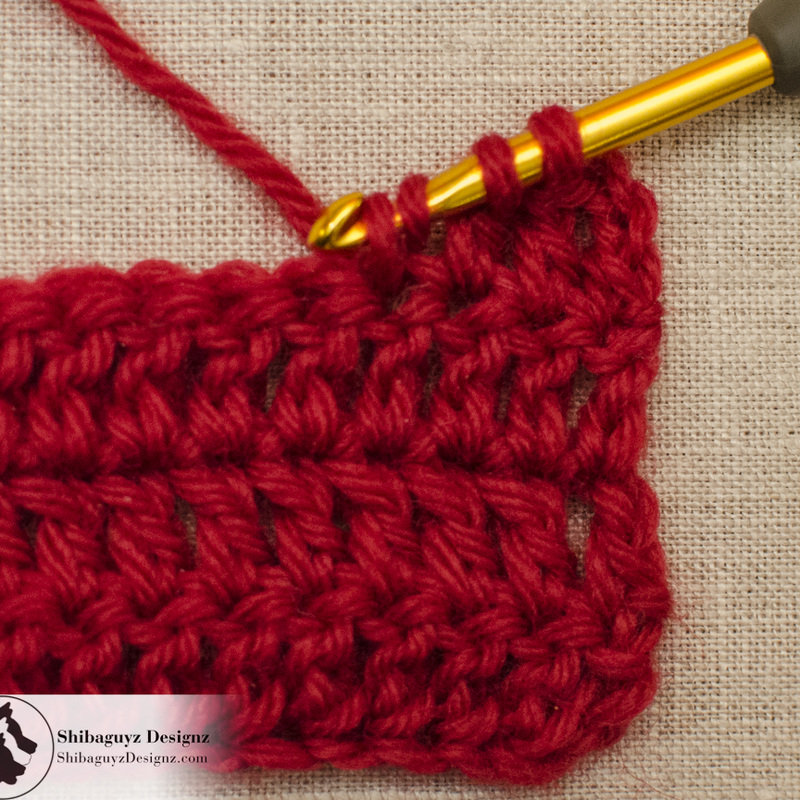
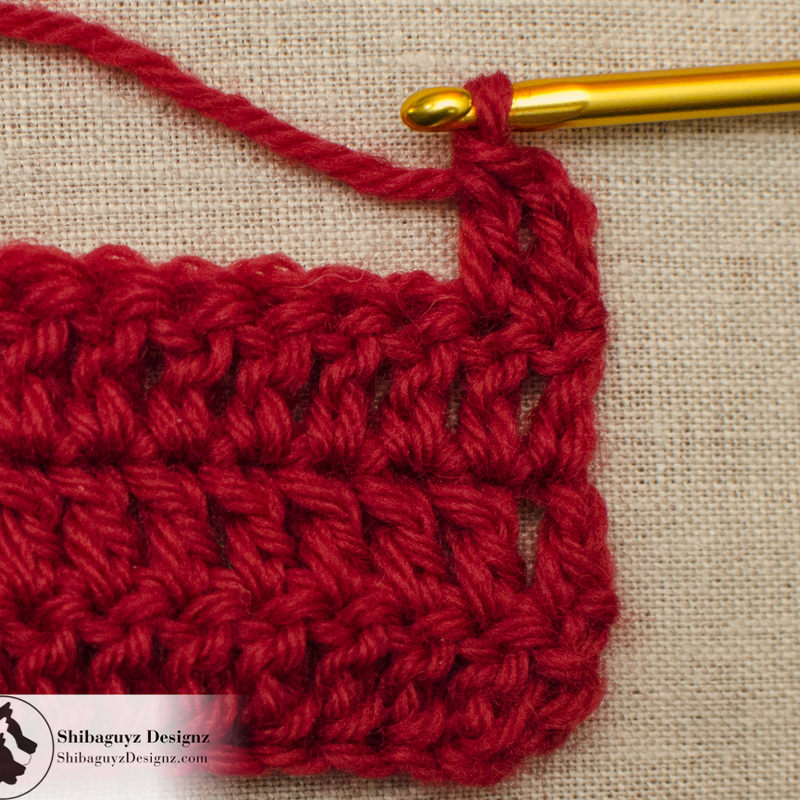
And there you have it! If you look carefully at this photo and compare it to the photo in Step 8 of the previous dc2tog technique, you will see a clear difference in the bases of the two Compound Double Crochet Stitches we have created. Note how this Low Double Crochet 2 Together (low-dc2tog) clearly shows the two Double Crochet Base Stitches nearly overlapping each other rather than sitting side by side as in the High Double Crochet 2 Together (high-dc2tog) technique. Again, this is because the low-dc2tog joins the BASES of the two stitches while the high-dc2tog joins the HEADS of the two stitches.


Six Ways To Make the Double Crochet 2 Together Decrease – Part 1: The first three techniques. A free step-by-step photo crochet tutorial by Shibaguyz Designz
8. Here is the decrease with three Double Crochet stitches worked after it. You can see how it pulls the stitches around it toward it with a slight left lean BUT it should also be noted that this dc2tog technique makes a slightly shorter stitch that the other techniques. AHA!! Might this not indicate that this stitch would work well for decreases at the beginning of a row to create a slopped edge OR in a circular or spiral stitch pattern where the object is to create a round or dome shaped object like a hat or a ball or the head of a bear? We have found this to be a VERY valuable stitch for shaping sleeve caps. Although the curving properties of this dc2tog decrease stitch are slight, they do exist and it does have its place and time. Hhmmmm… guess you'll need to experiment with this and see.

Now, that said, the slightly shorter Compound Double Crochet Stitch this technique creates can be completely blocked out with no real noticeable curve in the finished fabric. BUT that depends entirely on the fabric you are creating: THAT stitch with THAT hook with THAT yarn. Again… swatching. Expermenting to see what works best.


Normally I give a great big TAADAA!! here at the end of a tutorial (because everything we accomplish should come with a fanfare of some kind!). However, since this is, technically, the MIDDLE of a tutorial… you'll have to come back next week for Part 2 to get the BIG TAADAA.

Until then… maybe just do a little happy dance… and go ahead and give a WOOHOO!!

Just be sure to come back for the TAADAA next week… oh yeah… there will be THREE MORE double crochet 2 together decrease stitch techniques next week too!


A Final Word… or two…
As with all new skillz, these Double Crochet 2 Together techniques will take a little practice. Be patient, practice, and compare your work with the photos in this tutorial. You will get it and soon you will be customizing your decreases to better fit your crochet fabrics.

And… hey… if you aren't happy with your experiment rip it out and go again! You'll get it!

 
Thanks for dropping by for another Technique Tuesday! Our aim is to build the skillz of our FAB fiber community here on the web and it's always FAB to hear from you all that what we are doing is helping you and your fiber friends.

Check back often or, better yet, click on that RSS Feed button over there in the right-hand column of the page you are on right now. That way you will always be up to date and never miss a thing!

Stitch On!
S&J


Oh hey… before you go… Here are a few more pages we thought you might be interested in. Click on any of the photos below… enjoy!
FLAWLESS crochet seams!
No more wonky crochet edges!
The PERFECT pattern for him.
Your next FAB layering piece.

Come look us up on Facebook, Twitter, and Pinterest by clicking on one of these icons.
1 Comment
Sheila
11/14/2017 11:59:59 am

Very comprehensive and just what I’m looking for. Thanks!

Reply

Your comment will be posted after it is approved.


Leave a Reply.

    Author

    Shannon and Jason

    RSS Feed

    Sign Up For Our Newsletter

    Leave us a tip to help us do what we do!

    BERNINA Ambassador Badge
    Daylight Company Lamps
    Shibaguyz Aurifil Thread Collection

    Archives

    September 2022
    June 2022
    February 2022
    June 2021
    November 2020
    September 2020
    June 2020
    May 2020
    April 2020
    March 2020
    January 2020
    February 2019
    December 2018
    November 2018
    August 2018
    July 2018
    May 2018
    April 2018
    March 2018
    February 2018
    January 2018
    December 2017
    November 2017
    October 2017
    September 2017
    August 2017
    July 2017
    March 2017
    February 2017
    January 2017
    November 2016
    October 2016
    September 2016
    July 2016
    June 2016
    May 2016
    April 2016
    March 2016
    February 2016
    November 2015
    August 2015
    July 2015
    June 2015
    May 2015
    April 2015
    March 2015
    February 2015
    January 2015
    December 2014
    November 2014
    October 2014
    September 2014
    August 2014
    July 2014
    April 2014
    March 2014
    January 2014

    www.dickblick.com
    Picture
    Picture

    RSS Feed

    Categories

    All
    Afghan
    Aurifil
    Books
    Boro
    Camp STITCHES
    Classes
    Cleaning
    Clip On
    Clover
    Cowl
    Craft
    Craftsy
    CraftU Classes
    Crochet
    Crochet Geometry
    Daylight
    Daylight Company
    Design
    Designer Crochet
    Digital Download
    Donate
    Download
    English Paper Piecing
    Event
    Free
    Giveaway
    Hand Cream
    Hooks
    Inspirations
    International Crochet Month
    Interview
    Interweave
    Knit
    Knitting
    Lamp
    Marcus
    Marcus Fabrics
    Men
    Menswear
    National Craft Month
    National Crochet Month
    Needles
    Online Classes
    Ottlite
    Pattern
    Patterns
    Paypal
    Photography
    Podcast
    Prize
    Product Review
    Project
    Quilt
    Quilting
    Recipe
    Rotary Cutter
    Sashiko
    Season Of Giving Away
    Sew Expo
    Sewing
    Shibaguyz
    Shibaguyz Designz
    Shibaguyz Designz Indie Maker Pattern
    Shibaguyz LIVE
    Shibaguyz Photography
    Shop
    Soak
    STITCHES Events
    Sweater
    Thread
    Tool School
    Tools Of The Trade
    Travel Lamp
    Tutorials
    Vogue Knitting LIVE
    Walkthrough
    Warm Up America
    Wash
    Weaving
    Women
    Yarn
    Zoom Loom

    www.dickblick.com

Stay current on the news and events from Shannon and Jason as well as exclusive offers and tutorials available only for our newsletter subscribers.

* indicates required
Email Format

  • Home
  • Blog
    • Tips
    • tutorials
  • Our Books
    • Contemporary Kogin-zashi
    • Boro & Sashiko, Harmonious Imperfection: The Art of Japanese Mending & Stitching
    • Complete Crochet Course
    • Designer Crochet
    • Crochet Geometry
  • All Shopping
    • Books and Digital Patterns
    • Sashiko Shop
    • Thread
    • Fabric
    • Stitchips
  • Classes
  • Sashiko
  • About
  • Contact and Subscribe
  • Sponsors