 Stacked First-Stitches - Your gateway to crochet First-StitchesRather than pulling out large clumps of hair or screaming and ranting so that the Shibakidz go running for the hills, we set out on a quest of experimentation that lead us to a happy place full of unicorns, rainbows, cheesecake, chocolate, puppies... and straight edges (mmmm… chocolate cheesecake). We call this land, The Land of First-Stitches. (But let's get back to the chocolate and cheesecake thing soon…) In order to reach this blissful place of non-wonkiness, we’ve developed a series of stitches we call First-Stitches designed to clean up those edges by replacing the chain ups at the beginnings of rows. In fact, we’ve come up with FOUR different options for first-stitches that we will be sharing with you over the next few weeks starting today! WOOHOO!! In today’s tutorial we'll focus on the first of these 4 First-Stitch techniques: The Stacked First-Stitch.
Wonky edges occur when a row of pattern instruction starts with a chain-up that is meant to be counted as the first stitch of the row: Chain 3, count as first double crochet of row. Because of how chain stitches sit on the outside of the fabric, these chain substitutes for the first stitch of a row create an unsightly gap where the first stitch should be. We hate that... I mean, REALLY hate that. And, from your emails and questions in classes, we know you're not particularly fond of wonky edges either. The outrage is totally understandable! We spend days/weeks/months working on the perfect crochet fabric; only to have the edges betray us. And don't even get us started on the difficulties these wonky edges create when sewing garment components together. Nope… not gonna go there right now because we're watching our blood pressure. Breathe in… breathe out… The Steps To Making A Stacked First-dc
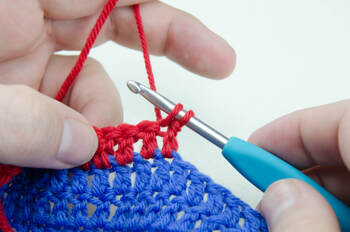
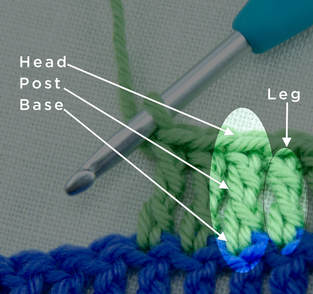
We experimented with several different ways of emulating the look of this first double crochet of a row… below is the stitch we came up with and have been using for several years: the Stacked First-dc. Grab some yarn and follow along! 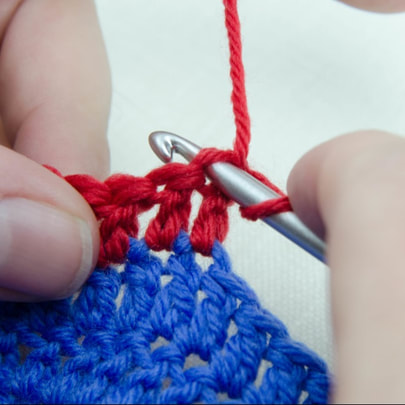 Work to the end of your row. Then turn your work. Step 1. Without chaining up to the height of the new row, insert your hook into first stitch of row. Yup… you read that correctly, do not chain up to the height of the new row. You’ll see why this is important here in a minute. 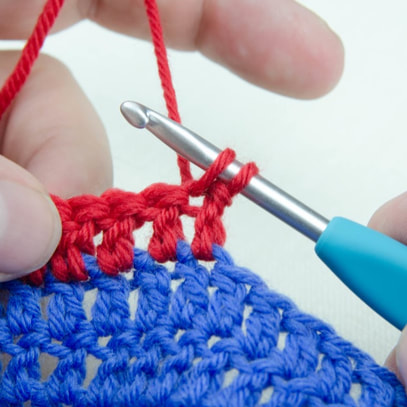 Step 2. Yarn over and draw up a loop (you’ll have two loops on your hook now). 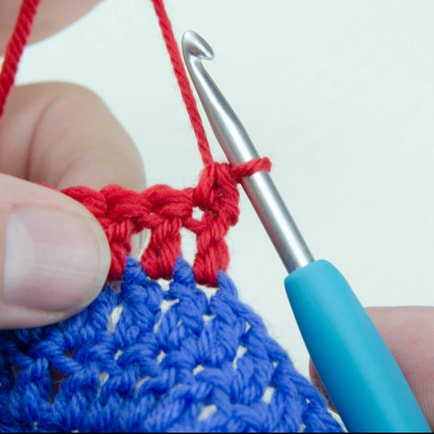 Step 3. Yarn over and draw through both loops on your hook. For those of you keeping track... yes, you just made a single crochet that is tilted on it’s side. This is due to the fact that we did not chain up to the height of the new working row and the head of the single crochet is now tilted to the side. This approximates the look of the base of a double crochet stitch. 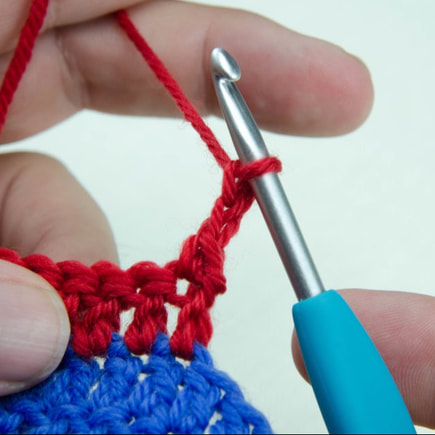 Step 4. Chain up to the height of the stitches in your new row. The photo to the right shows a completed Stacked First Dc (sc, and 2 chains). If the stitch pattern in this row was based on treble crochets you'd probably have 3 chains. See what we said there? We say probably because, depending on the yarn weight/fiber you are using and your stitching gauge, the number of chains needed may vary. This is why you need to be sure to test your First-Stitches on your gauge swatch! There are definitely times when we only use one chain for a stacked first-dc and two for a stacked first-tr because of the weight of the yarn. 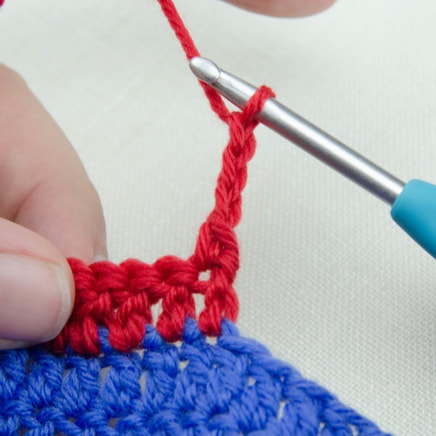 Here is what a Stacked First-Treble would look like. Look carefully and you'll see (in this case) the single crochet followed by three chains. This mimics the base, post, and head of any following trebel crochet stitches closely enough that even the pickiest of crocheters will have a hard time seeing it as anything other than a treble on the edge of your fabric. This keeps your edge straight with no huge holes. NOTE: Because of the height of stitches taller than a treble crochet, even this technique can leave your edges with a bit of a gap. It certainly won't be as severe as the gap from simply chaining up three or four times but it is more of a gap than we personally like. For that reason, with taller stitches and, in most cases, in the case of the first-treble crochet, we use on of the other first-stitch techniques we will be sharing with you in the coming weeks. Again, this isn't always the case but, as we said, it is best to test the stitches on your practice swatch and pick the one that works best for your crochet fabric. IMPORTANT NOTE: When using Stacked First-Stitches, it is important to insert your hook into the top chain of the stacked first stitch when making the last stitch of the following row. Remember, that top chain is standing in for the head of the first-stitch so you will insert your hook into the chain just as if it were the head of any other stitch. For example, if you worked a stacked first-double crochet at the beginning of Row 3, when you come to the last stitch of Row 4, insert your hook into the last chain of Row 3’s stacked first-double crochet. If you miss and make your stitch in the space made by the chains, you will create a hole in the edge of your fabric and it will not look as neat and tidy as you would like. So there you have it, your first step into banishing those Wonky Edges! Practice this stitch this week and come back next week to learn the second technique in your arsenal of First-Stitches: The Linked First-Stitch. (You're going to loooooove this one!) 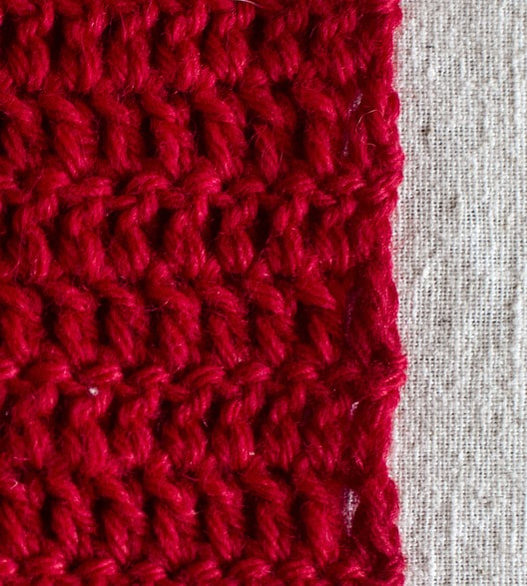 Double crochet fabric with beautiful, non-wonky edges made using the Stacked First-Dc Technique. Feel free to shout out "Look Ma! No Wonky Edge!"Want to see more tutorials like this? We've compiled them all into one convenient page that we update as we add more tutorials to our site. Click on the link below and bookmark that page for future reference! For the ultimate crochet reference guide, don't miss our NEW book Complete Crochet Course available now online and at book sellers. See it by clicking the FAB little button below.  Be sure to come by and say hey on our social media channels where we share all kinds of FAB photos and our new LIVE series of tutorials and recipes!
Mary Cast
1/31/2018 12:16:47 pm
Hi Guyz! This is very helpful in the giant afghan I am currently making. I will try it tonight and see how it works in giant yarn with a giant P hook. Thanks. Comments are closed.
|
AuthorShannon and Jason Leave us a tip to help us do what we do!


Archives
May 2024
 

 Categories
All
     |
 RSS Feed
