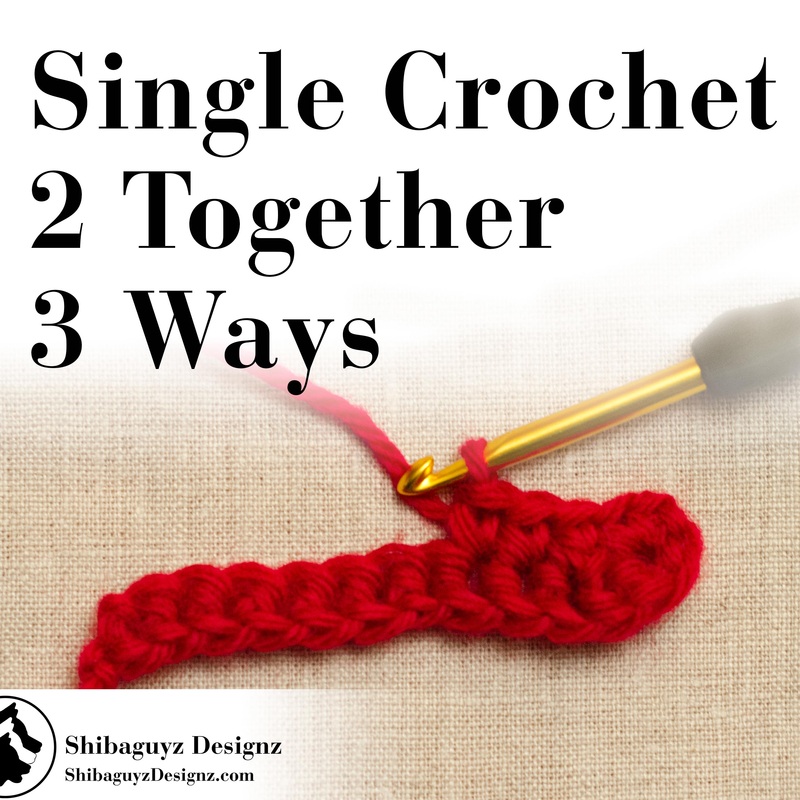
 Three Ways To Make the Single Crochet 2 Together Decrease (sc2tog) Technique Single Crochet 2 Together (sc2tog) Decrease
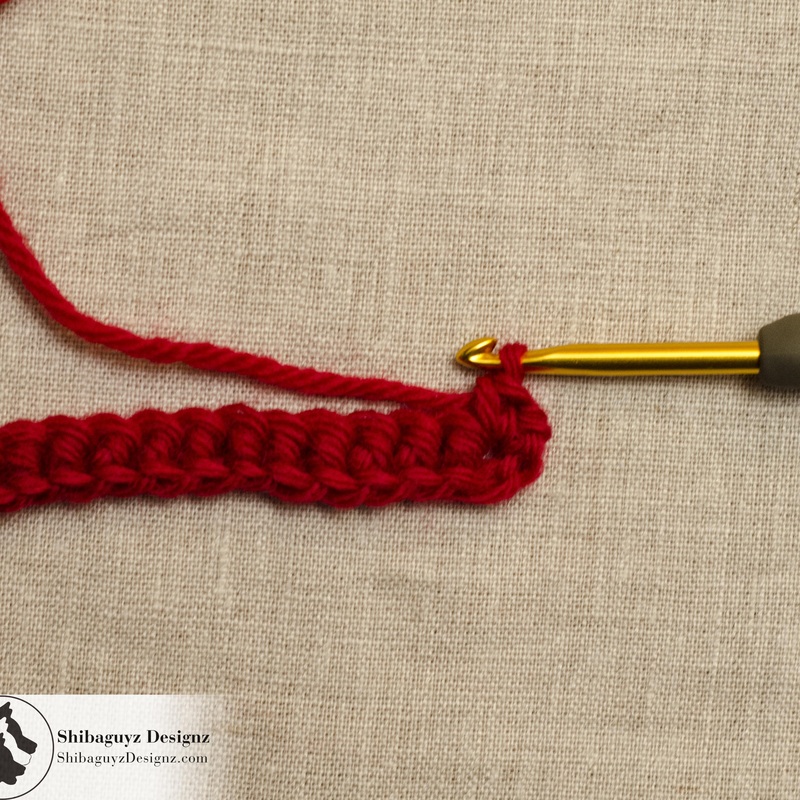
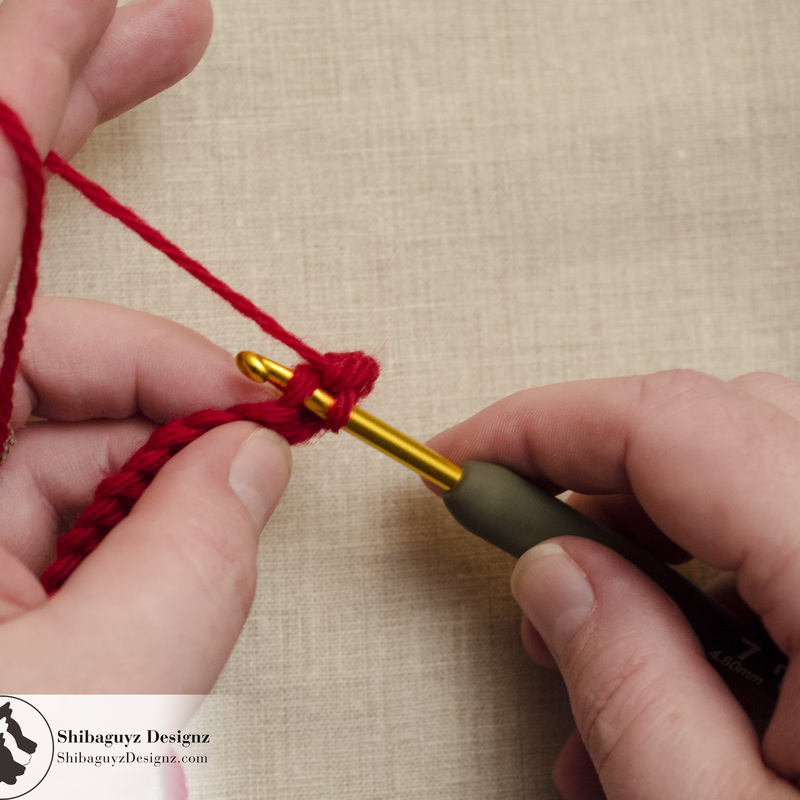
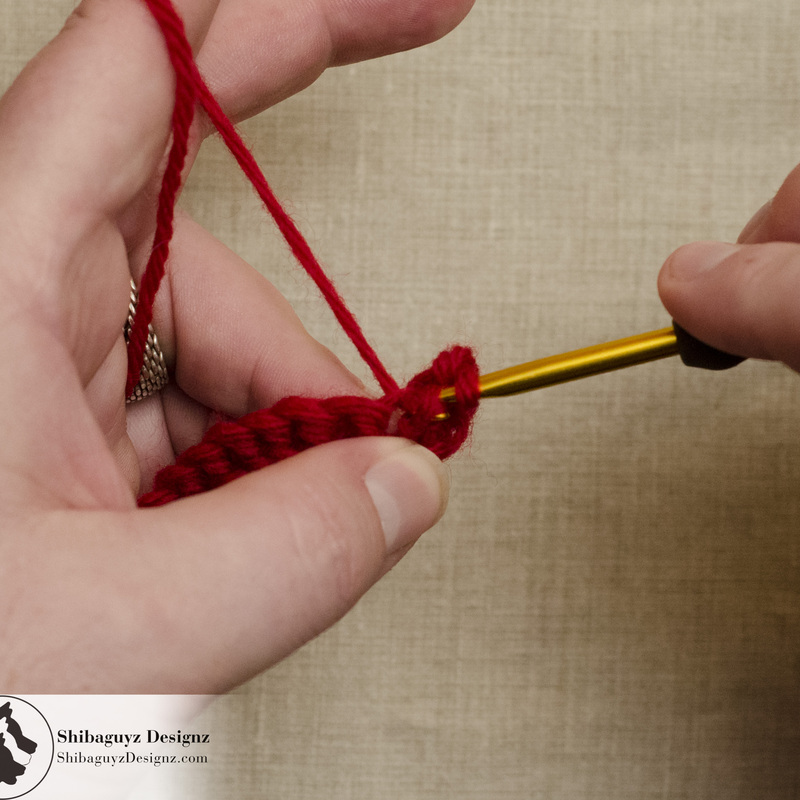
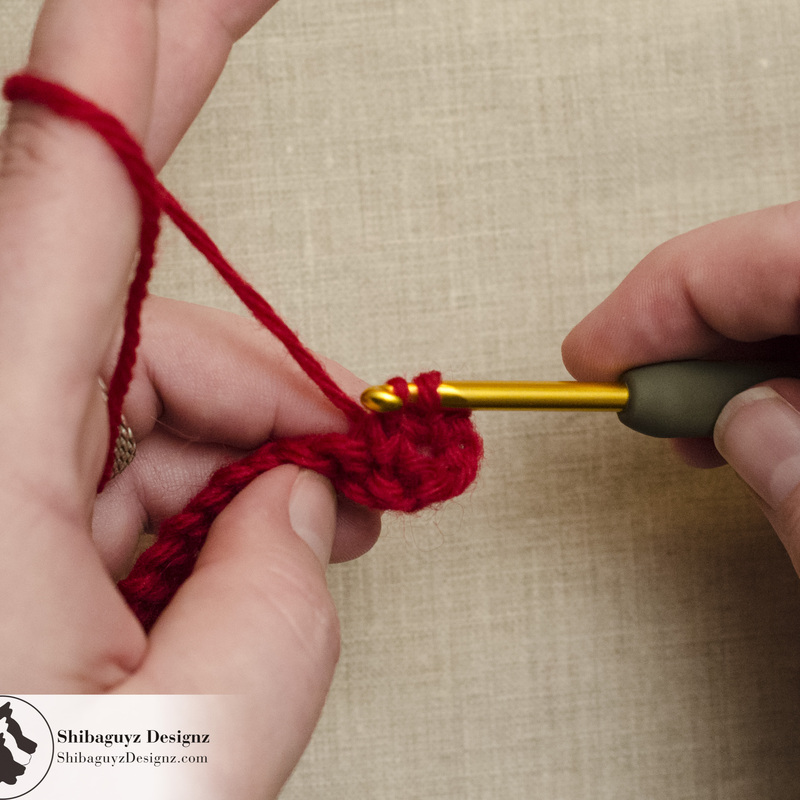
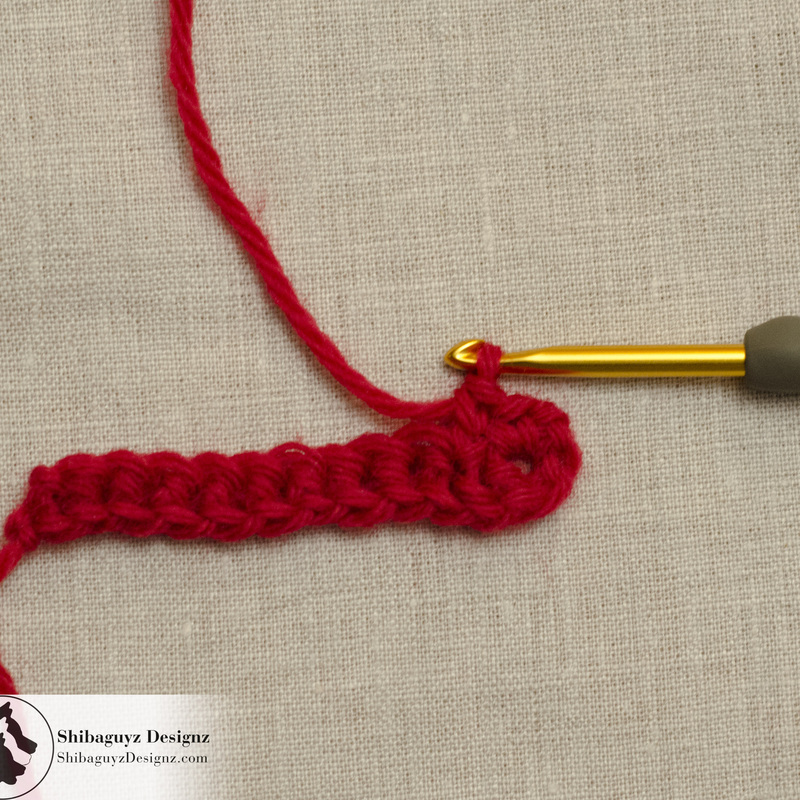
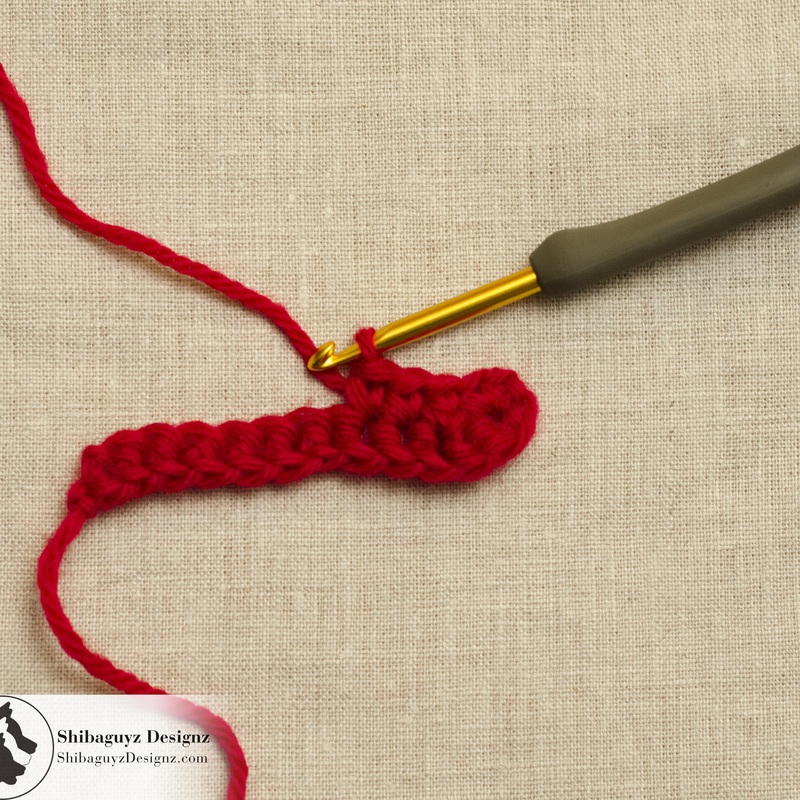
Why Use It? Or, more the the point, why have THREE different ways to make a Single Crochet decrease? Well… the answer is actually quite simple: Options! Different yarns, hook sizes, and stitch patterns all work together to create different types of crochet fabrics. Keeping in mind how many different fabric variations one might come up with with all these different combinations of yarn, hooks, and stitch patterns, it stands to reason that one might need an option for making a decrease using Single Crochet stitches beyond the standard sc2tog we all learned shortly after picking up a hook. Right? Right! At least… we have certainly found that to be the case. When it comes to the look of a finished piece of crochet fabric, sometimes even the slightest change in technique when making a stitch can make that stitch stand out… for better or for worse! We have found it desirable and even necessary to create alternate methods for decreasing using Single Crochet stitches to create cleaner lines around necklines, at seams, and along exposed borders of garments and accessories. In addition, sometimes a beautiful panel of crochet fabric can be broken rather abruptly and with non-esthetically desirable results with the introduction of a set of Single Crochet decrease stitches. To create a more esthetically pleasing effect, we set out to find different ways to make the Single Crochet decrease of one stitch: the Single Crochet 2 Together (sc2tog) Decrease. No, your written pattern instructions probably won't have specifics for how to make a Single Crochet Decrease beyond the abbreviation: (sc2tog). It is, therefore, up to you to decide if one of these techniques for decreasing fits your project better than the other techniques. When I am swatching is when I usually make this determination. And, even if your project doesn't suggest such swatching, it might be wise to go ahead and take the initiative to experiment with your project yarn and hook size to see with of these Single Crochet 2 Together (sc2tog) Decrease techniques suits your project best. Disclaimer: We don't believe for a minute that we are the first ones to "invent" these different techniques for making a Single Crochet 2 Together (sc2tog) Decrease. Anyone who is a crocheter or a knitter will play and experiment and come up with variations of their own… especially if designing crochet and knitting patterns, garments, accessories, or home decor is what you do for a living. We are always trying to perfect our skills and will, eventually, get to approximately the same place. To Work Today's Tutorial Here's a list of materials we used to make today's Single Crochet 2 Together (sc2tog) Decrease tutorial. While you can, of course, use any materials you have on hand, these materials listed are what we recommend you use while you are learning. Yarn Used CYCA 4 Worsted Weight, 100% Pure Wool Hook Used H-8/5.00mm Crochet Hook Skillz Used Foundation Single Crochet – How To Make the Foundation Single Crochet Stitch Tutorial Single Crochet Break It Down Single Crochet 2 Together (sc2tog): Insert hook in next st, yarn over and pull up a loop, insert hook in next st, yarn over and pull up a loop, yarn over and draw through all 3 loops on hook. Tried and true, this is the standard technique we all use when we see the instructions that read sc2tog. This technique for working a Single Crochet 2 Together Decrease creates the base for a Single Crochet stitch in the first stitch then repeats that step and creates the base for a second Single Crochet stitch in the next stitch. Both bases are then pulled together at the TOP of the two stitches to make one stitch. In fact, this is the ONLY sc2tog decrease technique we are showing you today that has a decrease at the TOP of the working row. We call this technique for making a Single Crochet 2 Together a Soft Decrease. In the photos below and in the stitches in your hand, you will see that the two bases you created with your Single Crochet Decrease stitch make a fairly wide bottom to the stitch since it is at the top where all the decreasing actually happens. This results in a softer decrease that works just about everywhere you see the instructions for a decrease when you are working a row of Single Crochet stitches.
NOTE: Whenever possible, we like to work our decreases one stitch into a row rather than on the very end of a row. This creates a nicer line along the edge of the fabric especially in the cases of exposed edges like necklines. Also, if we are sewing the decreased edges together such as in the case of sleeve caps being sewing into an armhole, the row of regular stitches along the edge of the fabric makes a much tidier seam.
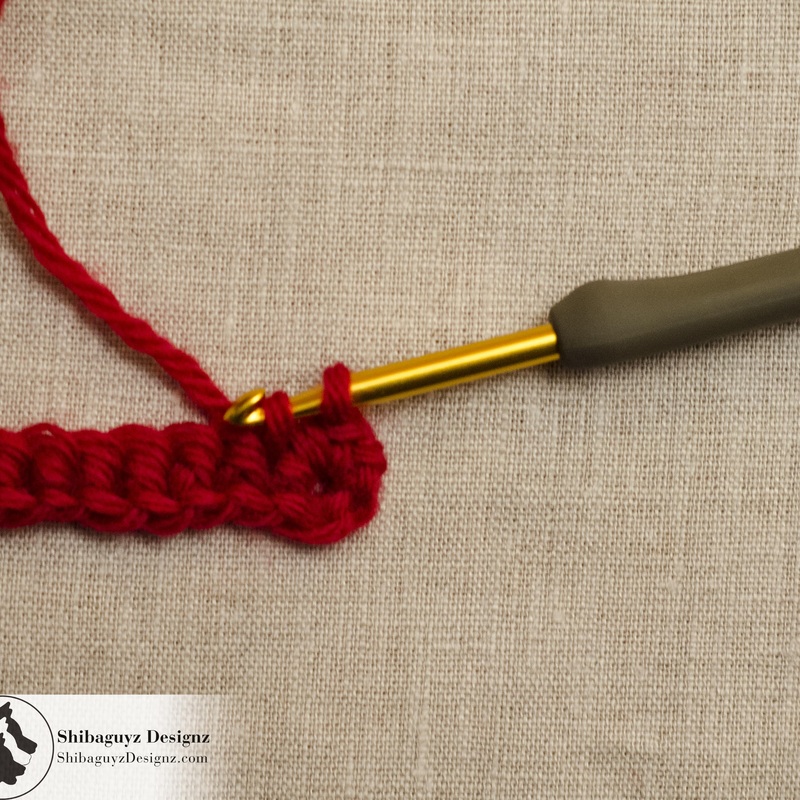
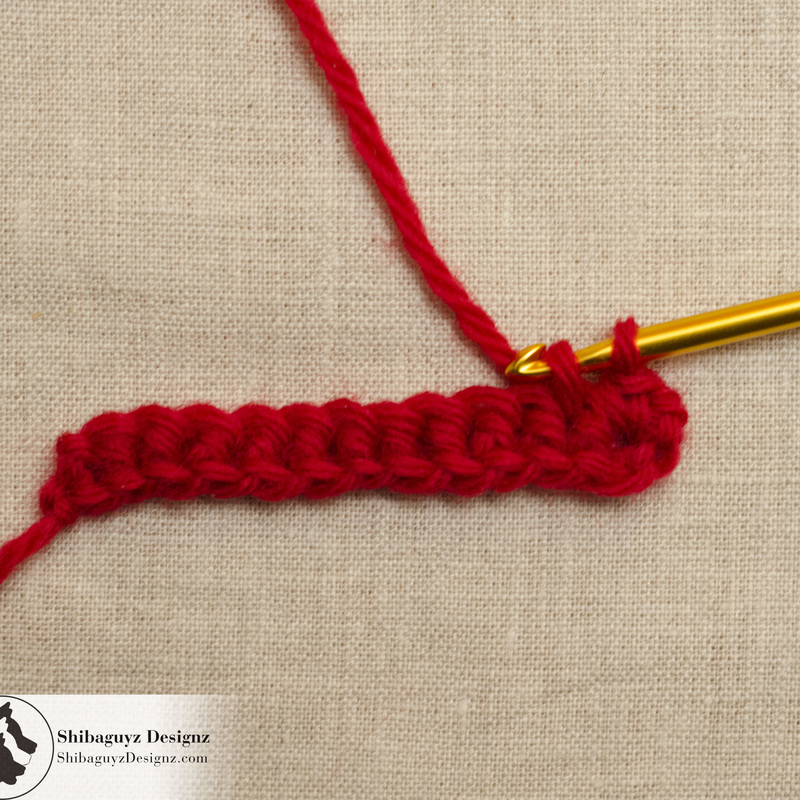
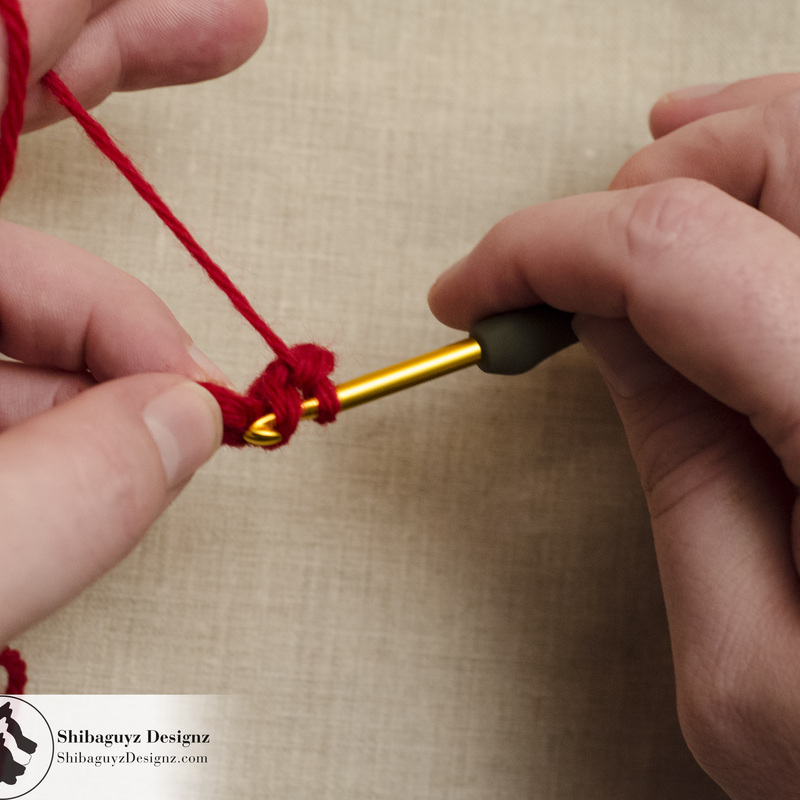
Single Crochet 2 Together Alternate (Alt-sc2tog): Insert hook in next st, yarn over and pull up a loop (2 loops on hook), insert hook in next st, yarn over and draw up a loop through st and both loops on hook. This is a slick little variation on the standard technique for making a decrease using Single Crochet stitches. In this Single Crochet 2 Together decrease, you are starting a Single Crochet stitch then you are actually bringing the two stitches below the row you are making together by using a Slip Stitch style action to squeeze those two stitches together. We say this stitch is slick because you would be hard pressed to find this version of a Single Crochet decrease stitch at all in a row of regular stitches. Again, this technique squeezes the stitches in the previous row (the row below the row you are currently making) together by using a Slip Stitch that passes through the second stitch you work into as well as the base and the head of the Single Crochet stitch on your hook. Basically, you create a Single Crochet base in the first stitch of the previous row then use the Slip Stitch technique to pull the next stitch together with the first stitch AND the base AND the head of your working Single Crochet. We categorize this as a Moderately Hard Decrease because it pulls the two stitches from the previous row together at the base of your working Single Crochet stitch. That said, it is only moderately hard because you can control the amount of pull between the two stitches being decreases by using different tensions in your working yarn while you make the Slip Stitch. With a little practice adjusting your tension to fit the rest of your row gauge, you will have a nearly invisible decrease because the Slip Stitch is hard to see unless you really get in there and look for it.
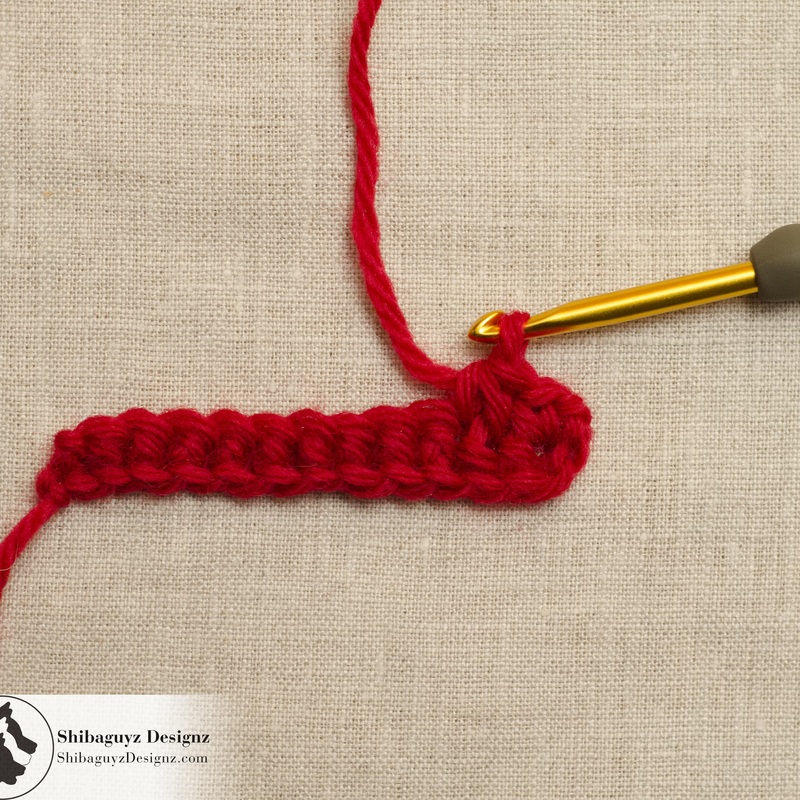
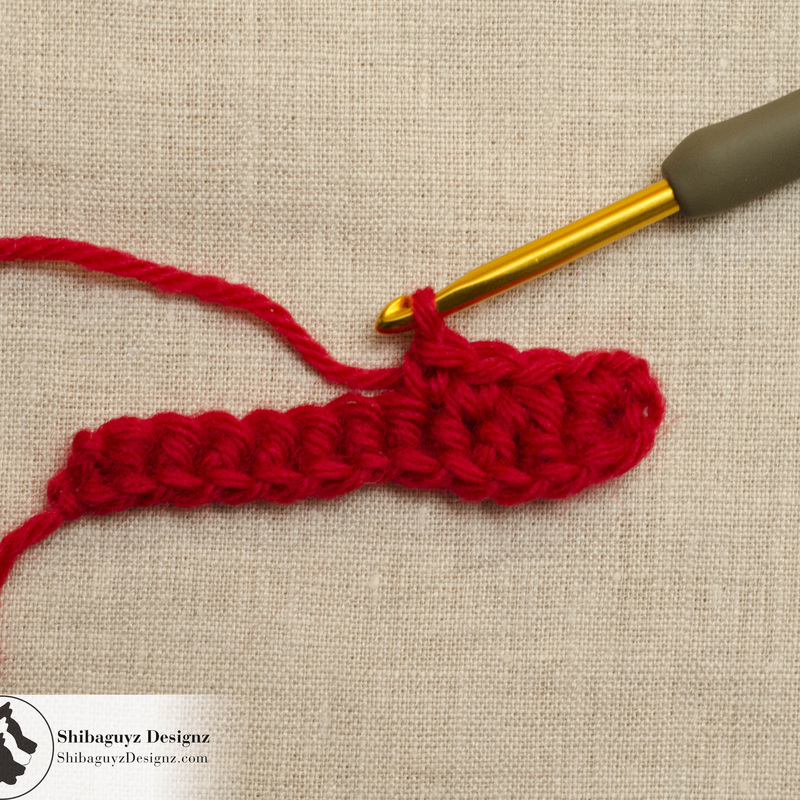
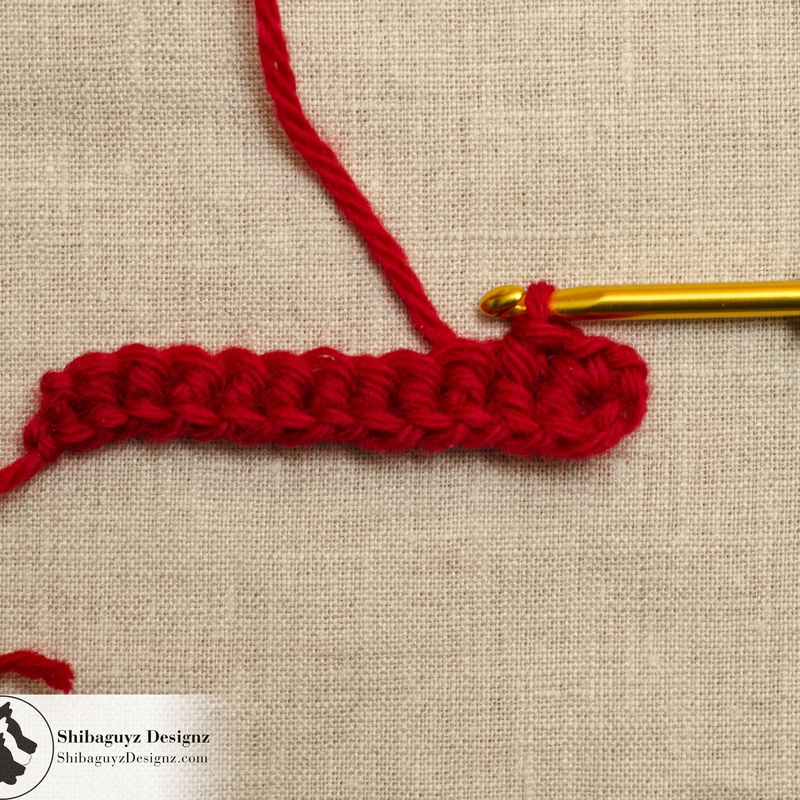
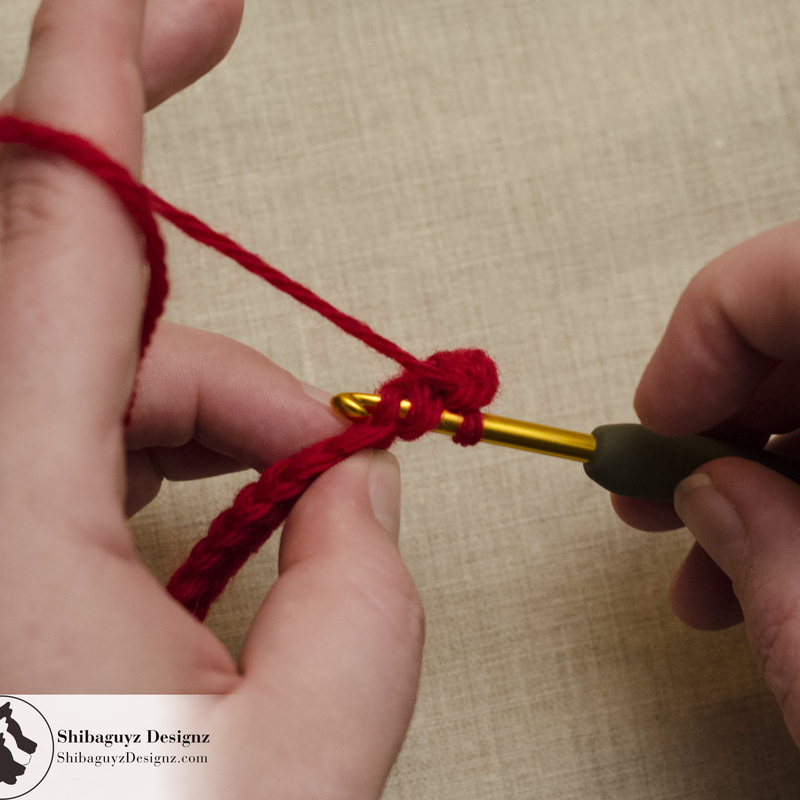
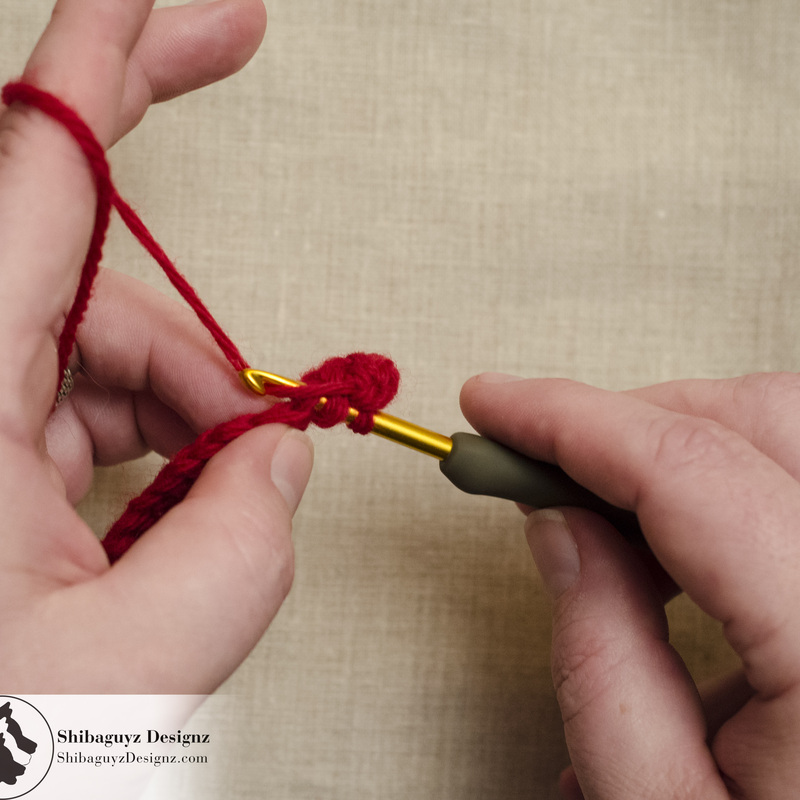
Rolling Single Crochet 2 Together (Rolling-sc2tog): Insert hook in next st, bring hook around to front of work and insert hook from front to back into next st (1 loop and 2 stitches on hook), yarn over and draw up a loop through both stitches (2 loops on hook), yarn over and draw through both loops on hook. In my quest for more perfect crochet decreases, I pulled from my knowledge base as both a crocheter and a knitter to develop my stitches. This Single Crochet Decrease comes from me experimenting with the way in which a decrease is made in knitting. That is, the knit stitches from the previous row are laid on top of one another in different arrangements then one stitch is pulled through those two stitches at the same time in order to make the decrease. I have no doubt that other stitchers have come up with this but I haven't seen it so I don't know if there is an "official" name for it. We call it a Rolling Single Crochet 2 Together because of how your hook rolls over the top of the second stitch to line it up with the first stitch so they can be stitched together with a Slip Stitch. This technique for making a decrease using a Single Crochet stitch overlaps the two stitches in the previous row creating what we call a Hard Decrease. In comparison, the standard Single Crochet 2 Together (sc2tog) is a soft decrease because it has the posts of both Single Crochet stitches as a base with those two stitches from your working row pulled together at the top. This technique truly uses ONE Single Crochet stitch to bring together two stitches from the previous row. The most effective use we have found for this is in small objects using Single Crochet stitches every row (such as ornaments or amigurumi) and in taller stitches it is FAB for bringing together two Double Crochet (or Treble, or Double Treble, etc…) at the top of the stitches. Again, it really is ONE Single Crochet stitch pulling two overlapping stitches from the previous row together under one stitch. No extra base stitches, no tricking the eye with slip stitches.
TAADAA!! There you have it… Three Ways To Make the Single Crochet 2 Together (sc2tog) Decrease. A Few Final Words As with all new skillz, some of these Three Ways To Make the Single Crochet 2 Together (sc2tog) Decrease techniques will take some practice. Be patient, practice, and compare your work with the photos in this tutorial. You will get it! Then experiment! Work larger swatches where you work each one of these Single Crochet Decrease techniques along only one side of the swatch as if you are making a neckline. Make them in the middle of the row stacked on top of one another. Make them in a round as if you were shaping the top of a hat or the toe of a sock or maybe a shape that will become the body of a cute little amigurumi dinosaur or Shiba Inu… just a thought… Whatever you do, play with these techniques and make them your own. And… hey… if you aren't happy with your experiment rip it out and go again! You'll get it! Thanks for dropping by for another Technique Tuesday! Our aim is to build the skillz of our FAB fiber community here on the web and it's always FAB to hear from you all that what we are doing is helping you and your fiber friends. Check back often or, better yet, click on that RSS Feed button over there in the right-hand column of the page you are on right now. That way you will always be up to date and never miss a thing! Stitch On! S&J Oh hey… before you go… Here are a few more pages we thought you might be interested in. Click on any of the photos below… enjoy! Also, come look us up on Facebook, Twitter, and Pinterest by clicking on one of these icons.
4 Comments
12/4/2014 11:56:42 am
Thanks for expanding my crochet repertoire! I always knew that there is more than one way to achieve anything in this world. Your explanations of the effect of the different techniques is most appreciated. Knowing a skill is one thing but knowing where to apply it is another. Cheers :-)
Ginger Gauthe
2/25/2017 07:22:53 am
I have been making a lot of baby booties lately and the single crochet decrease is used quite often. What I don't like about the traditional stitch is it leaves sort of a gap and with such a small project it really stands out. I even tried making up one not listed here, hook through stitch pull up a loop, hook through next stitch pull up a loop. Yarn over pull through two, yarn over pull through 2. Thinking it might help the stitch be wider so it wouldn't leave a gap. Tried working an reworking with different tensions. And then I found your site. AHHHHH!!. I am going home tonight to try all of them. I think number 3 will be the winner since you mentioned it is good for small pieces.
Monica Hoffman
7/9/2021 04:05:37 pm
I had problems with SC2TOG. Your explanation is so clear!
Kelley Allen
8/11/2021 04:44:14 pm
I just found your post on three ways to make a single crochet decrease. Brovo! Well thought out techniques and thorough explanations. Such great info. I'm in the middle of a piece now there these apply. #2 to the rescue. Thank you!!! Your comment will be posted after it is approved.
Leave a Reply. |
AuthorShannon and Jason Leave us a tip to help us do what we do!


Archives
May 2024
 

 Categories
All
     |


 RSS Feed
