SHANNON & JASON
  • Home
  • Blog
    • Tips
    • tutorials
  • Our Books
    • Contemporary Kogin-zashi
    • Boro & Sashiko, Harmonious Imperfection: The Art of Japanese Mending & Stitching
    • Complete Crochet Course
    • Designer Crochet
    • Crochet Geometry
  • All Shopping
    • Books and Digital Patterns
    • Sashiko Shop
    • Thread
    • Fabric
    • Stitchips
  • Classes
  • Sashiko
  • About
  • Contact and Subscribe
  • Sponsors

 Shannon & Jason's Blog 

Crochet First-Stitches Series: Linked First Stitches

2/6/2018

 
Picture

Crochet Linked First-Stitches

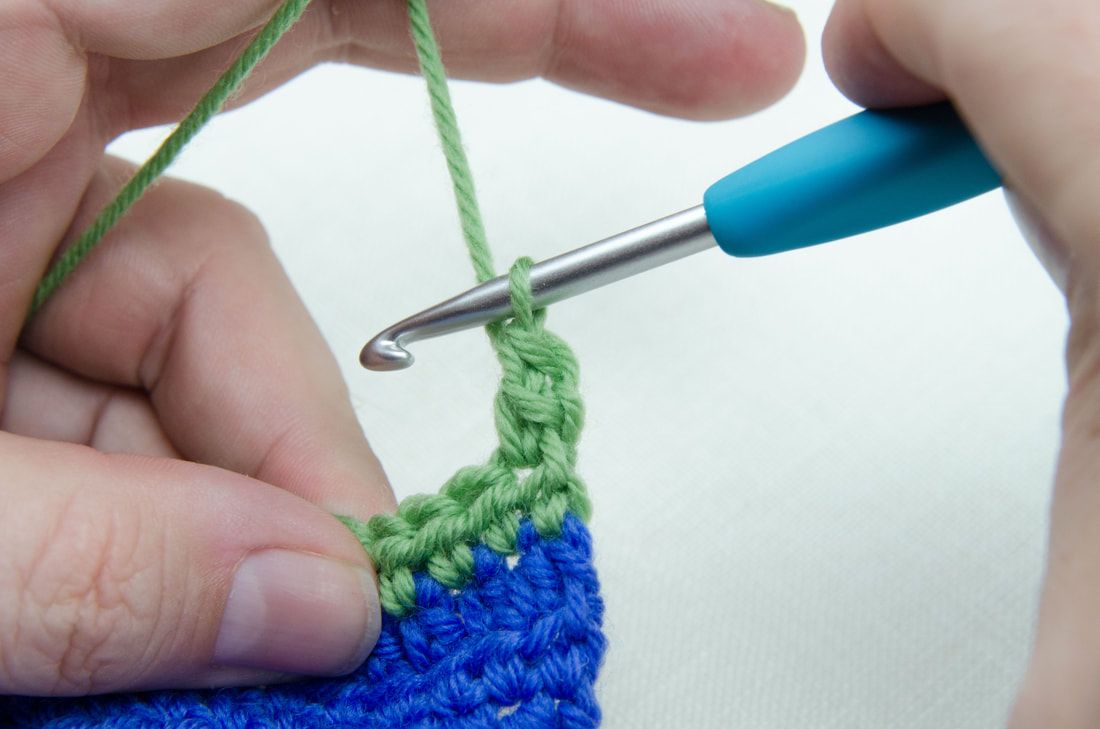
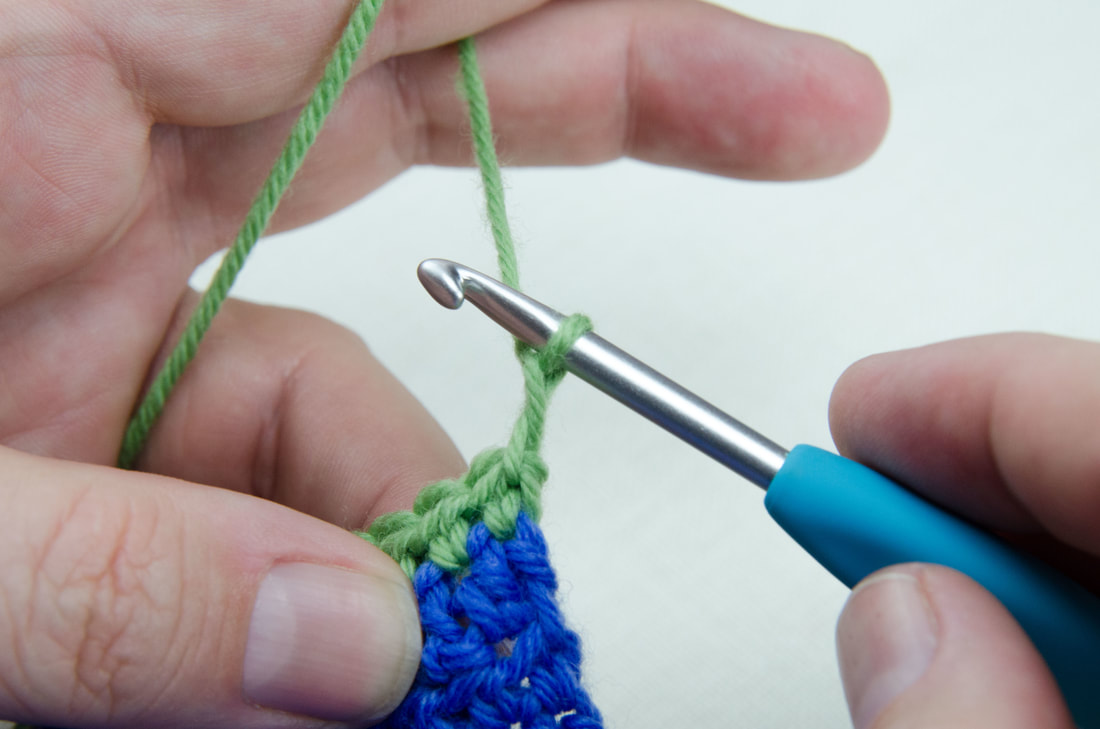
The Steps To Making A Linked First-dc:
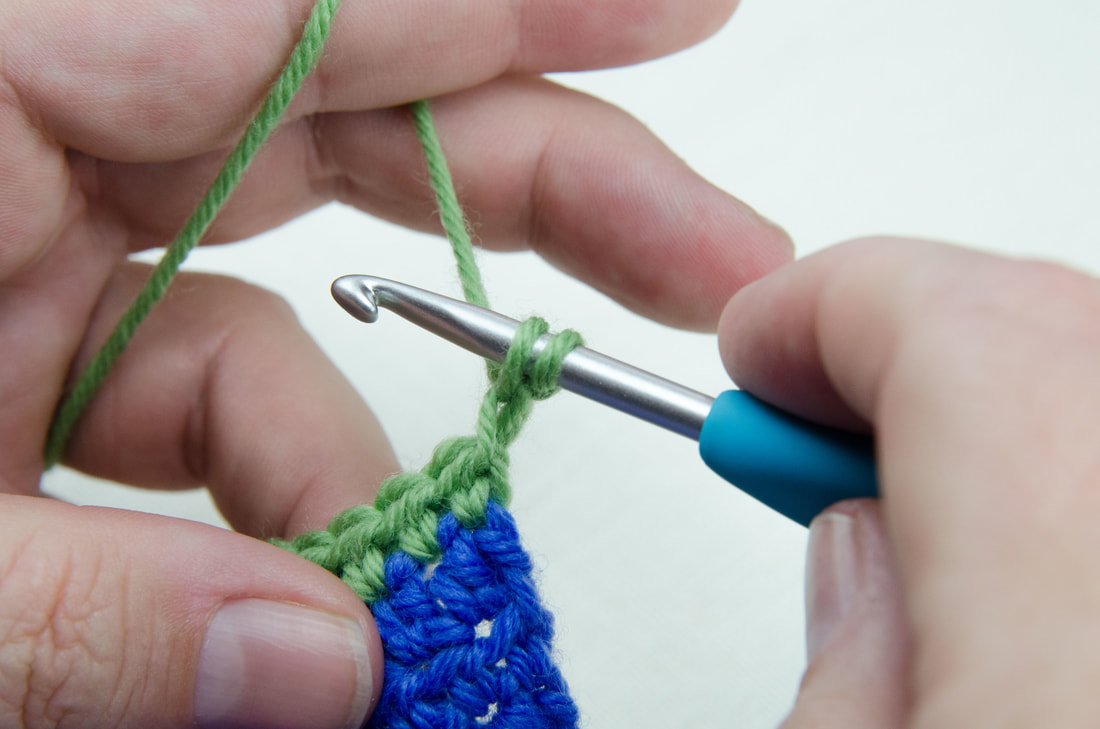
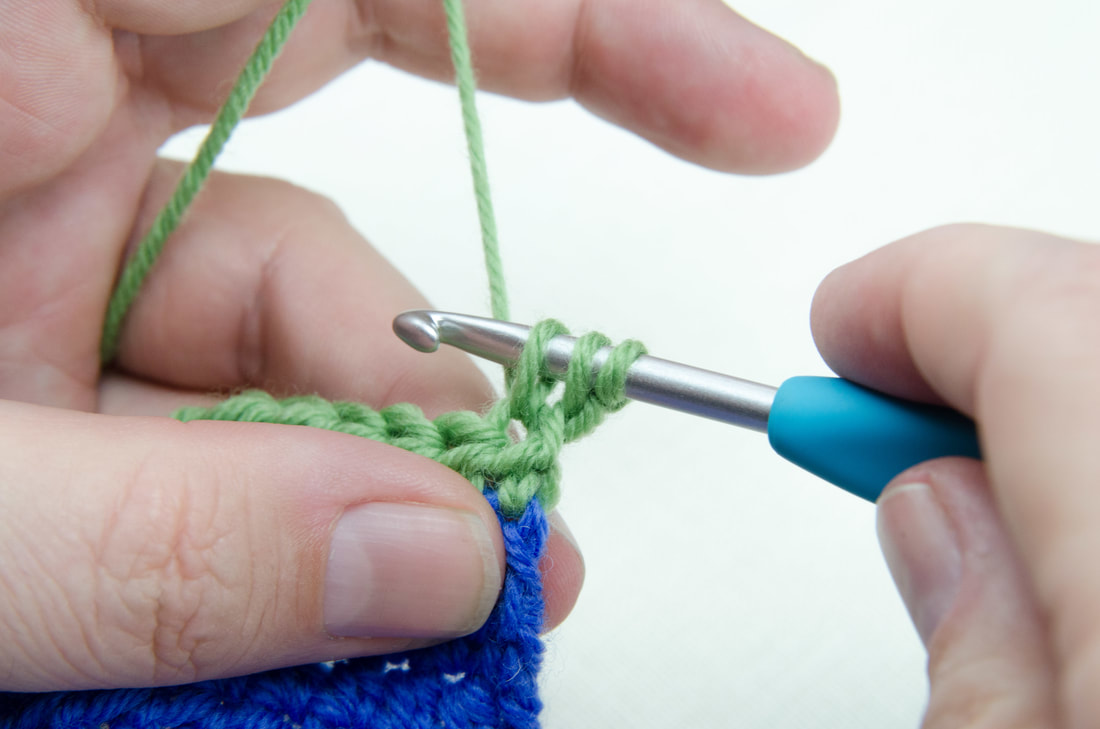
Pull loop on hook up to slightly taller than a normal loop, ch 1, insert hook in first chain from hook, yo and draw up a loop (2 loops on hook), insert hook into first st, yo and draw up a loop (3 loops on hook), [yo and draw through 2 loops on hook] 2 times.
As we showed in last week's Stacked First-Stitches tutorial, wonky edges are easily banished to the far corners of the multi-verse with the wave of a magic wand. What??? You DON'T think your hook is a magic wand?!? Yeah… you know it is. And we're going to show you one more spell for banishing wonky edges that even the students of a certain magical school would be envious of (see how we didn't violate any intellectual property laws or infringe on Ms. Rowling's work?).

Remember that first-stitches are what we use to replace those awful "chain 2 and count as first double crochet of row" instructions. ACK… oh, the wonkiness!! In our series, we're covering the four types of first-stitches and this week, we're talking about Linked First-Stitches.
Picture
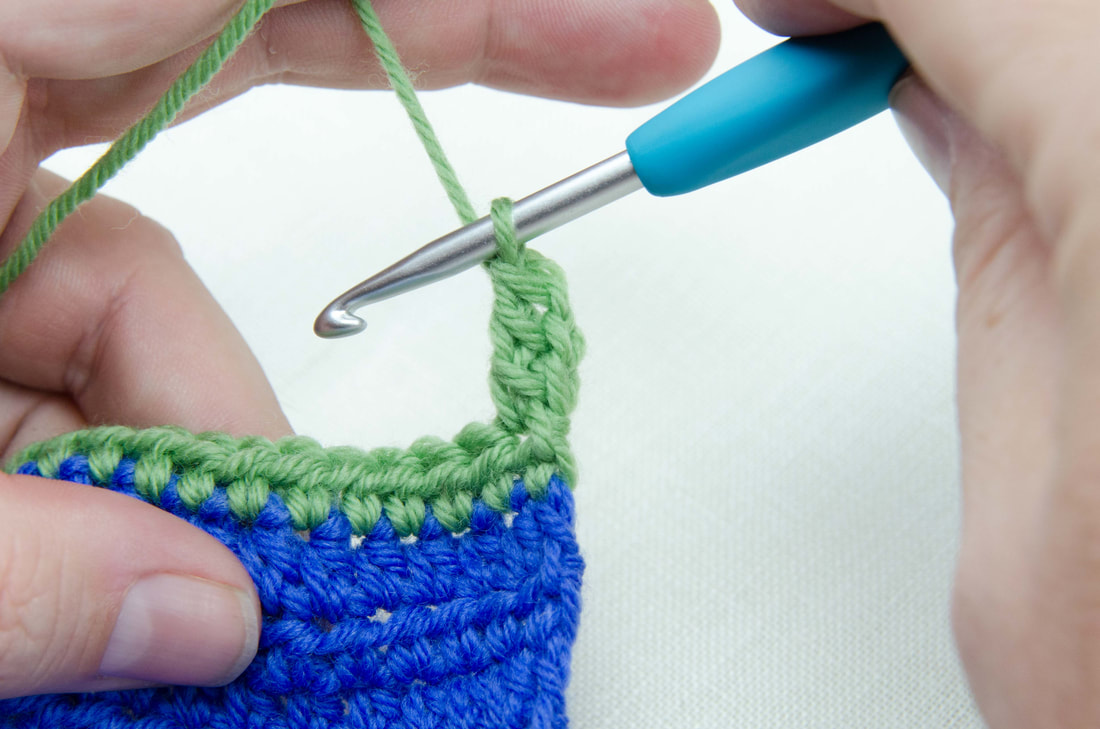
Now, we did say that all four of the first-stitch techniques have their use and that you should use them where fit best as determined by your practice swatch you make before starting a project. That said… linked first-stitches is the technique we go to more often that the others when it comes to making a neat, clean, tidy border on your crochet fabric. Not only does it look FAB when left as a raw edge, but is is SOOOOO easy to work into when sewing seams or picking up stitches for an edging or an accent band of stitches. In addition, linked first-stitches work WAY better than other first-stitch techniques when it comes to taller stitches… more on that at the end of this tutorial.

So, without further ado, here is the step-by-step tutorial for making the Linked First-Double Crochet stitch.

Crochet Linked First Dc Tutorial Step 1
Linked First-Double Crochet, Step 1
Step 1
First, you're going to pull up the loop on your hook so it is slightly taller than a normal loop. This is the loop that is on your hook before you even chain up… THEN chain 1.

If you look at the photo, you will see the taller loop under the loop on the hook after making the chain one.

NOTE: You will need to play with the size of the taller loop so it blends in with the other stitches. If you don't get it right the first time… no worries… try it again. You'll develop and eye for it just like you have other crochet stitches.

Crochet Linked First Dc Tutorial Step 2
Linked First-Double Crochet, Step 2
Step 2
Now, working from front to back, insert your hook into the bottom bump of the first chain from the hook (the taller loop you made in the previous step).

This is the same action you use for inserting your hook into the bump of a foundation chain if you use that method to start your crochet fabrics. If you've come this far on the path to improving your crochet skillz… you'll have no problem with this! Even if you don't succeed the first time, just keep at it for a little bit. This is a brand new technique and you will develop a muscle memory for it just like you did when you first started making crochet stitches.


Crochet Linked First Dc Tutorial Step 1
Linked First-Double Crochet, Step 3
Step 3
Yarn over and draw up a loop… you'll have 2 loops on your hook now.

Crochet Linked First Dc Tutorial Step 4
Linked First-Double Crochet, Step 4
Step 4
Next, insert your hook into the first stitch of the row then yarn over and draw up a loop so you have 3 loops on your hook as shown in the photo.

NOTE: It is easy to get confused about where the "first stitch of the row" is. Just keep in mind that the first stitch of this new row is the last stitch you made of the previous row.

Crochet Linked First Dc Tutorial Step 5
Linked First-Double Crochet, Step 5
Step 5
Finally, you will finish just like a regular double crochet stitch: Yarn over and draw through 2 loops on your hook, and yarn over and draw through 2 loops on your hook again.

This photo shows the finished Linked First-Double Crochet stitch. Note how neat and clean the outside edge is.

Finished Linked First-dc
Finished Linked First-Treble Crochet Stitch
​Bonus:
Here is what a finished Linked First-Treble looks like!


The real strength of this version of a first-stitch is that is works just as beautifully for taller stitches. The even and poker straight edges remain the same for treble, double treble, triple treble, or the legendary quintuple-back-over-flipty-do. Okay… we made that last one up. But ANY height of first stitch is more stable using this technique!! All you need to do is do one more chain up for every yarn over you would normally make. For example, we did one chain up for a double crochet stitch because we yarn over once before making a dc. To make a Linked First-Treble Crochet stitch, you would chain up two times and insert your hook into the bottom bump of each of the chains just like you did in Step 3 of this tutorial.
Remember: The higher the stitch, the more chains you make, matching the number of yarn overs you would make for that stitch. One you have made the correct number of chains, insert your hook into each chain one at a time and yarn over and draw up a loop. When you are finished, you will have the correct number of loops on your hook to complete the stitch.

So there you have it! One of our FAVORITE crochet techniques that can be applied to any project where the instructions call for you to make a certain number of chains to count as the first stitch of the row. ACK! No more wonky edges!!

Want to see more tutorials like this?
​We've compiled them all into one convenient page that we update as we add more tutorials to our site.
​Click on the link below and bookmark that page for future reference!
Shibaguyz Tutorial Page

For the ultimate crochet reference guide, don't miss our NEW book Complete Crochet Course available now online and at book sellers. See it by clicking the FAB little button below.
Complete Crochet Course by Shannon Mullett-Bowlsby
Complete Crochet Course

Be sure to come by and say hey on our social media channels where we share all kinds of FAB photos
​and where you can find our new LIVE series of tutorials and recipes!
Follow my blog with Bloglovin
Kandy
3/30/2018 08:14:58 am

I’m so confused..help! Trying to make the Aloe Wrap printed in Interweave’s Spring 2018 Edition. Starting with “First Points” Row 1 states: “(RS) Ch 2, (linked first-hdc [see Stitch Guide], hdc) 2 times in 2nd ch from hook, turn” - so here’s my issue: I ch 2 (as stated) then begin my linked first-hdc in 2nd ch from hook by pulling up lap to height of hdc, then ch 1, insert hook in bottom lip of first ch from hook, yo, pull up lp - here is where, according to the stitch guide, I should have 2 LOOPS on my hook, HOWEVER, I have 3 LOOPS. What in the world am I doing wrong? Seems the stitch guide doesn’t account for the beginning Ch 2 leaving me a loop on my hook when I start the linked stitch...so confused. I’m hoping you can understand my conundrum and clarify anything I’m misunderstanding or misreading. I have drooled over this pattern since I received my magazine a month or so ago. Please help before my drool-soaked pages become unreadable. Thanks so much!
Kandy

Shibaguyz link
3/31/2018 11:40:00 am

Heya Kandy - It looks like you might be reading the instructions for the linked first-hdc a little too quickly. Here is how that stitch instruction reads in the Stitch Guide in the magazine:

Pull up lp to height of hdc, ch 1, insert hook in bottom lp of first ch from hook, yo, pull up lp (2 lps on hook), insert hook in first st, yo, pull up lp (3 lps on hook), yo, draw through all 3 lps on hook.

You can see that you first have 2 loops on your hook then, after completing the second step of the stitch, you have 3 loops on your hook.

This should get you back on track!
S&J


Comments are closed.

    Author

    Shannon and Jason

    RSS Feed

    Sign Up For Our Newsletter

    Leave us a tip to help us do what we do!

    BERNINA Ambassador Badge
    Daylight Company Lamps
    Shibaguyz Aurifil Thread Collection

    Archives

    September 2022
    June 2022
    February 2022
    June 2021
    November 2020
    September 2020
    June 2020
    May 2020
    April 2020
    March 2020
    January 2020
    February 2019
    December 2018
    November 2018
    August 2018
    July 2018
    May 2018
    April 2018
    March 2018
    February 2018
    January 2018
    December 2017
    November 2017
    October 2017
    September 2017
    August 2017
    July 2017
    March 2017
    February 2017
    January 2017
    November 2016
    October 2016
    September 2016
    July 2016
    June 2016
    May 2016
    April 2016
    March 2016
    February 2016
    November 2015
    August 2015
    July 2015
    June 2015
    May 2015
    April 2015
    March 2015
    February 2015
    January 2015
    December 2014
    November 2014
    October 2014
    September 2014
    August 2014
    July 2014
    April 2014
    March 2014
    January 2014

    www.dickblick.com
    Picture
    Picture

    RSS Feed

    Categories

    All
    Afghan
    Aurifil
    Books
    Boro
    Camp STITCHES
    Classes
    Cleaning
    Clip On
    Clover
    Cowl
    Craft
    Craftsy
    CraftU Classes
    Crochet
    Crochet Geometry
    Daylight
    Daylight Company
    Design
    Designer Crochet
    Digital Download
    Donate
    Download
    English Paper Piecing
    Event
    Free
    Giveaway
    Hand Cream
    Hooks
    Inspirations
    International Crochet Month
    Interview
    Interweave
    Knit
    Knitting
    Lamp
    Marcus
    Marcus Fabrics
    Men
    Menswear
    National Craft Month
    National Crochet Month
    Needles
    Online Classes
    Ottlite
    Pattern
    Patterns
    Paypal
    Photography
    Podcast
    Prize
    Product Review
    Project
    Quilt
    Quilting
    Recipe
    Rotary Cutter
    Sashiko
    Season Of Giving Away
    Sew Expo
    Sewing
    Shibaguyz
    Shibaguyz Designz
    Shibaguyz Designz Indie Maker Pattern
    Shibaguyz LIVE
    Shibaguyz Photography
    Shop
    Soak
    STITCHES Events
    Sweater
    Thread
    Tool School
    Tools Of The Trade
    Travel Lamp
    Tutorials
    Vogue Knitting LIVE
    Walkthrough
    Warm Up America
    Wash
    Weaving
    Women
    Yarn
    Zoom Loom

    www.dickblick.com

Stay current on the news and events from Shannon and Jason as well as exclusive offers and tutorials available only for our newsletter subscribers.

* indicates required
Email Format

  • Home
  • Blog
    • Tips
    • tutorials
  • Our Books
    • Contemporary Kogin-zashi
    • Boro & Sashiko, Harmonious Imperfection: The Art of Japanese Mending & Stitching
    • Complete Crochet Course
    • Designer Crochet
    • Crochet Geometry
  • All Shopping
    • Books and Digital Patterns
    • Sashiko Shop
    • Thread
    • Fabric
    • Stitchips
  • Classes
  • Sashiko
  • About
  • Contact and Subscribe
  • Sponsors