SHANNON & JASON
  • Home
  • Blog
    • Tips
    • tutorials
  • Our Books
    • Scrappy Wonky Quilt Block Extravaganza
    • Contemporary Kogin-zashi
    • Boro & Sashiko, Harmonious Imperfection: The Art of Japanese Mending & Stitching
    • Sashiko Stitching
    • Complete Crochet Course
    • Designer Crochet
    • Crochet Geometry
  • All Shopping
    • Books and Digital Patterns
    • Streaming Classes
    • Sashiko Shop
    • Thread
    • Fabric
  • Classes
  • Sashiko
  • About
    • Portfolio
  • Contact and Subscribe
  • Sponsors
  • Portfolio

 Shannon & Jason's Blog 

Technique Tuesday Crochet Tutorial – Where To Put Your Hook

3/19/2015

1 Comment

 
Technique Tuesday - Step-by-step crochet and knitting photo tutorials by Shibaguyz Designz

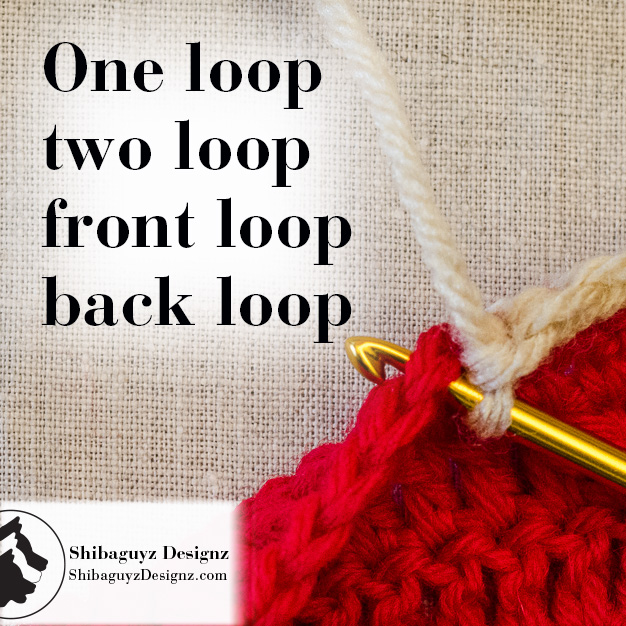
One loop… two loop… front loop… back loop… (OR) Where to put your crochet hook!


(There might have been a LITTLE Dr. Seuss influence in that title…)


Technique
Making different fabrics by inserting your crochet hook into different loops.


What is it?
The question of "where to insert your crochet hook when making your crochet stitches" has been sitting in the top five search terms for our website since we started posting crochet and knitting tutorials. Knowing exactly where to insert your crochet hook when you are making stitches is a common question for beginners who are faced with a confusing row of loops that all look the same after a while. Even experienced crocheters find that the way they learned to make basic crochet fabric involved inserting their hook under either of one or under both loops and it never once occurred to them that they might have been doing something "different" at all!

How To Make Different Crochet Fabrics By Inserting Your Hook Under Different Loops - A free step-by-step crochet tutorial by Shibaguyz Designz
Yup… we've seen all levels of crochet folk ask this question and we've answered it in every level of class from newbie to experienced.

Knowing where to insert your crochet hook when you make your crochet stitches and how different loops affects your final fabric is a vital piece of information that will change how you look at your stitching forever.

Read on…

Click the "Read More" link below for the full tutorial.

Why Use It?
In this crochet tutorial, we are going to cover three options for where to insert your hook when you make crochet stitches. As with all of our tutorials where we give multiple ways of working a particular technique, it's all about OPTIONS!

Whether you are making your first crochet square or your fiftieth crochet garment; whether you just picked up your hook for the first time or you've been wielding the hook for eons; having options for making different types of fabric is ALWAYS a good thing. The more versatile you can be when making your crochet fabric, the better you will be at making exactly what YOU want.

So… once again… OPTIONS!


To Work Today's Tutorial
Here's a list of materials we used to make today's tutorial for where to insert your crochet hook. While you can, of course, use any materials you have on hand, these materials listed are what we recommend you use while you are learning.

Yarn Used
CYCA 4
Worsted Weight, 100% Pure Wool

Hook Used
H-8/5.00mm Crochet Hook

Skillz Used
Double Crochet Stitch
Single Crochet Stitch
Single Crochet Through the Front Loop (sc tfl)
Single Crochet Through the Back Loop (sc tbl)


Break It Down


We'll start with a look at the parts of a crochet stitch.

Here in this handy dandy illustration, we've shown the two parts of a stitch using a Double Crochet stitch. The important part for us to focus on today is the Head of the crochet stitch.

How To Make Different Crochet Fabrics By Inserting Your Hook Under Different Loops - A free step-by-step crochet tutorial by Shibaguyz Designz

How To Make Different Crochet Fabrics By Inserting Your Hook Under Different Loops - A free step-by-step crochet tutorial by Shibaguyz Designz


We're going to be demonstrating with Single Crochet stitches in this tutorial so here is another handy dandy illustration of the two parts of a stitch using Single Crochet stitches. The Posts are outlined in green and the Heads are outlined in black.


Again, the important part for us to focus on today is the Head of the crochet stitch.


Here's a look at our fabric. This is a solid fabric of Double Crochet stitches (darker color yarn) with our new row of Single Crochet stitches (lighter color yarn) on top.


How To Make Different Crochet Fabrics By Inserting Your Hook Under Different Loops - A free step-by-step crochet tutorial by Shibaguyz Designz

How To Make Different Crochet Fabrics By Inserting Your Hook Under Different Loops - A free step-by-step crochet tutorial by Shibaguyz Designz


If we bend the top of the fabric to face us, we can see the tops of the Heads of our crochet stitches. The lighter colored stitches are the current working row (the stitches we are making now) and the darker colored yarn is the previous row (the stitches we just made)


From the top like this, the tops of the heads kind of look like little arrows, right? If we think of them as little arrows, we can see that the points of the arrows in the current row (lighter yarn) point to the right of the photo and the points of the arrows in the previous row (darker yarn) point to the left of the photo.

Note the hand dandy illustration again indicating the front loop and the back loop of the crochet stitch.

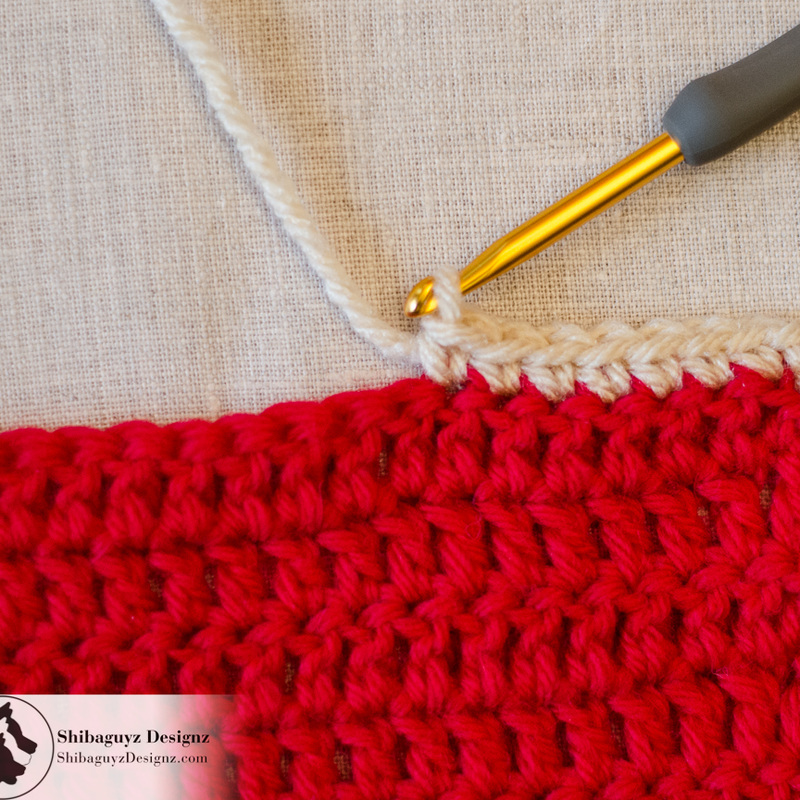
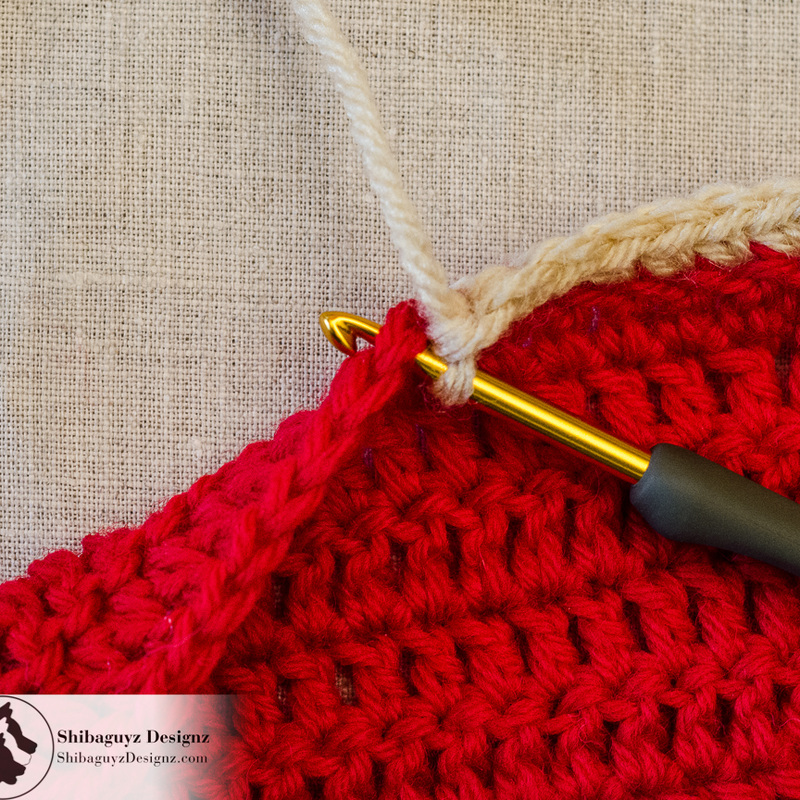
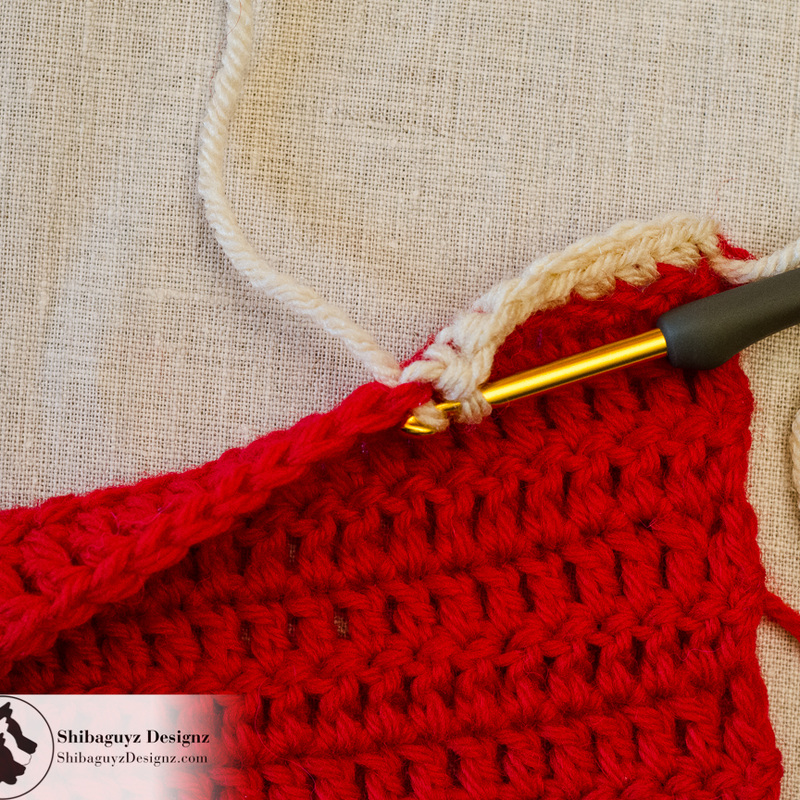
Now… on to the subject of where to insert your crochet hook when you make a stitch… 

Both Loops

1. Again looking down from the top, you can see that we've inserted our hook under BOTH the front and the back loops of the next stitch. There are only TWO LOOPS lying on top of the hook. Nothing more. Just the front and back loops are on top of your hook.

This where you insert your crochet hook when the pattern reads:
Sc in next st

Generally, when no other direction is given other than to make a stitch in the next available stitch, this is how you will make your stitch.

How To Make Different Crochet Fabrics By Inserting Your Hook Under Different Loops - A free step-by-step crochet tutorial by Shibaguyz Designz

How To Make Different Crochet Fabrics By Inserting Your Hook Under Different Loops - A free step-by-step crochet tutorial by Shibaguyz Designz

2. Since we're making a Single Crochet stitch, we've done a yarn over and drawn up a loop.

See how the new loop is drawn from back to front under both the front and back loops.

3. And here is that stitch finished just like the ones before. This is 8 single crochet stitches made by inserting our hook under both the front and back loops.

How To Make Different Crochet Fabrics By Inserting Your Hook Under Different Loops - A free step-by-step crochet tutorial by Shibaguyz Designz

Through the Back Loop

1. Looking down from the top again so you can see the loops more clearly, we've inserted our hook under JUST the back loop of the next stitch. There is only ONE LOOP lying on top of the hook.

This is where you insert your crochet hook when the pattern reads:
Sc tbl of next st
Or
Sc tblo of next st

tbl = through the back loop
tblo = through the back loop only

How To Make Different Crochet Fabrics By Inserting Your Hook Under Different Loops - A free step-by-step crochet tutorial by Shibaguyz Designz
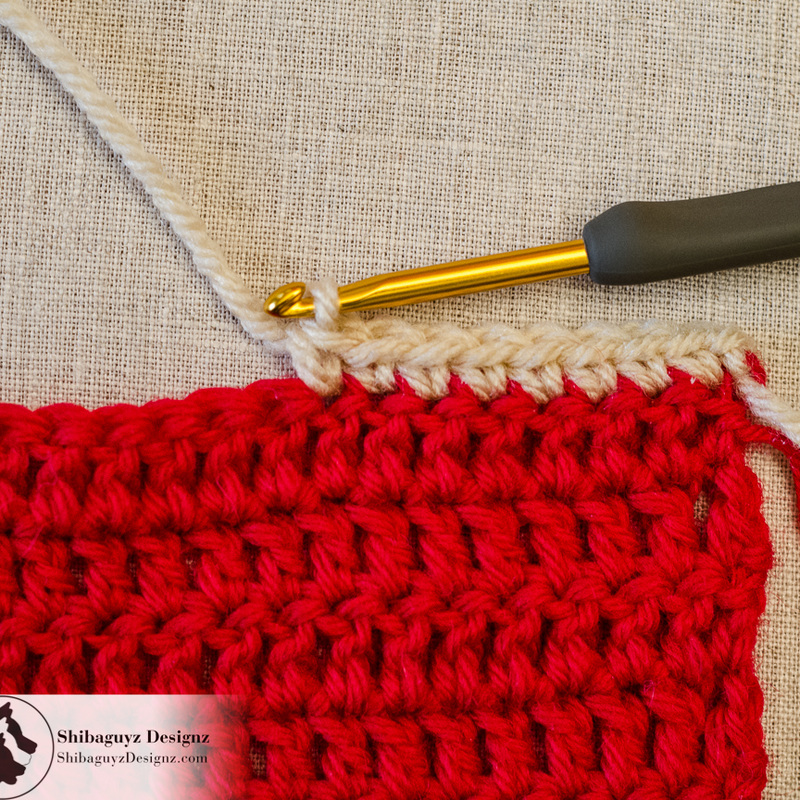
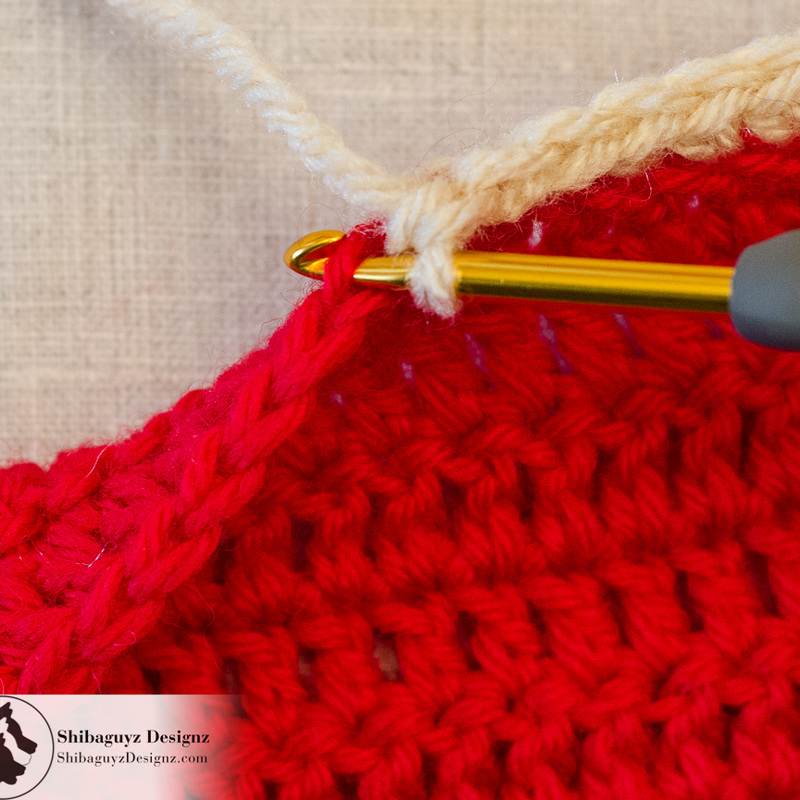
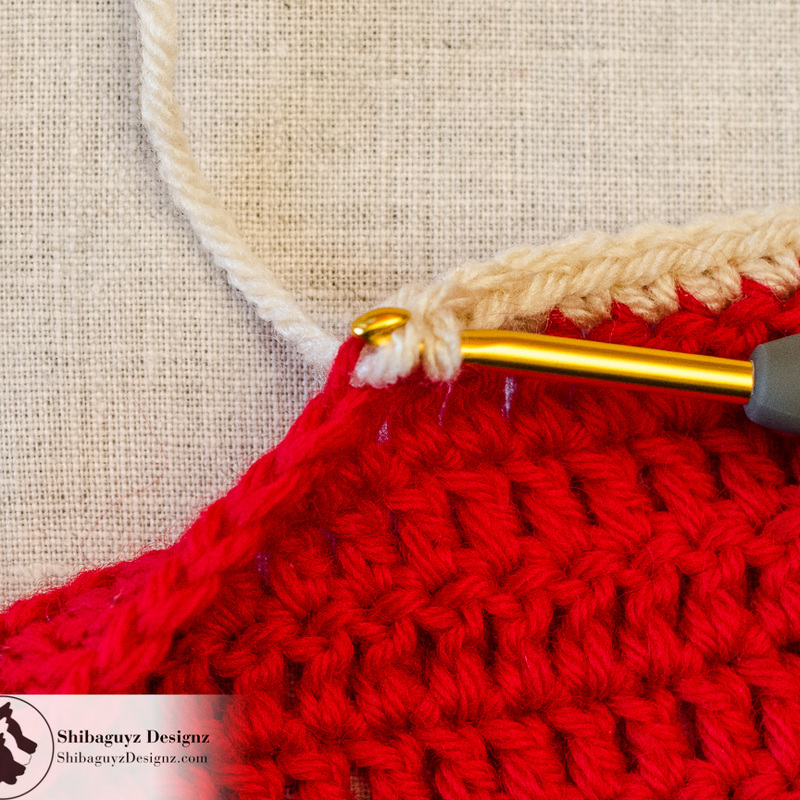
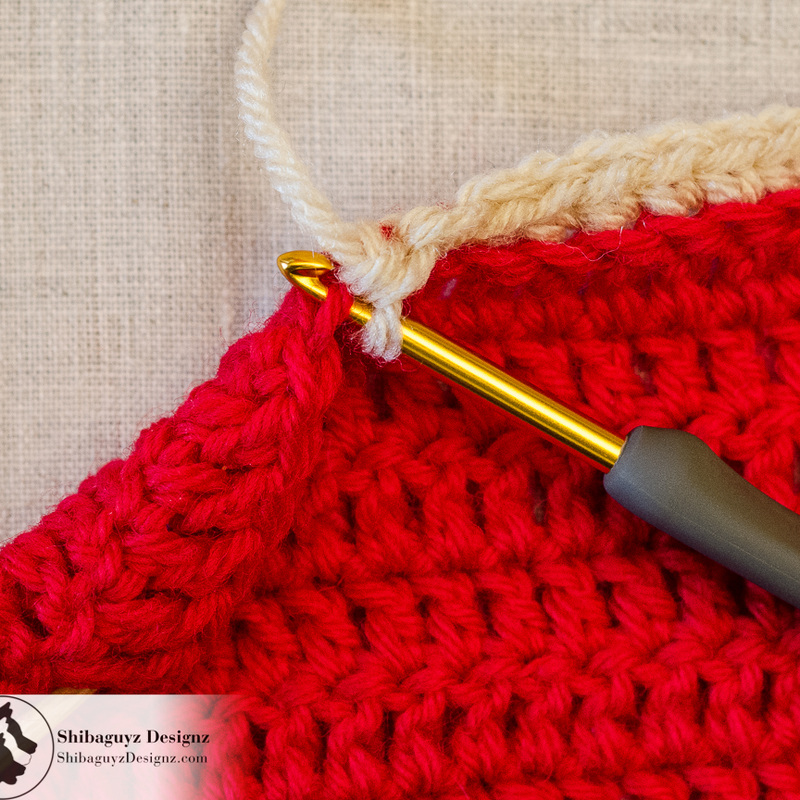
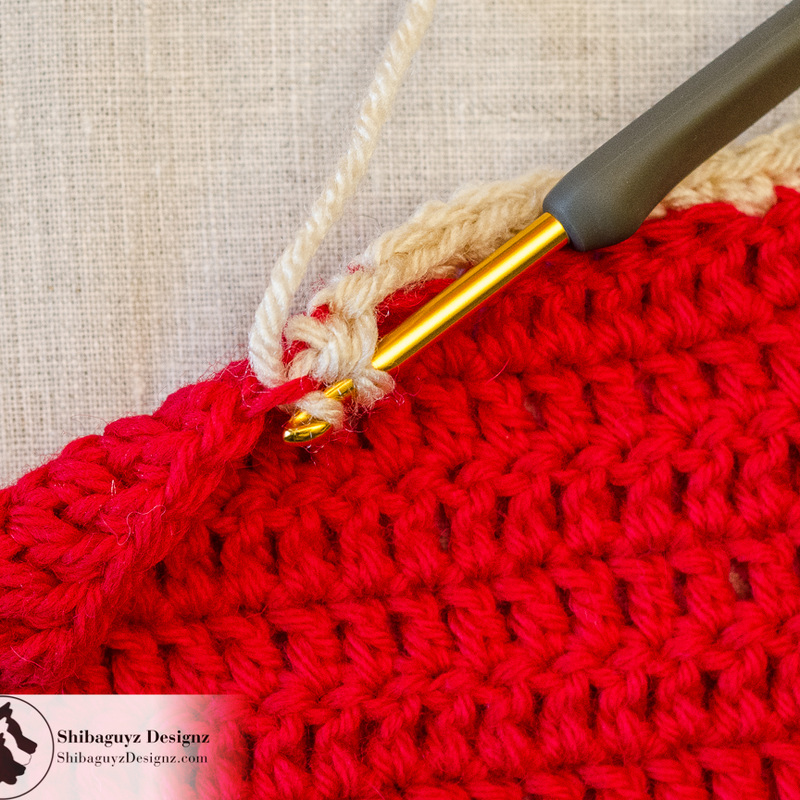
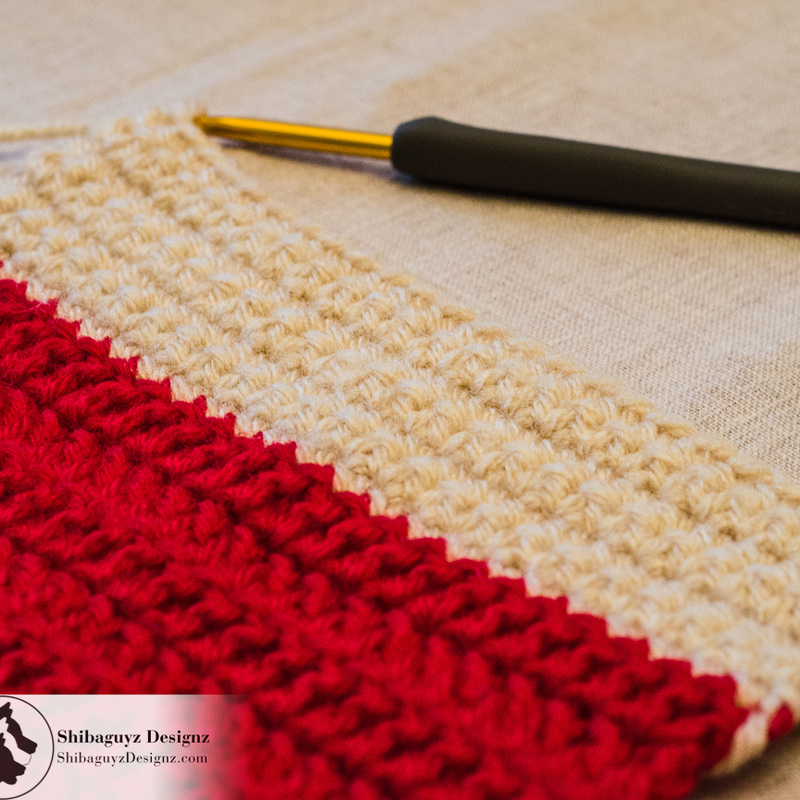
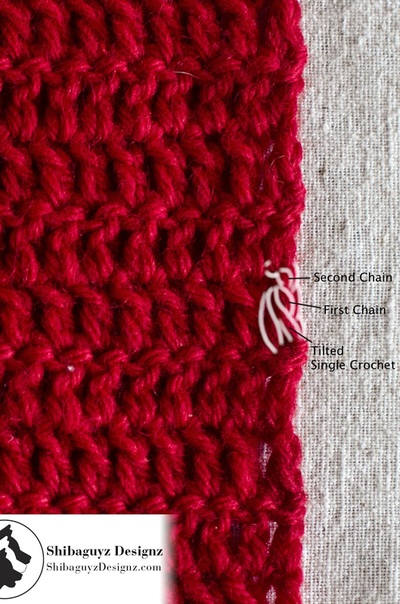
This is one of those instances where different pattern templates for different companies/publishers/magazines will use a different wording for the same stitch. In all cases, tbl and tblo both mean to insert your crochet into the back loop of the next stitch to make your new stitch.

How To Make Different Crochet Fabrics By Inserting Your Hook Under Different Loops - A free step-by-step crochet tutorial by Shibaguyz Designz


2. As before, this is the next step of making the Single Crochet stitch:

"…yarn over and draw up a loop…"


See how the new loop is drawn from back to front under ONLY the back loop.

3. And here is that stitch finished just like the ones before. This is nine (9) single crochet stitches made by inserting our hook under ONLY the back loops.

Compare the four (4) single crochet stitches on the right side of the photo to the nine (9) single crochet through the back loop (sc tbl) stitches we just made. It is fairly easy to see the difference between the four single crochet stitches on the right that come from inserting your crochet hook under both loops and the center nine (9) stitches made by inserting your crochet under only the back loop.

How To Make Different Crochet Fabrics By Inserting Your Hook Under Different Loops - A free step-by-step crochet tutorial by Shibaguyz Designz
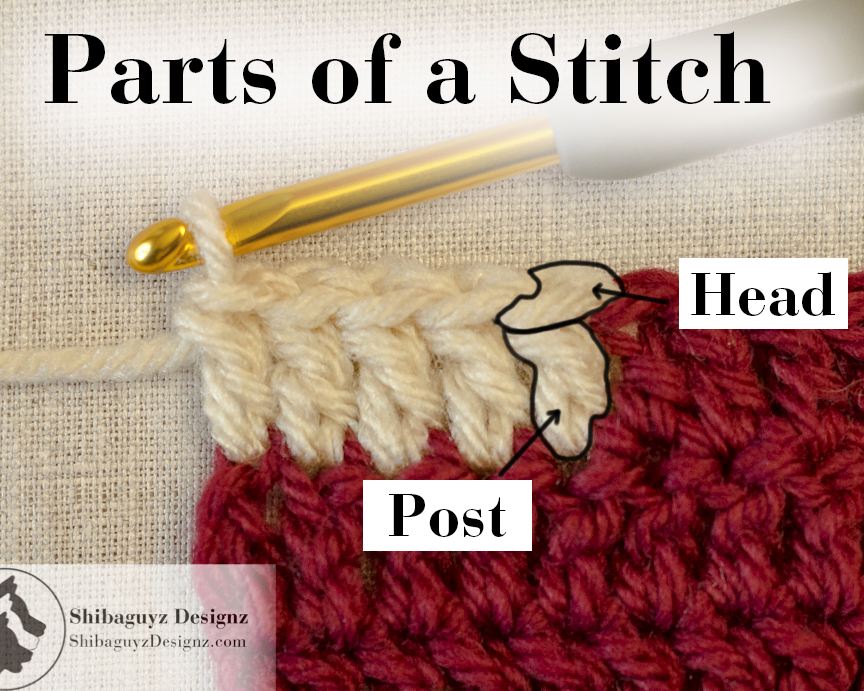
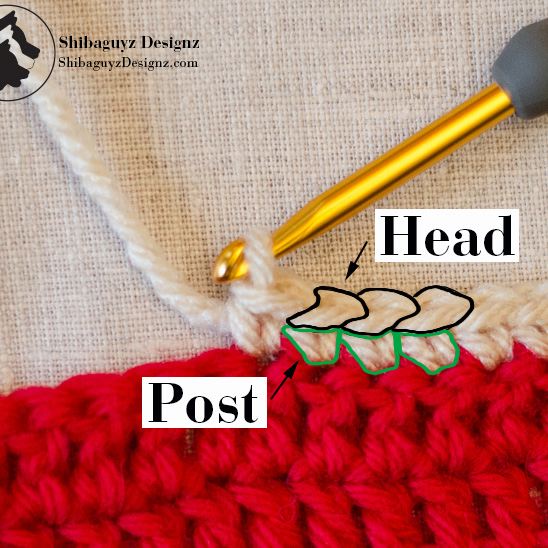
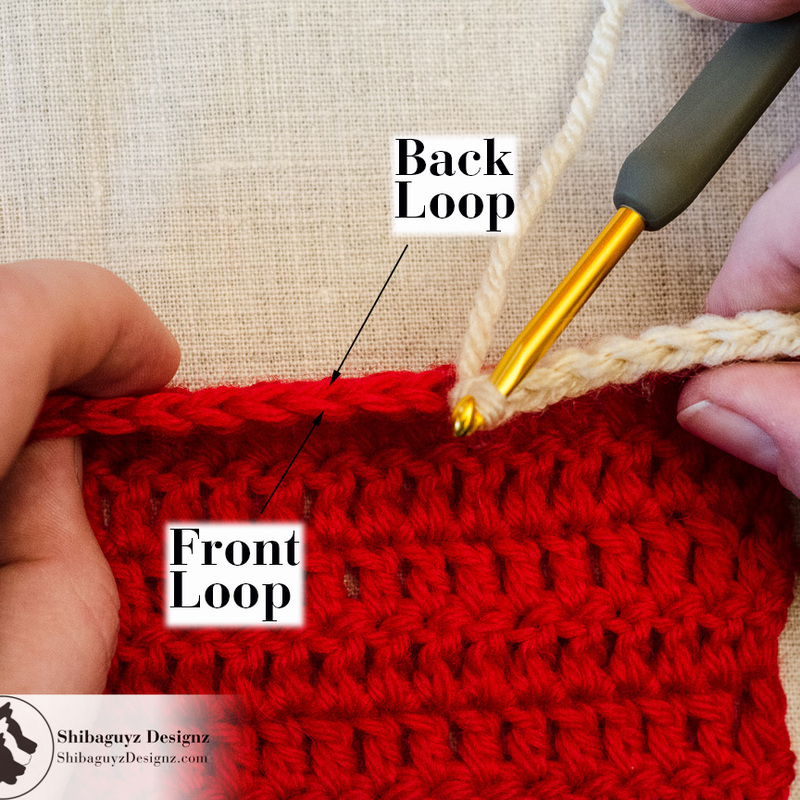
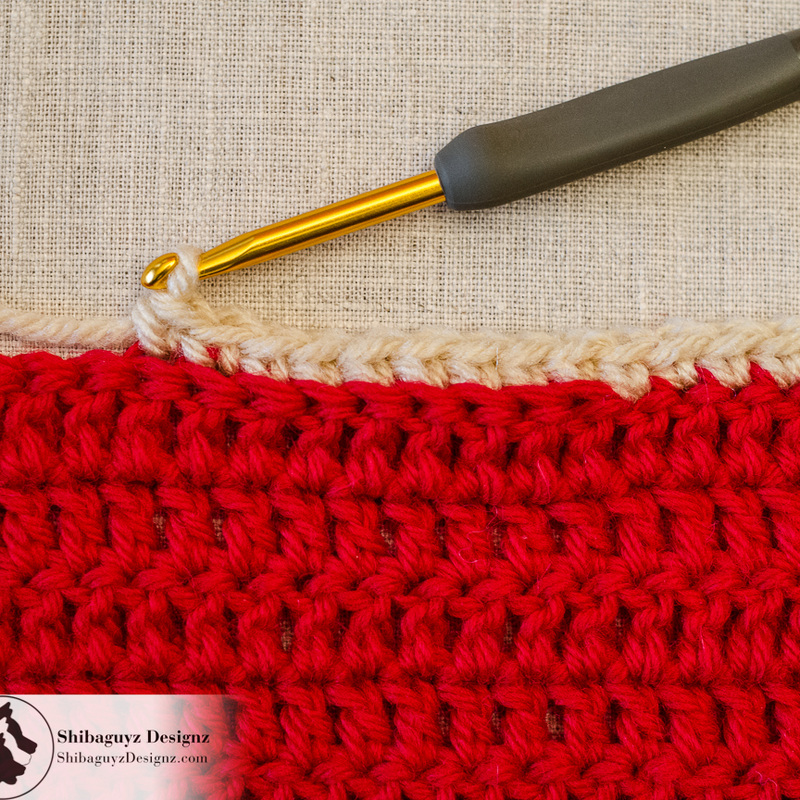
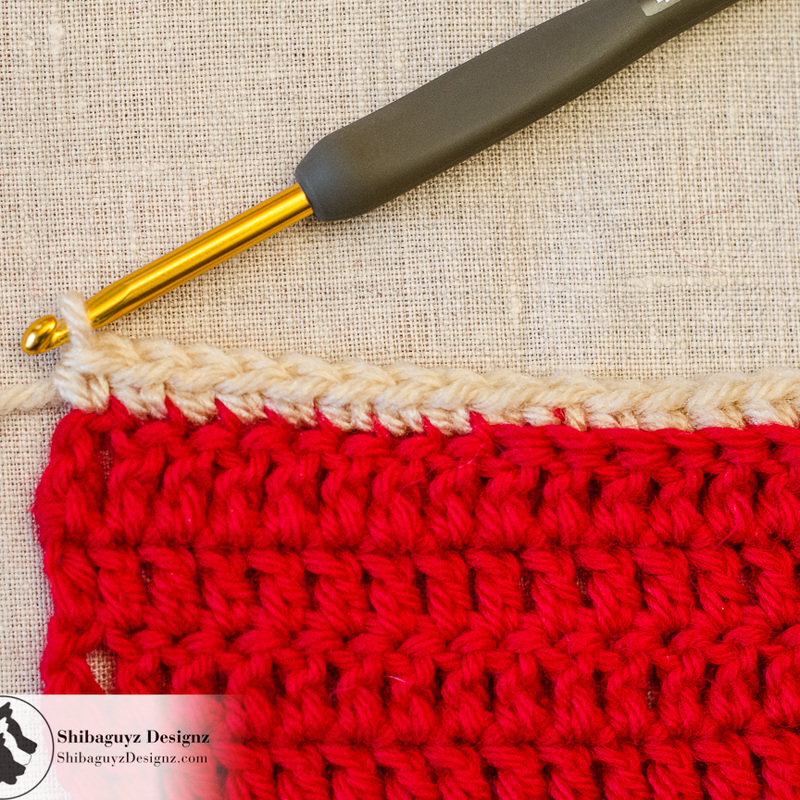
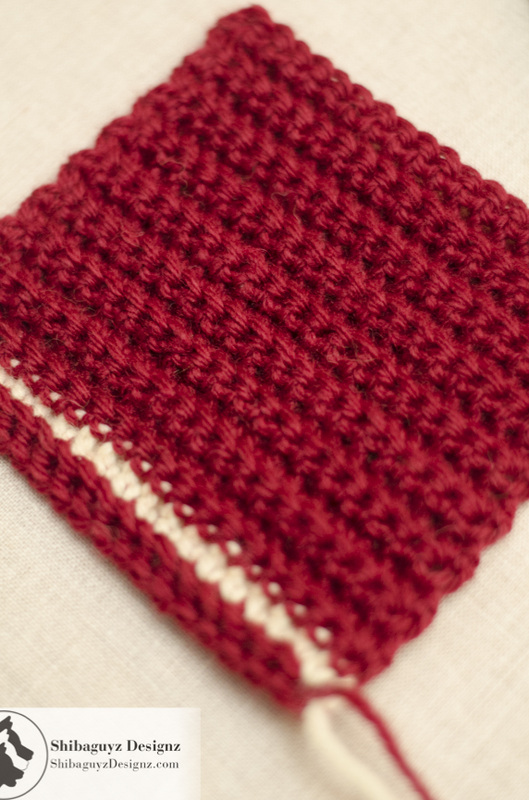
As you hold your own swatch in your hands, you will see that the stitches made in the back loop only leave a ridge on the front of your work. That ridge is created by the unworked front loops of the stitch you worked into. We'll show you how that unworked ridge comes into play in a minute…


Through the Front Loop

1. Back to our top view, you can see that we've inserted our crochet hook under JUST the front loop of the next stitch. There is only ONE LOOP lying on top of the hook.

This is where you insert your crochet hook when the pattern reads:

Sc tfl of next st
Or
Sc tflo of next st

tfl = through the front loop
tflo = through the front loop only

How To Make Different Crochet Fabrics By Inserting Your Hook Under Different Loops - A free step-by-step crochet tutorial by Shibaguyz Designz
Again… different pattern templates for different companies/publishers/magazines sometimes means different wording for the same stitch. In all cases, tfl and tflo both mean to insert your crochet into the front loop of the next stitch to make your new stitch.
How To Make Different Crochet Fabrics By Inserting Your Hook Under Different Loops - A free step-by-step crochet tutorial by Shibaguyz Designz

2. Continuing the making of the Single Crochet stitch:

"…yarn over and draw up a loop…"

This time, the new loop is drawn from back to front under ONLY the front loop.

3. And here's a neat little row of eight (8) single crochet stitches made by inserting our hook under ONLY the front loops.

Compare again and you will see how these single crochet tfl stitches differ from the six sc tbl stitches on the right of the photo.

The new stitches are made around the front loop of the stitch so the unworked loop is sitting on the back side of your work. Again… we'll show you how that kind of fabric plays out in a minute.

How To Make Different Crochet Fabrics By Inserting Your Hook Under Different Loops - A free step-by-step crochet tutorial by Shibaguyz Designz

Finished Fabrics
Both Loops Finished Fabric


And here are those finished fabrics! The first is stitches made by inserting your crochet hook under both loops. In this photo, you can see Double Crochet stitches in the darker colored yarn and Single Crochet stitches in the lighter colored yarn.

How To Make Different Crochet Fabrics By Inserting Your Hook Under Different Loops - A free step-by-step crochet tutorial by Shibaguyz Designz

How To Make Different Crochet Fabrics By Inserting Your Hook Under Different Loops - A free step-by-step crochet tutorial by Shibaguyz Designz


This is an angled shot of that same fabric so you can see how beautifully the stitches stack and line up making a gorgeous textured fabric.

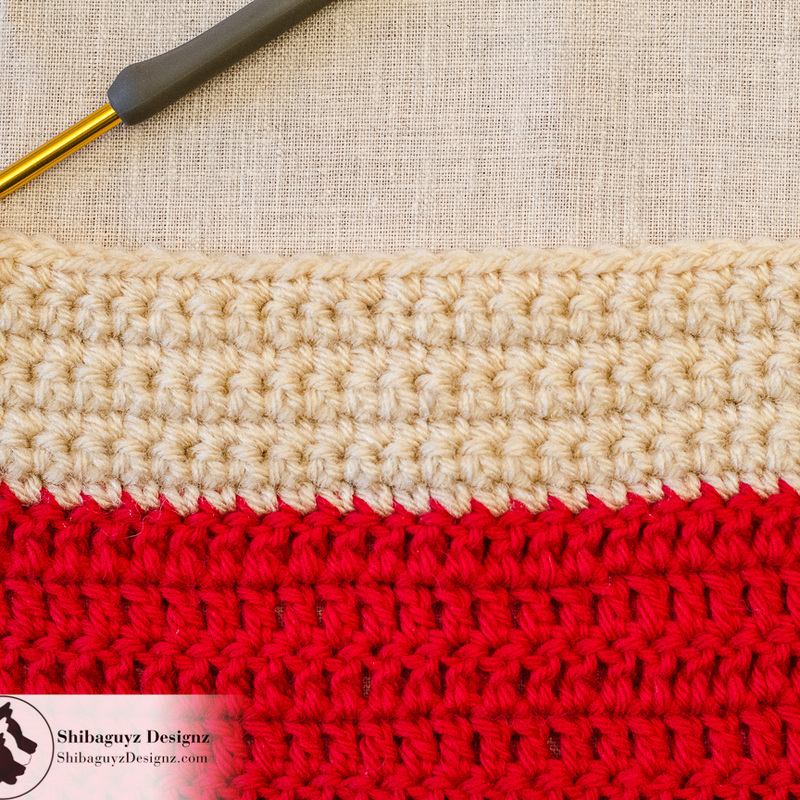
This fabric is highly versatile depending on your crochet hook size, the stitch and yarn you use to create it. We encourage you to play with different stitches (single crochet, half double crochet, double crochet) and types of yarn and hook sizes to see what kind of fabric variations you can create.

Through the Back Loop Finished Fabric

And THIS is what you get when you keep working Single Crochet tbl stitches. Crochet Ribbing! Yup… honest to goodness crochet ribbing that is light and springy and reversible. We use this in SO many of our designs from hats to dresses, as as accents on sleeves and borders. This is a FAB texture stitch to have in your crochet toolbox!

For a more in-depth tutorial on Single Crochet tbl Ribbing, check out our tutorial here:

How To Make Reversible Horizontal Back Loop Crochet Ribbing

WARNING: Once you start making this stitch, it's kind of addicting and hard to stop… just sayin'…

How To Make Different Crochet Fabrics By Inserting Your Hook Under Different Loops - A free step-by-step crochet tutorial by Shibaguyz Designz

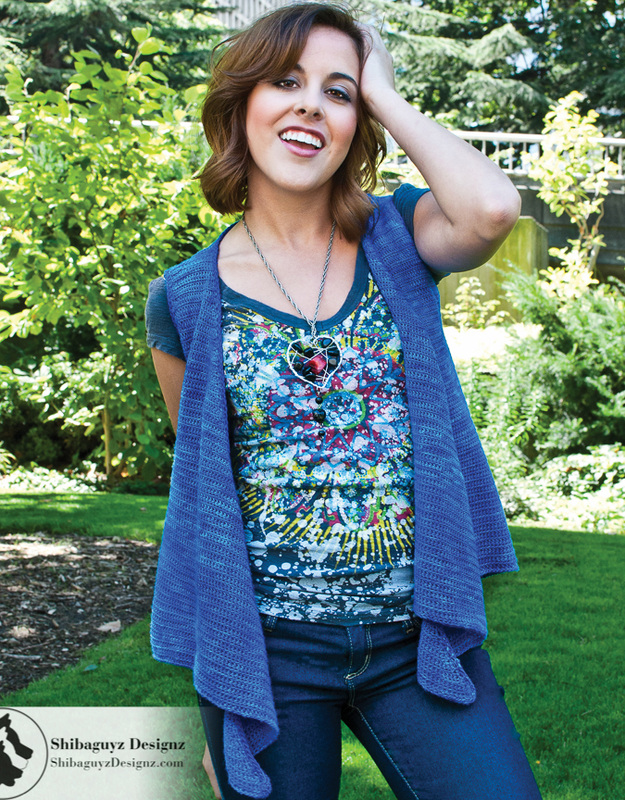
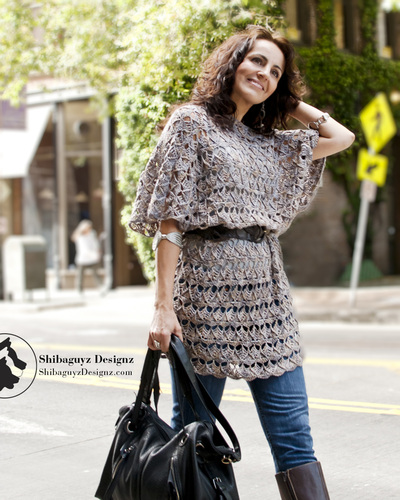
Through the Front Loop Finished Fabric

And this is the type of FAB fabric you get when you work in Single Crochet tfl stitches. This is a vest from our book Urban Edge. Check out the drape and flow of that fabric!

This particular vest is made in all sc tfl and the resulting fabric is flat with a little texture from that unworked loop and the drape is AH-MAY-ZING! Seriously… you have to try making this type of fabric in different yarns with different hook sizes. And, yes, you get a similar result from half double crochet tfl. We've also swatched in double crochet tfl but the fabric ends up being actually a little to loose for our liking in most cases. That said… swatch it up! Y'all might LOVE it and use it for your next project!

You can click on the photos below to see more of Urban Edge

The Seattle Vest from Urban Edge Crochet Pattern Book by Shibaguyz Designz


TAADAA!!


A Final Word… or two…

In the end, yes, it's all about choices. The more choices we have in our crochet toolbox, the more versatile we can be as stitchers when it comes to making our projects. If you wanted to buy fabric and walked into a fabric store and they only had three or four bolts of fabric, your choices would be limited as to what you could make. Can you imagine your kitchen being stocked with only three or four items… TOTAL?!? Meal options would be a little limited… and would become boring really fast. Likewise, your crochet toolbox needs to have options. When you want to make a project and need a certain type of fabric, the more skillz you have to pull from your crochet toolbox, the more likely you are to be able to make exactly what YOU want.

So give these different loops a try. Make some swatches and play with the stitches, yarn, and hook size to see what kind of fabric variations you come up with.

As with any new technique, it takes a few times to get the muscles to coordinate so the result is flawless. That's okay… As always… experment! Play! SWATCH! That's how we get better at what we do and how we make our already good crochet skills FAB!

And… hey… if you aren't happy with your experiment rip it out and go again! You'll get it!
 

Thanks for dropping by for another Technique Tuesday! Our aim is to build the skillz of our FAB fiber community here on the web and it's always FAB to hear from you all that what we are doing is helping you and your fiber friends.

Check back weekly for our Technique Tuesday features and make sure you check us out on Facebook, Twitter, Pinterest. Those links are down there at the bottom of the post. We'd love to hear from you!

Stitch On!
S&J

Oh hey… before you go… Here are a few more pages we thought you might be interested in. Click on any of the photos below… enjoy!
MAGIC Adjustable Ring For Starting Crochet In-The-Round
No More Wonky Crochet Edges EH-VAR With This Easy Technique
The PERFECT Light & Lacy Crochet Tunic Pattern
A Crochet Hooded Vest Pattern He Will LOVE Wearing!
Come look us up on Facebook, Twitter, and Pinterest by clicking on one of these icons.
1 Comment
Cherie Shirey
3/30/2015 11:37:08 am

As a collector of tutorials of crochet techniques on Pinterest as a source for myself and others, I have seen many tutorials and I appreciate everyone's work. That said, the quality of your tutorials, especially the drawing to show what the head and the post are, exceed my wildest expectations. I have crocheted for many years, completely stopped and lated started again (which took a good two months to get up to speed again) focusing on afghans for gifts and squares for charity! I want to expand my skills to include baby clothes and stuffed animals for charity and for a very special baby! Your tutorials are for everyone; new to crochet, returning to crochet and learning new techniques. I wish they were around when I stopped at afghans! :)

Reply

Your comment will be posted after it is approved.


Leave a Reply.

    Author

    Shannon and Jason

    RSS Feed

    Sign Up For Our Newsletter

    Leave us a tip to help us do what we do!

    Picture
    BERNINA Ambassador Badge
    Shibaguyz Aurifil Thread Collection

    Archives

    May 2024
    September 2022
    June 2022
    February 2022
    June 2021
    November 2020
    September 2020
    June 2020
    May 2020
    April 2020
    March 2020
    January 2020
    February 2019
    December 2018
    November 2018
    August 2018
    July 2018
    May 2018
    April 2018
    March 2018
    February 2018
    January 2018
    December 2017
    November 2017
    October 2017
    September 2017
    August 2017
    July 2017
    March 2017
    February 2017
    January 2017
    November 2016
    October 2016
    September 2016
    July 2016
    June 2016
    May 2016
    April 2016
    March 2016
    February 2016
    November 2015
    August 2015
    July 2015
    June 2015
    May 2015
    April 2015
    March 2015
    February 2015
    January 2015
    December 2014
    November 2014
    October 2014
    September 2014
    August 2014
    July 2014
    April 2014
    March 2014
    January 2014

    www.dickblick.com
    Picture
    Picture

    RSS Feed

    Categories

    All
    Afghan
    Aurifil
    Books
    Boro
    Camp STITCHES
    Classes
    Cleaning
    Clip On
    Clover
    Cowl
    Craft
    Craftsy
    CraftU Classes
    Crochet
    Crochet Geometry
    Daylight
    Daylight Company
    Design
    Designer Crochet
    Digital Download
    Donate
    Download
    English Paper Piecing
    Event
    Free
    Giveaway
    Hand Cream
    Hooks
    Inspirations
    International Crochet Month
    Interview
    Interweave
    Knit
    Knitting
    Lamp
    Marcus
    Marcus Fabrics
    Men
    Menswear
    National Craft Month
    National Crochet Month
    Needles
    Online Classes
    Ottlite
    Pattern
    Patterns
    Paypal
    Photography
    Podcast
    Prize
    Product Review
    Project
    Quilt
    Quilting
    Recipe
    Rotary Cutter
    Sashiko
    Season Of Giving Away
    Sew Expo
    Sewing
    Shibaguyz
    Shibaguyz Designz
    Shibaguyz Designz Indie Maker Pattern
    Shibaguyz LIVE
    Shibaguyz Photography
    Shop
    Soak
    STITCHES Events
    Sweater
    Thread
    Tool School
    Tools Of The Trade
    Travel Lamp
    Tutorials
    Vogue Knitting LIVE
    Walkthrough
    Warm Up America
    Wash
    Weaving
    Women
    Yarn
    Zoom Loom

    www.dickblick.com

Stay current on the news and events from Shannon and Jason as well as exclusive offers and tutorials available only for our newsletter subscribers.

* indicates required
Email Format
Colonial Needle Co 100 year logo
  • Home
  • Blog
    • Tips
    • tutorials
  • Our Books
    • Scrappy Wonky Quilt Block Extravaganza
    • Contemporary Kogin-zashi
    • Boro & Sashiko, Harmonious Imperfection: The Art of Japanese Mending & Stitching
    • Sashiko Stitching
    • Complete Crochet Course
    • Designer Crochet
    • Crochet Geometry
  • All Shopping
    • Books and Digital Patterns
    • Streaming Classes
    • Sashiko Shop
    • Thread
    • Fabric
  • Classes
  • Sashiko
  • About
    • Portfolio
  • Contact and Subscribe
  • Sponsors
  • Portfolio