SHANNON & JASON
  • Home
  • Blog
    • Tips
    • tutorials
  • Our Books
    • Contemporary Kogin-zashi
    • Boro & Sashiko, Harmonious Imperfection: The Art of Japanese Mending & Stitching
    • Complete Crochet Course
    • Designer Crochet
    • Crochet Geometry
  • All Shopping
    • Books and Digital Patterns
    • Sashiko Shop
    • Thread
    • Fabric
    • Stitchips
  • Classes
  • Sashiko
  • About
  • Contact and Subscribe
  • Sponsors

 Shannon & Jason's Blog 

Technique Tuesday – Reversible Horizontal Back Loop Crochet Ribbing Tutorial

10/30/2014

1 Comment


How To Make Reversible Horizontal Back Loop Crochet Ribbing


Technique Tuesday - Step-by-step crochet and knitting photo tutorials by Shibaguyz Designz

Technique

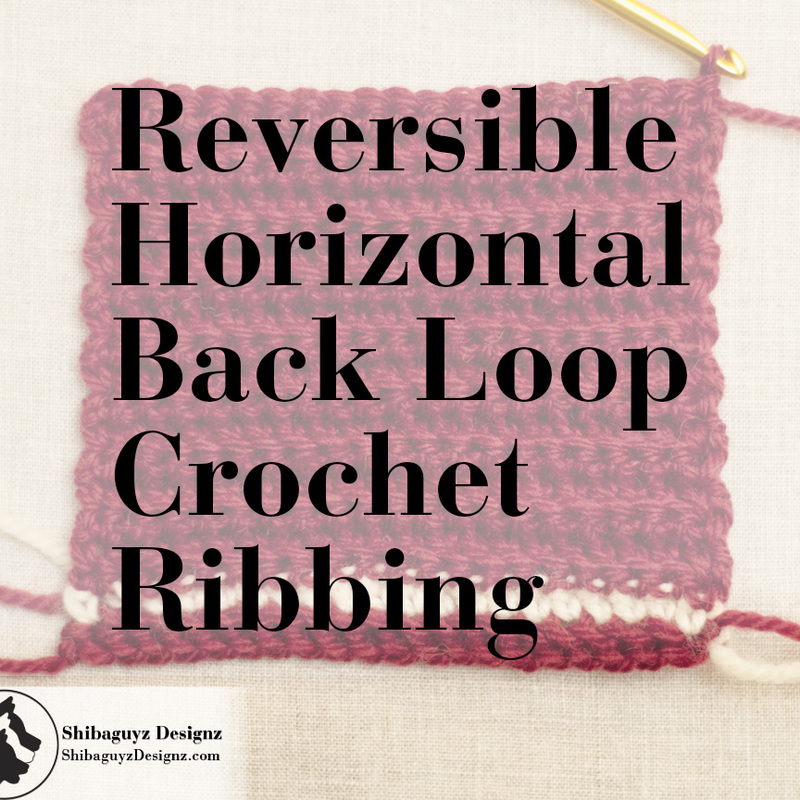
Reversible Horizontal Back Loop Crochet Ribbing

Technique Tuesday - A free step-by-step photo tutorial for How to Make Reversible Horizontal Back Loop Crochet Ribbing by Shibaguyz Designz

What is it?

Reversible Horizontal Back Loop Crochet Ribbing is the only non-post stitch technique for making Crochet Ribbing.

Reversible Horizontal Back Loop Crochet Ribbing looks the same from both sides and is constructed horizontally by working ONLY in the Back Loops of the crochet stitches of each row.

As the name indicates, Reversible Horizontal Back Loop Crochet Ribbing is made horizontally which means the wales (the raised ridges) and the troughs (the contrasting lower lines) are created by working from side to side in relation to the way we normally see ribbing – in vertical lines.

The Reversible Horizontal Back Loop Crochet Ribbing technique for making crochet ribbing is very different from the previous methods we have covered here for making crochet ribbing. Reversible Horizontal Back Loop Crochet Ribbing is made by working every row of stitches in the Back Loops ONLY of the previous row of crochet stitches. Working in the Back Loop only of the stitches leaves the front loops standing out against the surface of the crochet fabric with makes the lines of wales needed to create ribbing.

While we have used Slip Stitch, Single Crochet, and Half Double Crochet stitches for making Reversible Horizontal Back Loop Crochet Ribbing, today we will be demonstrating with Single Crochet stitches. For your first attempts, Single Crochet Through the Back Loop (sc tbl) will give you the best results. That said… DEFINITELY try Half Double Crochet Through the Back Loop (hdc tbl) then try Slip Stitch Through the Back Loop (sl st tbl). You will love both results although, sl st tbl does take a little practice and some patience to master… maybe we'll cover that one in a post all by itself… later…
Click "Read More" link below for the full post.

Why Use It?

Reversible Horizontal Back Loop Crochet Ribbing is a FAB textural and visual element with excellent functional spring back to the finished fabric.

Texturally, the wales and troughs of this reversible ribbing provide depth and contrast to crochet fabric. The height and depth of the wales and troughs will vary greatly depending on the size of the yarn used and the hook used.

Fingering, sock, or DK weight yarns worked on smaller hooks produce perfect little ribs that are FAB when used in garment hems, sleeves, necklines, gloves, wristwarmers, and hat brims. Switch up to a worsted weight or even a chunky weight yarn with larger hooks and you will be rewarded with equally chunky ribs that feel amazing and are FAB for hats, wristwarmers and gloves, cuffs, sleeves, and chunky sweater hems and necklines.

Play around with differently spun yarns as well. You will LOVE the textural difference between a finely spun fingering weight and a worsted weight single. I play with these different textures in Reversible Horizontal Back Loop Crochet Ribbing for hours and hours at a time and the results are always amazing to me.

Visually, the lines of the wales and troughs are striking when used in the traditional vertical alignment of ribbing along garment hems (of even an entire garment!), hats, wristwarmers… heck anywhere you want the visual appeal of a long, clean line.

Equally striking is Reversible Horizontal Back Loop Crochet Ribbing used in a horizontal alignment for detailing around cuffs and hems. Again… the possibilities are endless for such a strong visual element with long, clean lines.

No matter the combination of yarns and hook sizes, you are sure to notice your finished Reversible Horizontal Back Loop Crochet Ribbing fabric has a wonderful spring back quality to it. This method of working in the back loop only of ever row of crochet stitches gives the finished fabric a gentle elasticity that can be used in garments and accessories to hold fabric securely in place and provide support without binding. This is particularly valuable in hems of garments you want to stay in place without riding up. The subtle elasticity is also FAB for keeping hats and the cuffs of gloves and wristwarmers in place during wear.

NOTE: To maintain this elasticity, we recommend blocking only from the ends of the rows. This will line up the wales and troughs nicely without stretching your ribbing too far apart. Of course, for a more relaxed ribbing fit or if you only want the LOOK of ribbing without any of the holding properties, block your fabric in both directions to both line up the stitches and to separate the ribs to your desired width.

To Make Today's Swatch
Here's a list of materials we used to make today's swatch. You should, of course, experiment (as we have) with different yarn weights and hook sizes to see what kinds of FAB fabrics you come up with. These materials listed are what we recommend you use for your learning swatches.

Yarn Used
CYCA 4
Worsted Weight, 100% Pure Wool

Hook Used
H-8/5.00mm Crochet Hook

Skillz Used
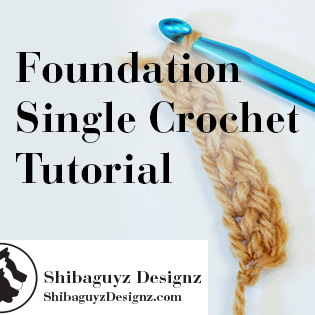
Foundation Single Crochet (Fsc) – How to make the Foundation Single Crochet stitch
Single Crochet Through the Back Loop (Sc tbl)

Break It Down
Here is the pattern for our swatch:
 
Reversible Horizontal Back Loop Crochet Ribbing
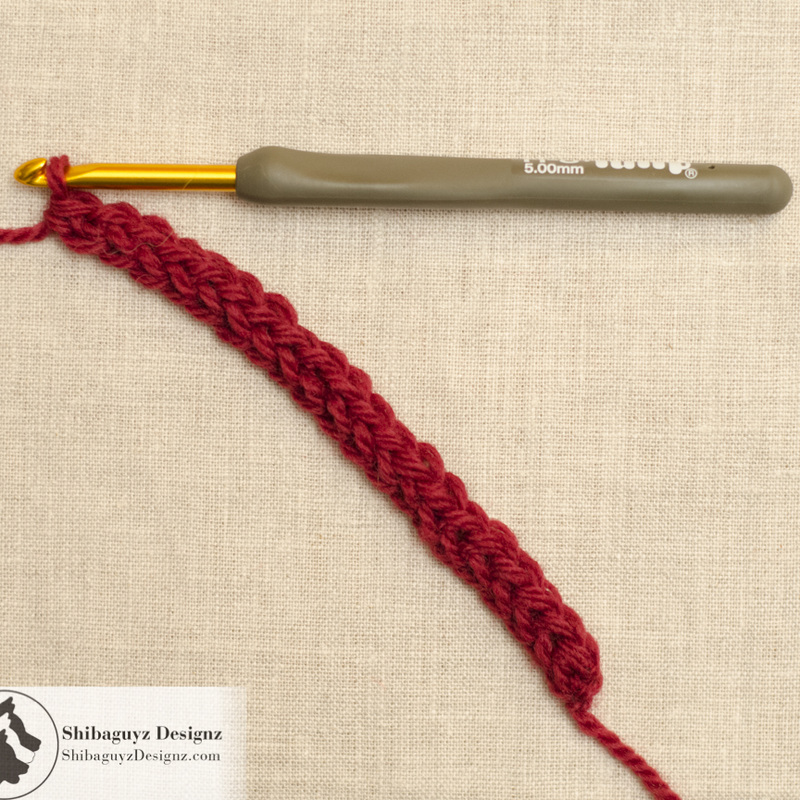
Row 1: Fsc 20, turn.
Row 2: Ch 1, sc in first st, sc tbl of each st across row to last st, sc in last st, turn.
Row 3–19: Repeat Row 2.
Fasten off.

1. Row 1: 20 Foundation Single Crochet stitches

Again, for a refresher on the Foundation Single Crochet stitch, you can head on over to our tutorial here: How to make the Foundation Single Crochet Stitch

We'll wait… la la la la la la la…

You're back! Good… let's move on…
Technique Tuesday - How to make Reversible Horizontal Back Loop Crochet Ribbing - a step-by-step photo tutorial by Shibaguyz Designz

Technique Tuesday - How to make Reversible Horizontal Back Loop Crochet Ribbing - a step-by-step photo tutorial by Shibaguyz Designz
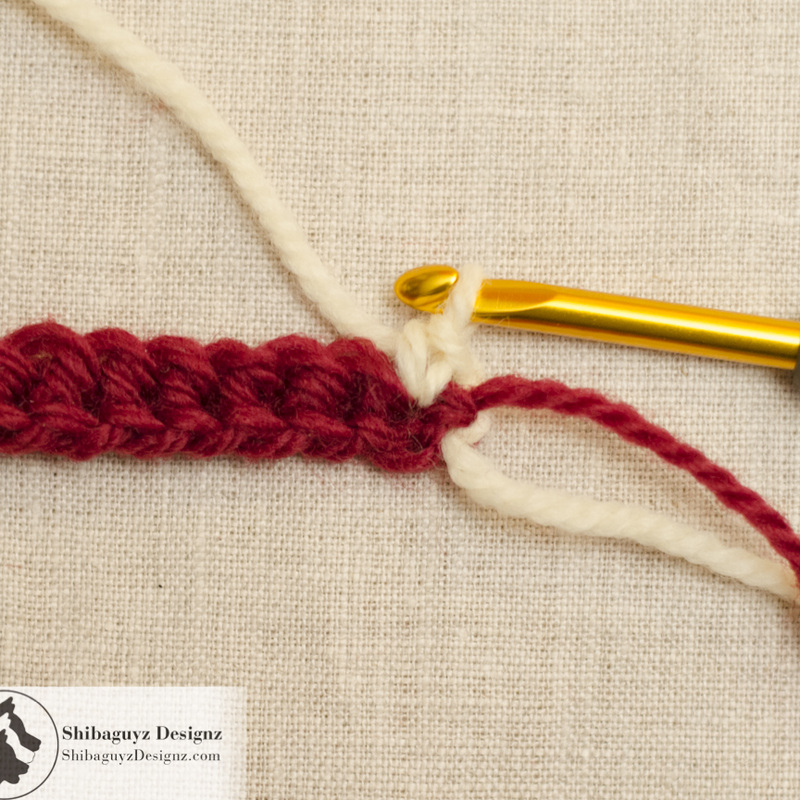
2. Ch 1, Single Crochet in first stitch…

We've switched to a lighter colored yarn here to make the stitches easier to see in the photos.

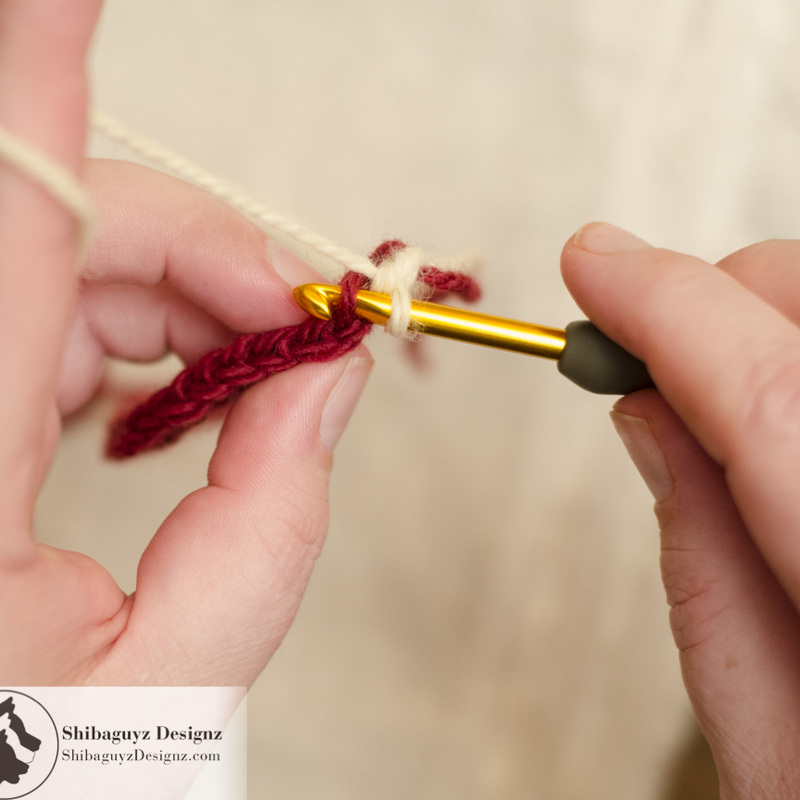
 While you CAN work a sc tbl here in this first stitch, we have found it produces a small hole in the edge of the fabric due to stretching out that first stitch. For hems and borders, we don't like that… not at all… Working a regular Single Crochet stitch in the first and last stitches of each row makes a neat, tidy border and does not adversely affect the integrity of the ribbed fabric.

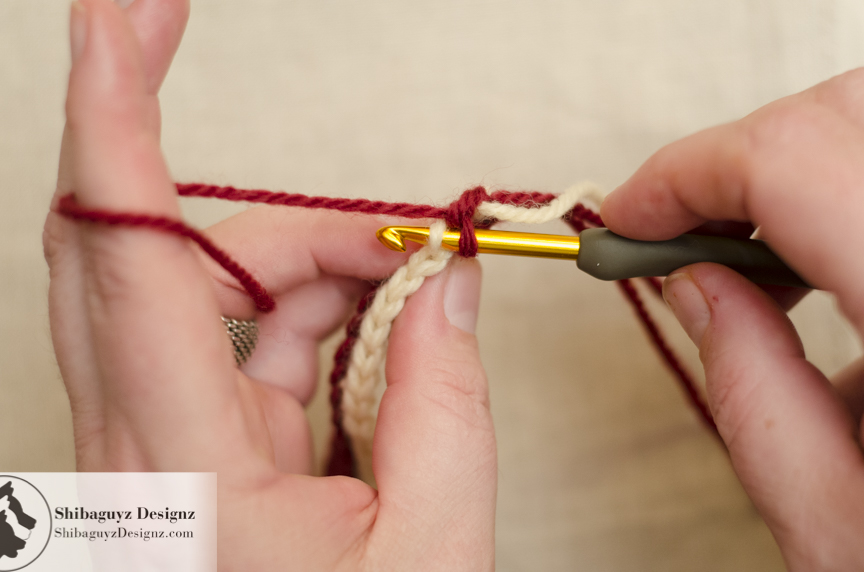
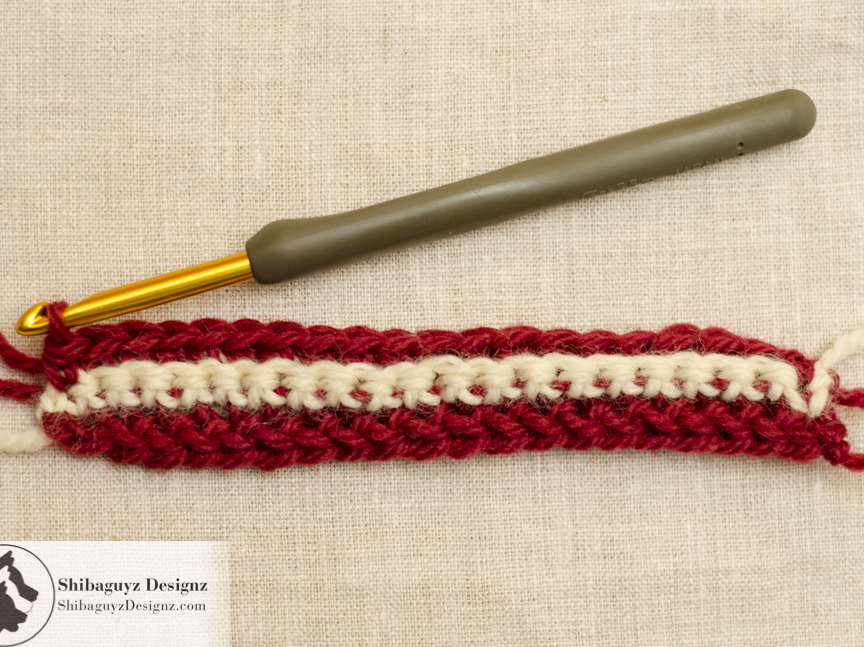
3. …Single Crochet Through the Back Loop…

Here's where the magical ribbing starts!

With the assistance of hands, you can see the hook is inserted into the next stitch through the loop that is farthest away from me as I am holding the fabric for this current row. This is the back loop.
 
NOTE: No matter what row you are working on, you will always insert your hook and make your stitch in the loop that is farthest from you as you are holding the fabric for working that row. This is what creates the crochet ribbing!

Stitch on… you'll see…
Technique Tuesday - How to make Reversible Horizontal Back Loop Crochet Ribbing - a step-by-step photo tutorial by Shibaguyz Designz

Technique Tuesday - How to make Reversible Horizontal Back Loop Crochet Ribbing - a step-by-step photo tutorial by Shibaguyz Designz
4. Continued…

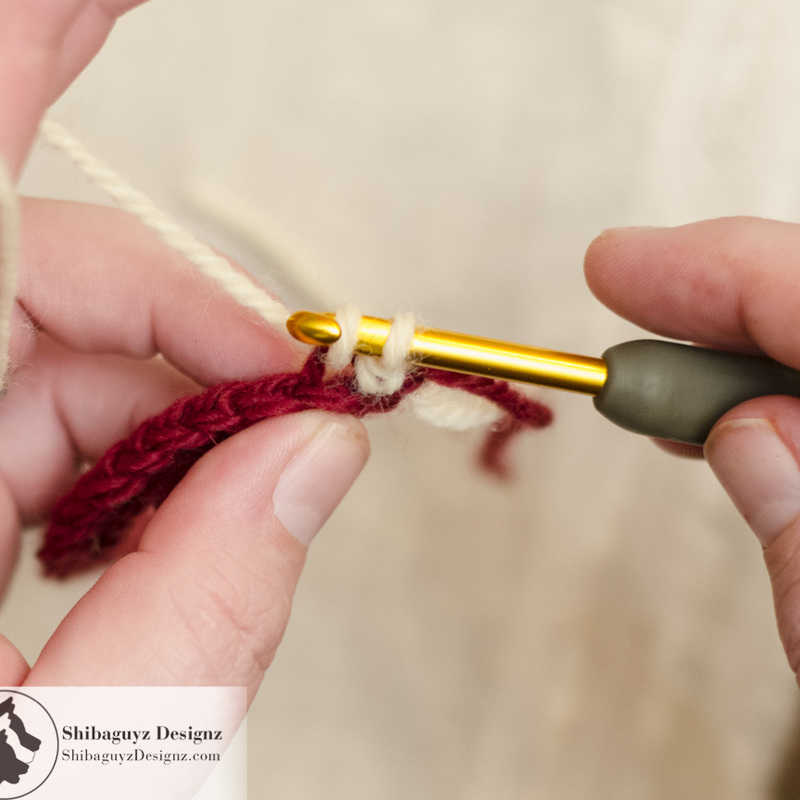
Drawing up that first loop for my Single Crochet stitch. You can see the yarn is only coming up through the Back Loop.

5. …one more step…

And the finished Single Crochet Through the Back Loop.

NOTE: We have seen this stitch written and abbreviated two different ways:
Single Crochet Through the Back Loop Only (sc tblo)
Single Crochet Through the Back Loop (sc tbl)

Depending on the naming guidelines for each company or the age of the pattern, you might see it both ways. Generally, we use "sc tbl."
Technique Tuesday - How to make Reversible Horizontal Back Loop Crochet Ribbing - a step-by-step photo tutorial by Shibaguyz Designz

Technique Tuesday - How to make Reversible Horizontal Back Loop Crochet Ribbing - a step-by-step photo tutorial by Shibaguyz Designz
6. Another one…

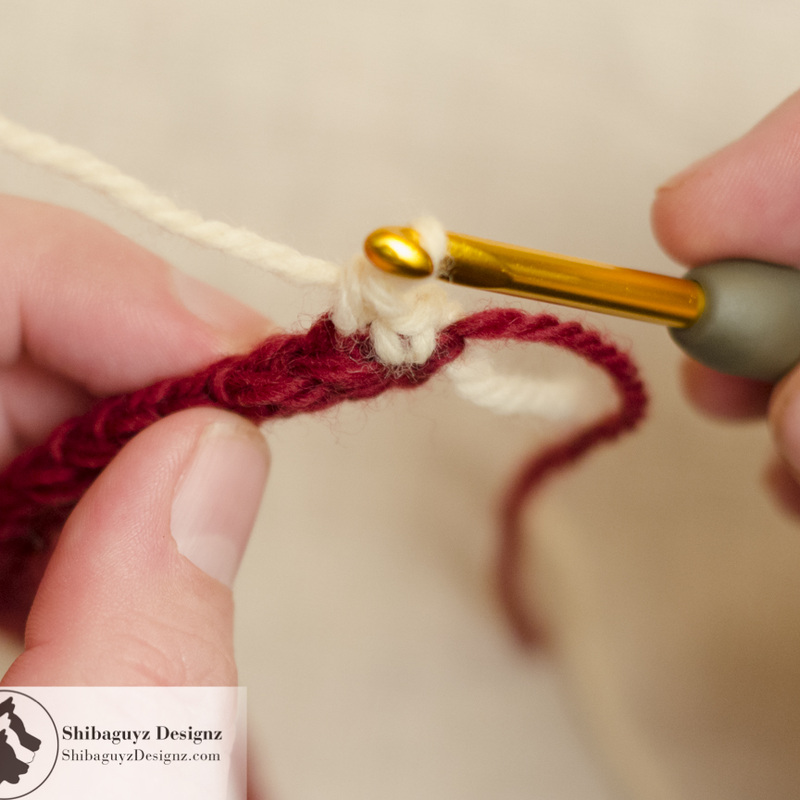
Here's the next Single Crochet Through the Back Loop made. You can definitely see how the unworked Front Loop shows the beginnings of the ribbing ridges.

7. …sc tbl of each st across row to last st, sc in last st…

One completed row of Single Crochet Through the Back Loop with regular Single Crochet stitches worked in the first and last stitches of the row.
Technique Tuesday - How to make Reversible Horizontal Back Loop Crochet Ribbing - a step-by-step photo tutorial by Shibaguyz Designz

Technique Tuesday - How to make Reversible Horizontal Back Loop Crochet Ribbing - a step-by-step photo tutorial by Shibaguyz Designz
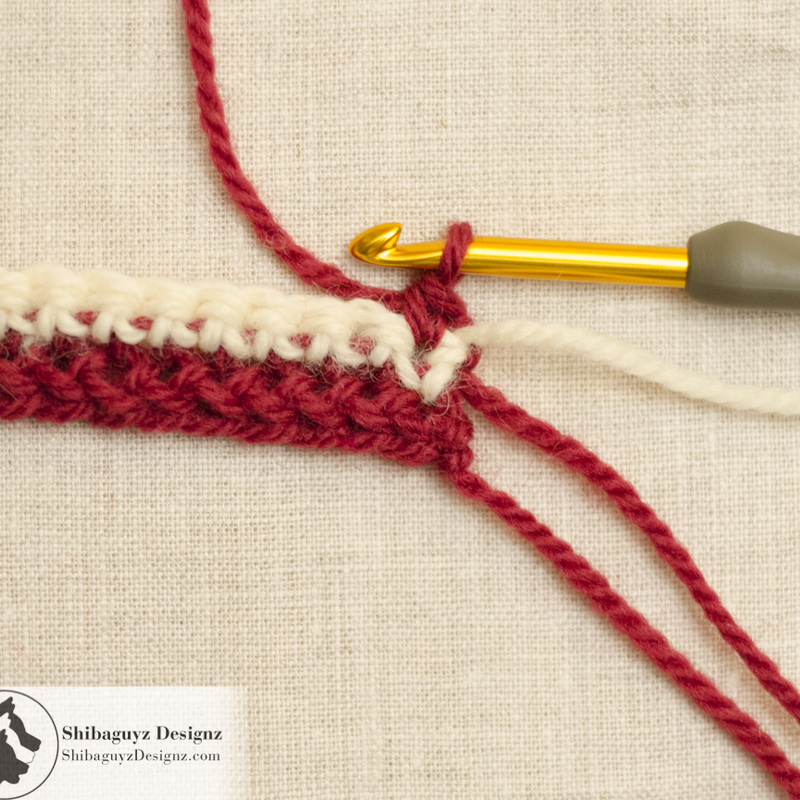
8. Row 3

Same as Row 2, we've turned our work and made a regular Single Crochet in the first stitch of the row.

We've switched to the darker colored yarn here… again… making the stitches easier to see. That said… after you've worked out the kinks of this technique. Go back and remake today's swatch alternating light and dark colors every row. Just do it… trust us…

9. Single Crochet Through the Back Loop

Again, showing the hook inserted into only the Back Loop of the next stitch.

Remember, no matter which row you are working, the Back Loop always the loop farthest away from you as you are holding the fabric to work that current row.
Technique Tuesday - How to make Reversible Horizontal Back Loop Crochet Ribbing - a step-by-step photo tutorial by Shibaguyz Designz

Technique Tuesday - How to make Reversible Horizontal Back Loop Crochet Ribbing - a step-by-step photo tutorial by Shibaguyz Designz
10. Finished Single Crochet Through the Back Loop

And that first Single Crochet Through the Back Loop stitch finished.

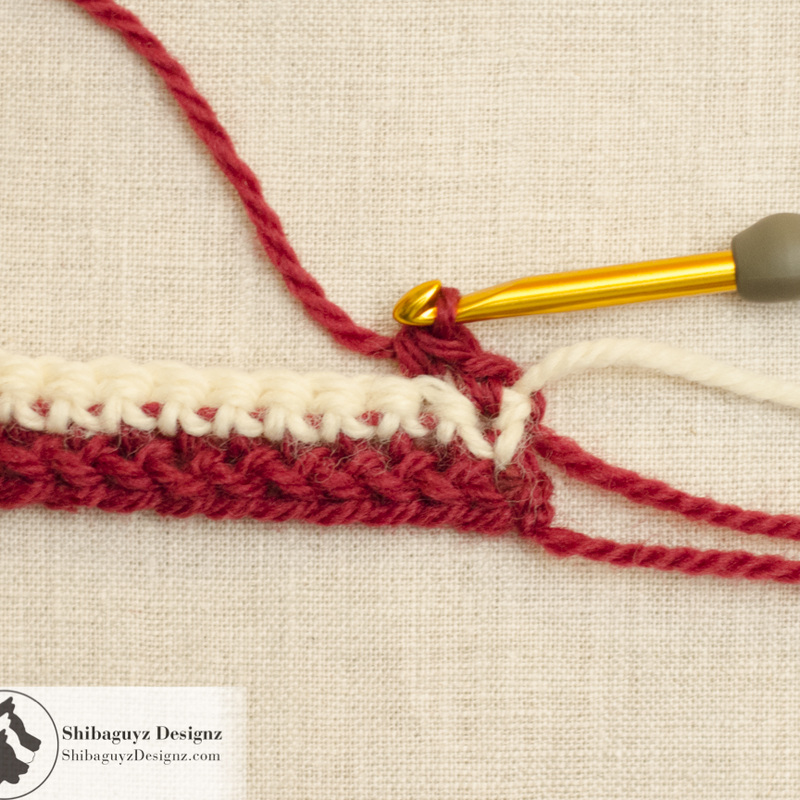
11. …sc tbl of each st across row to last st, sc in last st…

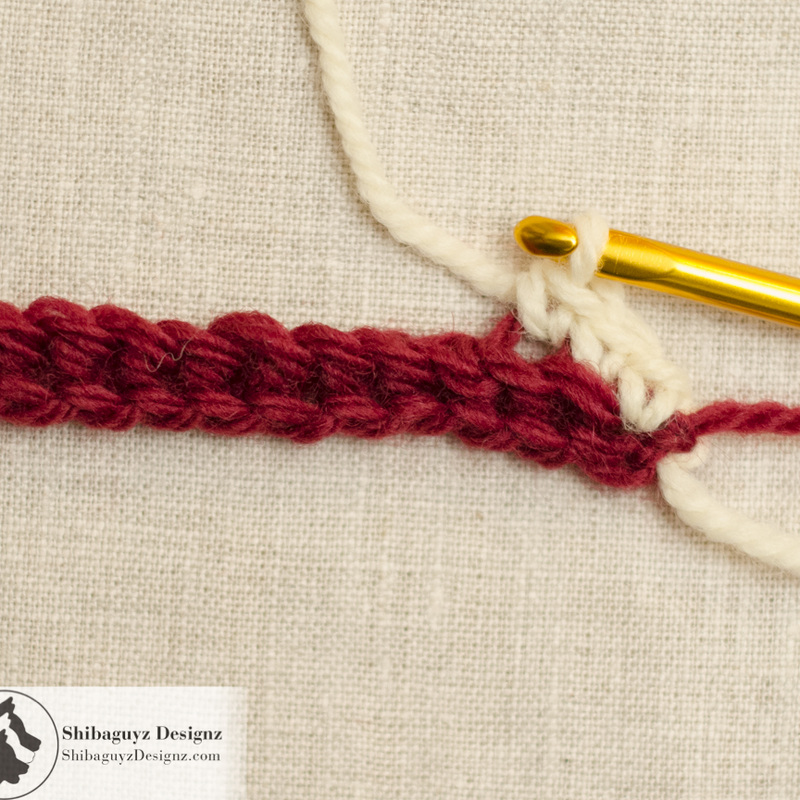
Another completed row of Single Crochet Through the Back Loop stitches with a regular Single Crochet worked in the first and last stitches of the row.

Now you can REALLY see how working every row of stitches in the Back Loop makes those wales and troughs stand out. LOVE it!
Technique Tuesday - How to make Reversible Horizontal Back Loop Crochet Ribbing - a step-by-step photo tutorial by Shibaguyz Designz

Technique Tuesday - How to make Reversible Horizontal Back Loop Crochet Ribbing - a step-by-step photo tutorial by Shibaguyz Designz
12. Row 4–19

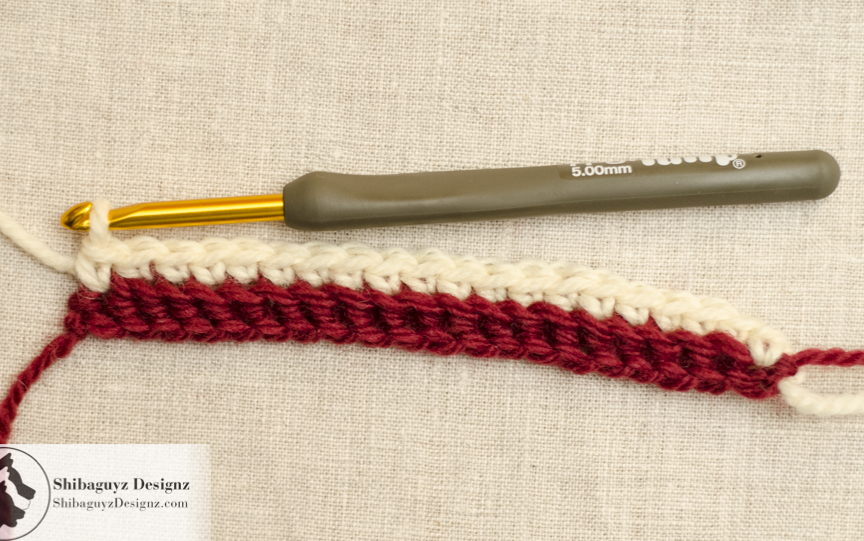
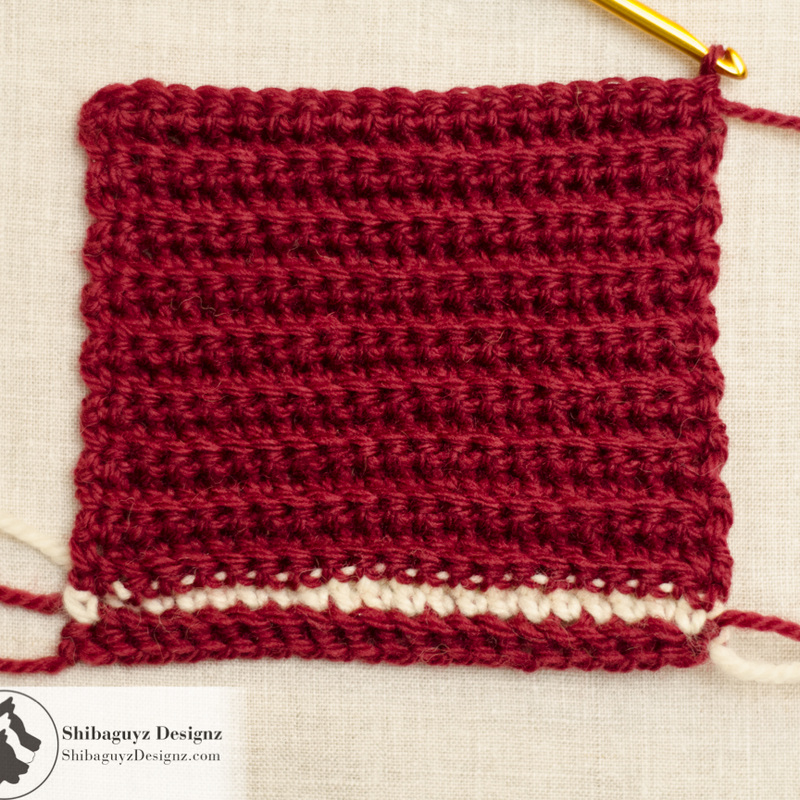
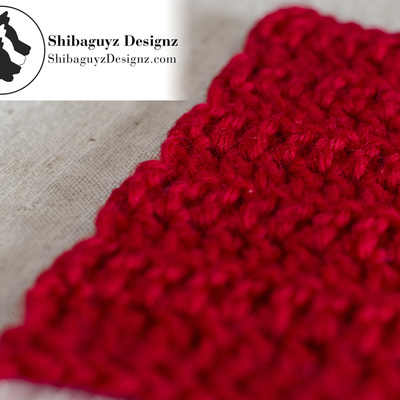
And here is your finished swatch of Reversible Horizontal Back Loop Crochet Ribbing.

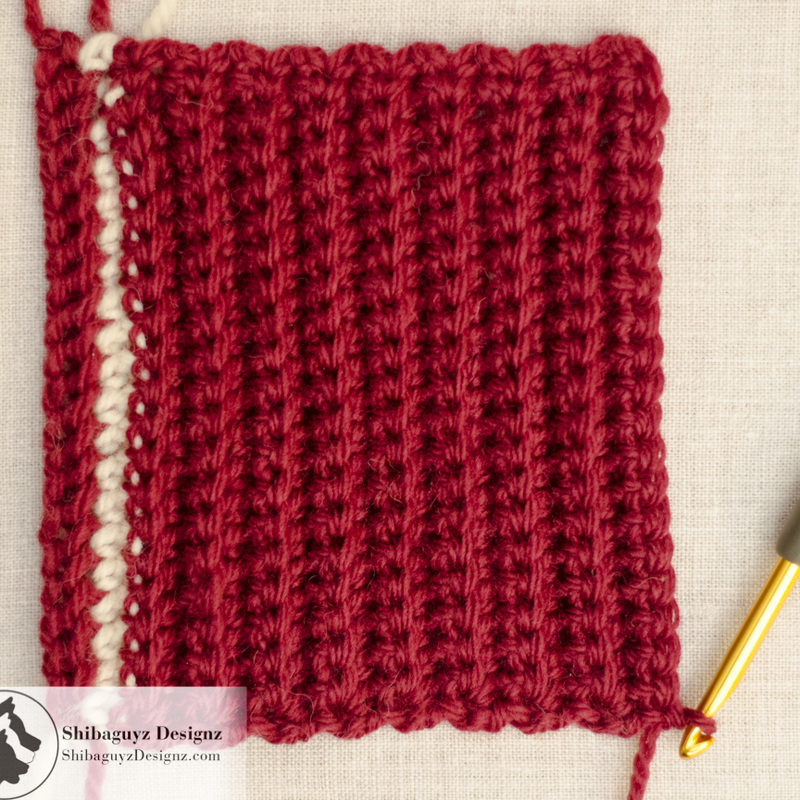
13. Rotate!
Here is that same swatch rotated one-quarter turn to demonstrate the traditional vertical alignment of the ribbing lines. You can see Row 1 on the left side of the photo and Row 19 on the right side of the photo. This is, of course, how this technique for making crochet ribbing comes by the Horizontal part of its name since it is constructed horizontally in relation to the traditional vertical alignment of ribbing lines. 

Technique Tuesday - How to make Reversible Horizontal Back Loop Crochet Ribbing - a step-by-step photo tutorial by Shibaguyz Designz

Technique Tuesday - How to make Reversible Horizontal Back Loop Crochet Ribbing - a step-by-step photo tutorial by Shibaguyz Designz
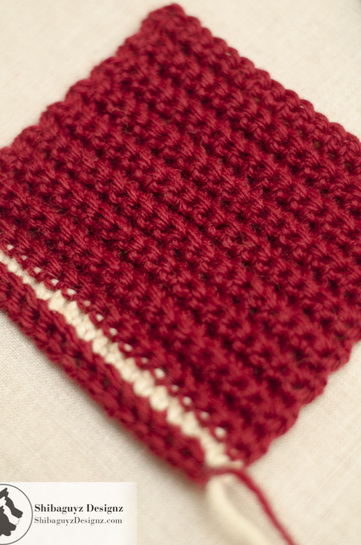
And the beauty shot… ooooooo… 


TAADAA!!


Remember, we don't block these swatches in our tutorials because we want you all to see exactly what you will be holding in your hands when you finish your swatch.

A Few Final Words
The first few times you practice this technique, we suggest using two colors of yarn just like we did so you can see which stitches go where more easily AND you can compare your work to our tutorial photos more easily.  After that, of course, you'll probably want to work in all one color… or not… remember our little recommendation up there in Step 8. Give it a try!

Also, do experiment with different yarn weights, with yarns spun differently, and with different hook sizes. We find going down one hook size is, sometimes, a good thing to tighten up the ribbing and give it a lot more elasticity. But you can and will decide for yourself.

As always with ANY new skill, all it takes is practice for new techniques to feel natural and easy for you. We recommend you stitch up a few swatches like ours, use our photo walk through to compare your stitches to make sure they are behaving and lining up correctly, and… hey… if you aren't happy rip 'em back out and go again! You'll get it!

Finally, PLEASE DO EXPERIMENT and PLAY with these techniques for creating crochet ribbing. NONE of our Technique Tuesday tutorials are meant to be the stopping point for your stitching. To the contrary, they are all meant to be a starting point where you experiment and play with with different yarn weights and hook sizes to see what kind of fabric you can create. Once you get the basics down and can create a swatch that looks like the ones pictured, STITCH ON! and create your own fabric variations.
 

Thanks for dropping by for another Technique Tuesday! Our aim is to build the skillz of our FAB fiber community here on the web and it's always FAB to hear from you all that what we are doing is helping you and your fiber friends.

Check back often or, better yet, click on that RSS Feed button over there in the right-hand column of the page you are on right now. That way you will always be up to date and never miss a thing!

Stitch On!
S&J

Oh hey… before you go… Here are a few more pages we thought you might be interested in. Click on any of the photos below… enjoy!


Come look us up on Facebook, Twitter, and Pinterest by clicking on one of these icons.


1 Comment
Viridianarcher
1/20/2015 07:06:18 pm

I used sc back loop ribbing to make a scarf, it came out beautifully, but I hadn't realised that the springiness of ribbing means you effectively have to crochet twice as much to make something the right length (or width, in my case) - so it was a very frantic few evenings just before Christmas Day when I was getting it finished!!

Reply

Your comment will be posted after it is approved.


Leave a Reply.

    Author

    Shannon and Jason

    RSS Feed

    Sign Up For Our Newsletter

    Leave us a tip to help us do what we do!

    BERNINA Ambassador Badge
    Daylight Company Lamps
    Shibaguyz Aurifil Thread Collection

    Archives

    September 2022
    June 2022
    February 2022
    June 2021
    November 2020
    September 2020
    June 2020
    May 2020
    April 2020
    March 2020
    January 2020
    February 2019
    December 2018
    November 2018
    August 2018
    July 2018
    May 2018
    April 2018
    March 2018
    February 2018
    January 2018
    December 2017
    November 2017
    October 2017
    September 2017
    August 2017
    July 2017
    March 2017
    February 2017
    January 2017
    November 2016
    October 2016
    September 2016
    July 2016
    June 2016
    May 2016
    April 2016
    March 2016
    February 2016
    November 2015
    August 2015
    July 2015
    June 2015
    May 2015
    April 2015
    March 2015
    February 2015
    January 2015
    December 2014
    November 2014
    October 2014
    September 2014
    August 2014
    July 2014
    April 2014
    March 2014
    January 2014

    www.dickblick.com
    Picture
    Picture

    RSS Feed

    Categories

    All
    Afghan
    Aurifil
    Books
    Boro
    Camp STITCHES
    Classes
    Cleaning
    Clip On
    Clover
    Cowl
    Craft
    Craftsy
    CraftU Classes
    Crochet
    Crochet Geometry
    Daylight
    Daylight Company
    Design
    Designer Crochet
    Digital Download
    Donate
    Download
    English Paper Piecing
    Event
    Free
    Giveaway
    Hand Cream
    Hooks
    Inspirations
    International Crochet Month
    Interview
    Interweave
    Knit
    Knitting
    Lamp
    Marcus
    Marcus Fabrics
    Men
    Menswear
    National Craft Month
    National Crochet Month
    Needles
    Online Classes
    Ottlite
    Pattern
    Patterns
    Paypal
    Photography
    Podcast
    Prize
    Product Review
    Project
    Quilt
    Quilting
    Recipe
    Rotary Cutter
    Sashiko
    Season Of Giving Away
    Sew Expo
    Sewing
    Shibaguyz
    Shibaguyz Designz
    Shibaguyz Designz Indie Maker Pattern
    Shibaguyz LIVE
    Shibaguyz Photography
    Shop
    Soak
    STITCHES Events
    Sweater
    Thread
    Tool School
    Tools Of The Trade
    Travel Lamp
    Tutorials
    Vogue Knitting LIVE
    Walkthrough
    Warm Up America
    Wash
    Weaving
    Women
    Yarn
    Zoom Loom

    www.dickblick.com

Stay current on the news and events from Shannon and Jason as well as exclusive offers and tutorials available only for our newsletter subscribers.

* indicates required
Email Format

  • Home
  • Blog
    • Tips
    • tutorials
  • Our Books
    • Contemporary Kogin-zashi
    • Boro & Sashiko, Harmonious Imperfection: The Art of Japanese Mending & Stitching
    • Complete Crochet Course
    • Designer Crochet
    • Crochet Geometry
  • All Shopping
    • Books and Digital Patterns
    • Sashiko Shop
    • Thread
    • Fabric
    • Stitchips
  • Classes
  • Sashiko
  • About
  • Contact and Subscribe
  • Sponsors