SHANNON & JASON
  • Home
  • Blog
    • Tips
    • tutorials
  • Our Books
    • Contemporary Kogin-zashi
    • Boro & Sashiko, Harmonious Imperfection: The Art of Japanese Mending & Stitching
    • Complete Crochet Course
    • Designer Crochet
    • Crochet Geometry
  • All Shopping
    • Books and Digital Patterns
    • Sashiko Shop
    • Thread
    • Fabric
    • Stitchips
  • Classes
  • Sashiko
  • About
  • Contact and Subscribe
  • Sponsors

 Shannon & Jason's Blog 

Technique Tuesday – Introduction to Intarsia Crochet

11/11/2014

8 Comments


Technique Tuesday - Step-by-step crochet and knitting photo tutorials by Shibaguyz Designz

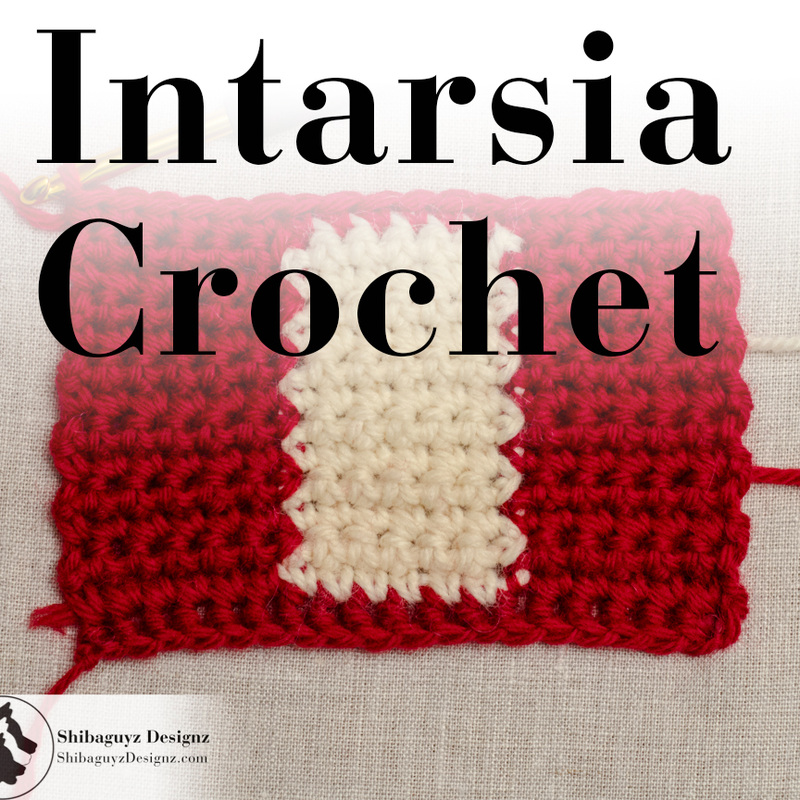
An Introduction to How To Work the Intarsia Crochet Colorwork Technique    


Technique
Intarsia Crochet

What is it?
Here's the definition you'll find via the folks at Merriam-Webster.com:

Intarsia
in•tar•sia
\in-ˈtär-sē-ə\

Definition
1 : a mosaic usually of wood fitted into a support; also : the art or process of making such a mosaic
2 : a colored design knitted on both sides of a fabric

Origin
German, modification of Italian intarsio
First Known Use: 1867

"Intarsia." Merriam-Webster.com. Merriam-Webster, n.d. Web. 11 Nov. 2014. <http://www.merriam-webster.com/dictionary/intarsia>.
Technique Tuesday - A free step-by-step photo tutorial for How To Work the Intarsia Crochet Colorwork Technique by Shibaguyz Designz
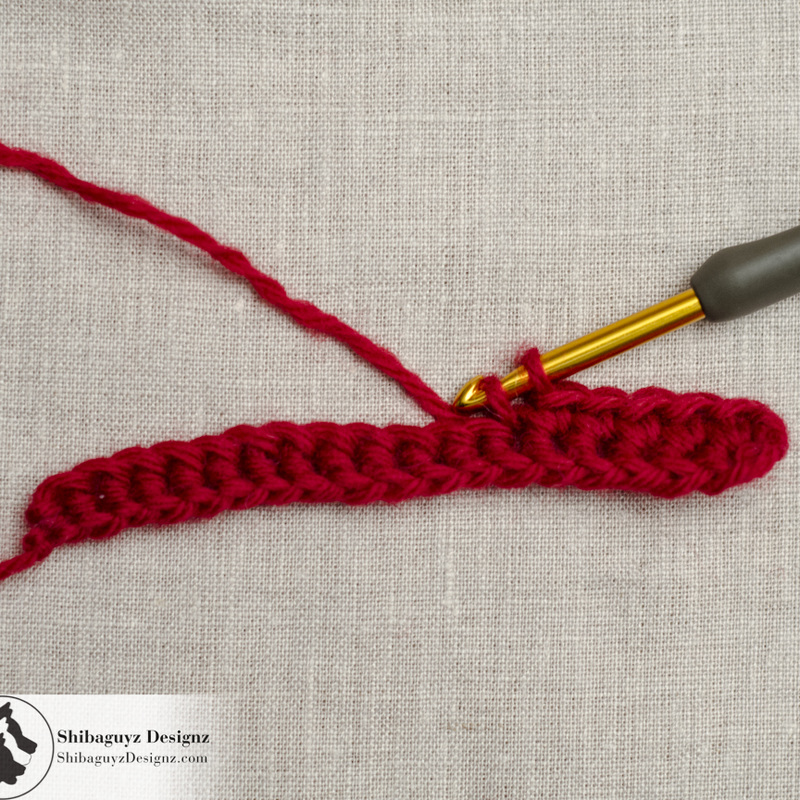
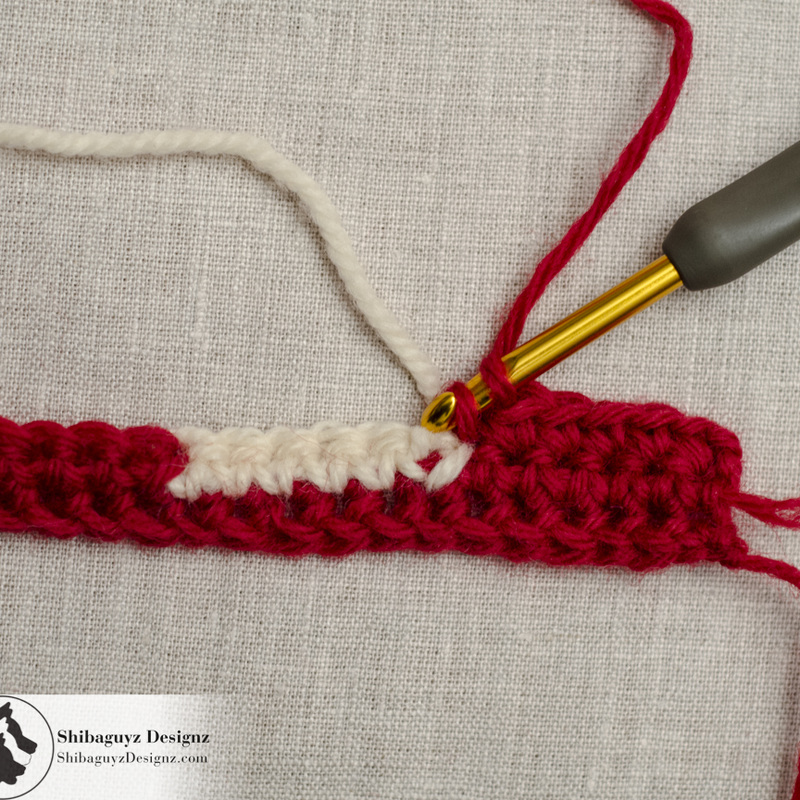
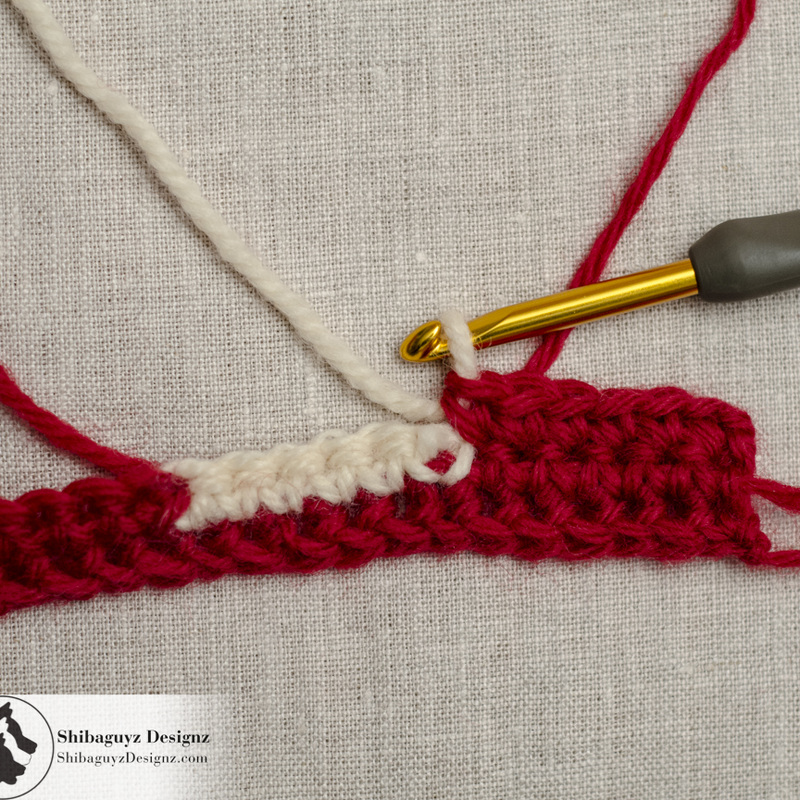
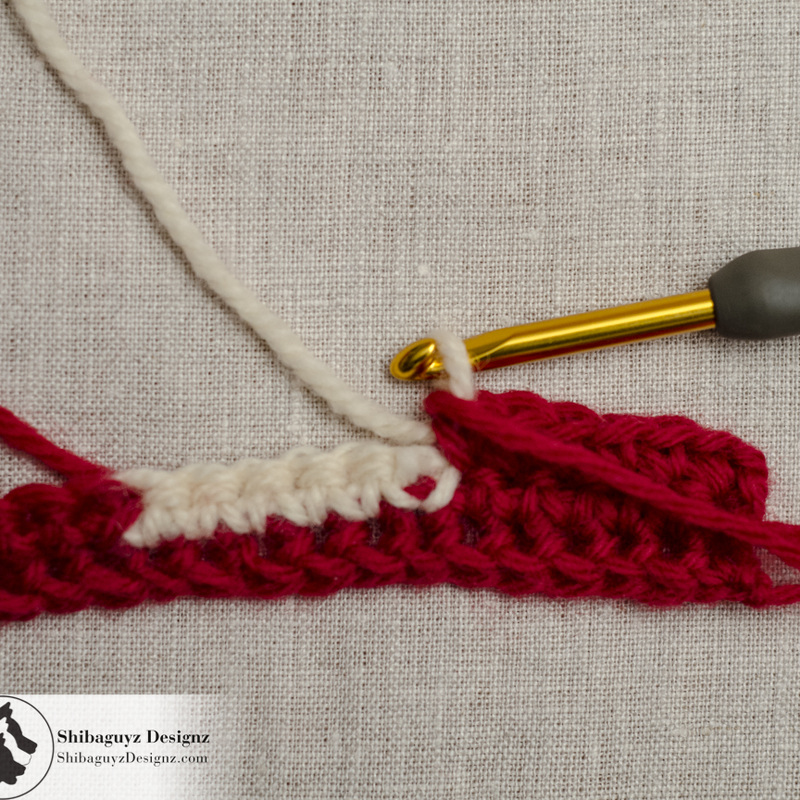
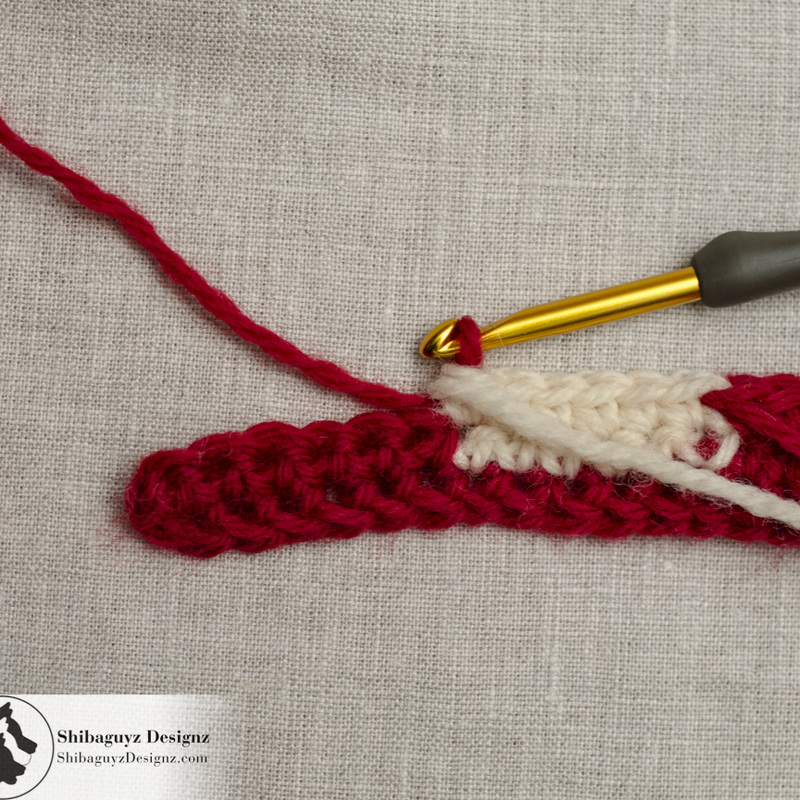
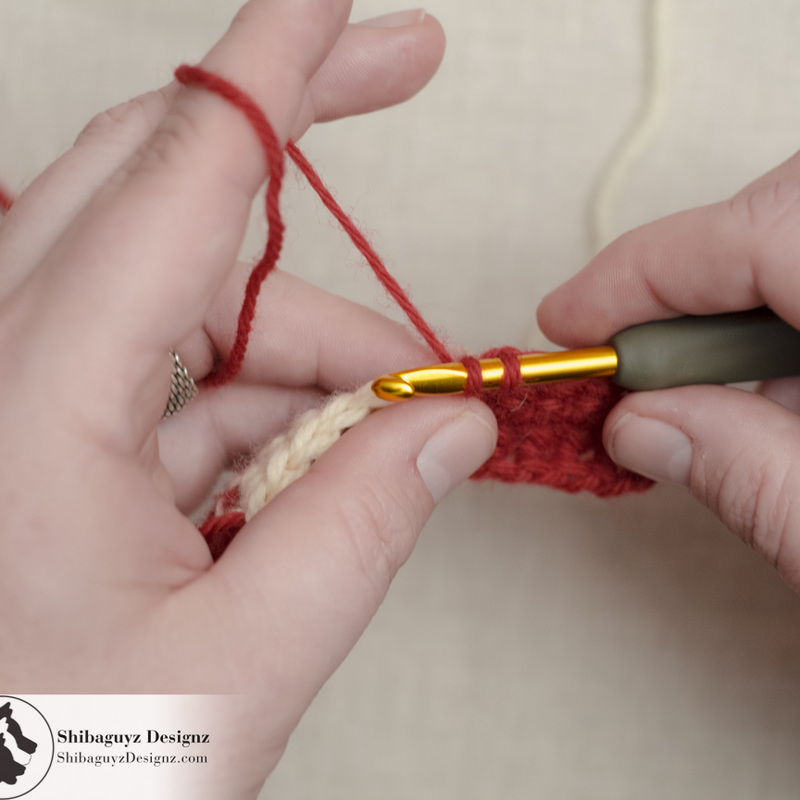
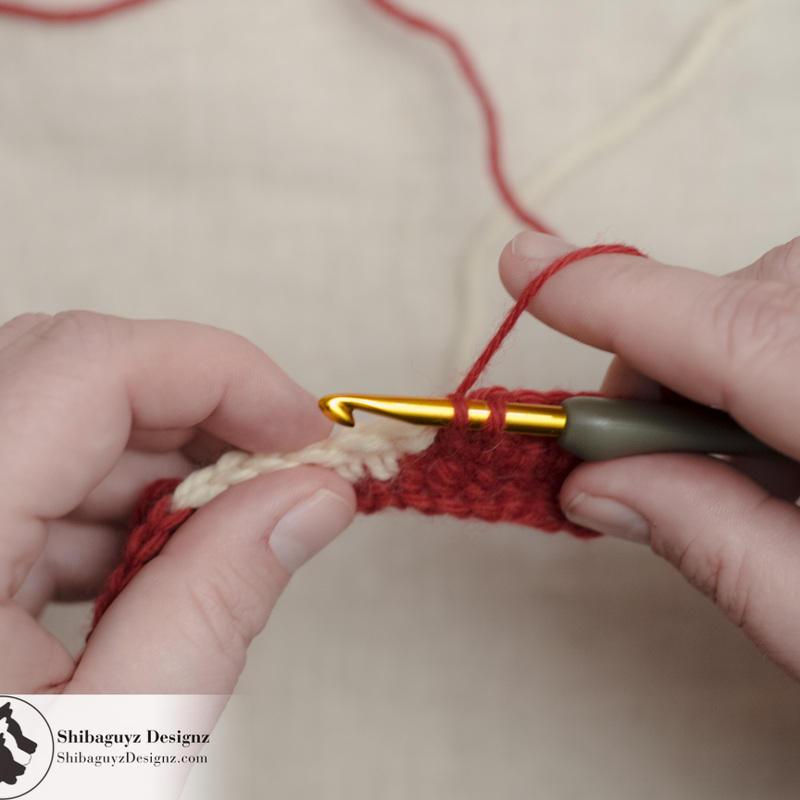
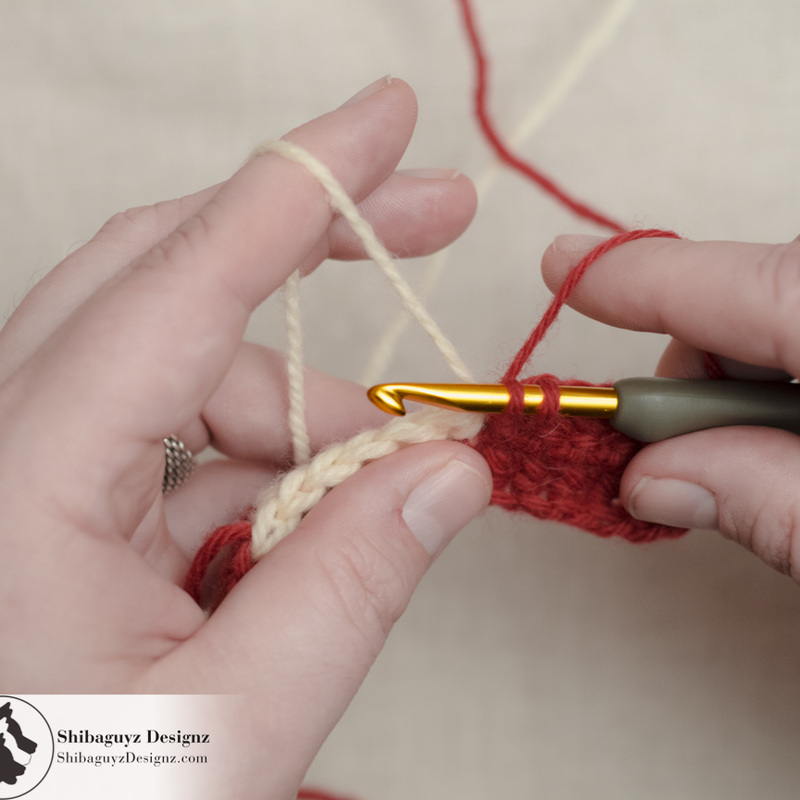
Click "Read More" link below for the full post.

And we have to say, that definition sums it up quite nicely! Intarsia began, and continues to this day, to be a method of making shapes and pictures from little pieces of wood, marble, and… well… yarn! More specifically, and most importantly to us, is the fact that Intarsia Crochet (and intarsia knitting) is making a shape or picture that is double sided. More on that distinction in a moment…

If you keep going down the rabbit hole of research and knowledge that is the internet, you will find lovely photos of wood inlaid benches and cabinets primarily from Italian churches as well as the evolution of the woodworking technique of intarsia into marble inlays in such places as the floors of famous/infamous Italian structures.

Even without this dive into the deep end of research and exploration, it isn't a stretch of the imagination at all to see how folks with hooks, sticks, and lengths of wool came to emulate this technique and make intarsia their own.

We would like to send a thank you back through the tunnels of time to those creative folks as it was their creative endeavors that have led us here to this tutorial on this very day.

Ain't history grand?
 

Now, before we go any farther, let's jump back here for a minute and touch upon that distinction we mentioned earlier about Intarsia Crochet being double sided.

There are two main techniques for making colorwork pictures and graphic shapes in your crochet and knitting. They are Fair Isle and our subject for today's tutorial: Intarsia. Put simply, you can think of Fair Isle as stranded colorwork and Intarsia as double sided colorwork.

Without going too far into it, Fair Isle Crochet (and Knitting) uses a technique where the strands of yarn are carried behind the work until they are picked up and used again in a stitch. This creates strands or floats on the inside of your work. It is beneficial when you are using a LOT of different colors or if you are making particularly intricate designs like reindeer prancing through a meadow of snowflakes with borders of Douglas Firs while gents and fair maidens carry buckets of who knows what round and round. Yes… I have owned that sweater…

Intarsia Crochet (and Knitting) uses multiple lengths of individual color to create pictures or geometric shapes. No yarn is carried in strands behind the work so the picture you make looks the same on the front and the back of the piece you crochet.

Why Use It?
Intarsia Crochet is a clean, neat, and tidy way to add colorwork to your crochet pieces without the potential issues stranded colorwork techniques can present. For example, if you are making a sweater for little Joey or Susie and want to add a dinosaur to the front, you might be better off using Intarsia Crochet since you really don't want any tangley bits for small humans to get twined up in.

Note: Yes, we know, there are ways to minimize the snag & tangle effect sometimes associated with stranded colorwork… don't send hate mail… we're just not addressing that topic today.

In addition, if you aren't making a particularly intricate design (ala reindeer in snowflake meadow) there isn't any need to carry the strands of yarn across the back of your work. In fact, if Joey and Susie's dinosaur takes up most of the front of their sweater, if would even be a little nutso to float such long strands across the back of your work. You would be MUCH better served to utilize separate balls of yarn to represent your larger blocks of color as in the technique of Intarsia Crochet (and knitting).

Finally, if you have a piece you are stitching up where both sides of the work are going to show (a scarf or an afghan, for example), you definitely should explore using Intarsia Crochet to create a clean double-sided fabric.

To Work Today's Tutorial
Here's a list of materials we used to make today's Intarsia Crochet tutorial. While you can, of course, use any materials you have on hand, these materials listed are what we recommend you use while you are learning.

Yarn Used
CYCA 4
Worsted Weight, 100% Pure Wool

NOTE: You will need to wind off a separate length of the darker colored yarn for today's tutorial. We used two lengths of the darker colored yarn and one length of the lighter colored yarn. For the purposes of this tutorial, we call them First Length of darker colored yarn, length of lighter colored yarn, and Second Length of darker colored yarn.

Hook Used
H-8/5.00mm Crochet Hook

Skillz Used
Foundation Single Crochet – How To Make the Foundation Single Crochet Stitch
Single Crochet
Adding Yarn in the Middle of a Row of Crochet Fabric – How to Add Yarn In the Middle Of A Row of Crochet Fabric

Break It Down
1. Foundation Row and Row 1

Using our First Length of darker colored yarn, we started our swatch with 18 Foundation Single Crochet stitches, turned and worked 5 Single Crochet stitches. Pictured is the 6th Single Crochet stitch as we prepare to change colors for the first time in this row.

To change colors, simply work your Single Crochet as usual right up until the last step:

Single Crochet: Insert hook into next stitch, yarn over and draw up a loop (2 loops on hook), STOP!
Technique Tuesday - A free step-by-step photo tutorial for How To Work the Intarsia Crochet Colorwork Technique by Shibaguyz Designz

Technique Tuesday - A free step-by-step photo tutorial for How To Work the Intarsia Crochet Colorwork Technique by Shibaguyz Designz
2. Now move your working yarn (the First Length of darker colored yarn here) to the right-hand side of your stitch and yarn over with the new color (the length lighter colored yarn here).

3. Draw up a loop of the lighter colored yarn through the two loops on your hook.
Technique Tuesday - A free step-by-step photo tutorial for How To Work the Intarsia Crochet Colorwork Technique by Shibaguyz Designz

Technique Tuesday - A free step-by-step photo tutorial for How To Work the Intarsia Crochet Colorwork Technique by Shibaguyz Designz
4. Snugging up the First Length of darker colored yarn, bring it around to the front of your work wrapping it securely around the last Single Crochet stitch you just made. Now you can let go of this yarn until you are ready to pick it back up again on the return row.

5. Single Crochet with the new color (lighter colored yarn) in the next stitch.

Here is where you will take the opportunity to weave in the tail of the new yarn by working your Single Crochet stitches OVER the tail. This means you will lay the tail along the tops of the stitches you are about to work your Single Crochet stitches into and make those stitches around both the tail and the loops of the stitch you are working into. One less tail to weave in at the end!
Technique Tuesday - A free step-by-step photo tutorial for How To Work the Intarsia Crochet Colorwork Technique by Shibaguyz Designz

Technique Tuesday - A free step-by-step photo tutorial for How To Work the Intarsia Crochet Colorwork Technique by Shibaguyz Designz
6. Work four more Single Crochet stitches for a total of 5 Single Crochet stitches. Pictured, we have started to make the 6th Single Crochet stitch and STOPPED before the last "yarn over and draw up a loop" just as we did with the First Length of darker colored yarn in Step 1.

7. Once again, move the working yarn (the lighter colored yarn) to the right-hand side of your stitch and yarn over with the new color (the Second Length of darker colored yarn).
Technique Tuesday - A free step-by-step photo tutorial for How To Work the Intarsia Crochet Colorwork Technique by Shibaguyz Designz

Technique Tuesday - A free step-by-step photo tutorial for How To Work the Intarsia Crochet Colorwork Technique by Shibaguyz Designz
8. Draw up a loop of the Second Length of darker colored yarn through the two loops remaining on your hook.

9. Just like we did before, snug up the length of lighter colored yarn and bring it around to the front of your work wrapping it securely around the last Single Crochet stitch you just made. Let go of the lighter colored yarn until you are ready to pick it back up on the next row.
Technique Tuesday - A free step-by-step photo tutorial for How To Work the Intarsia Crochet Colorwork Technique by Shibaguyz Designz

Technique Tuesday - A free step-by-step photo tutorial for How To Work the Intarsia Crochet Colorwork Technique by Shibaguyz Designz
10. Single Crochet with the new color (the Second Length of darker colored yarn) in the next stitch.

11. And work an additional 5 Single Crochet stitches to the end of the row for a total of 6 Single Crochet stitches.

Here you can clearly see the finished first row of Intarsia Crochet colorwork. COOL!!

From right to left there are 6 Single Crochet stitches using the First Length of darker colored yarn; next, there are 6 Single Crochet stitches using the lighter colored yarn; finally, there are 6 Single Crochet stitches using the Second Length of darker colored yarn.

You can also see the First Length of darker colored yarn hanging down in front of the work and the lighter colored yarn hanging down in front of the work as well. The Second Length of darker colored yarn is, of course, still on the hook since we are about to turn and work the next row with it. So… here we go… TURN!

Technique Tuesday - A free step-by-step photo tutorial for How To Work the Intarsia Crochet Colorwork Technique by Shibaguyz Designz

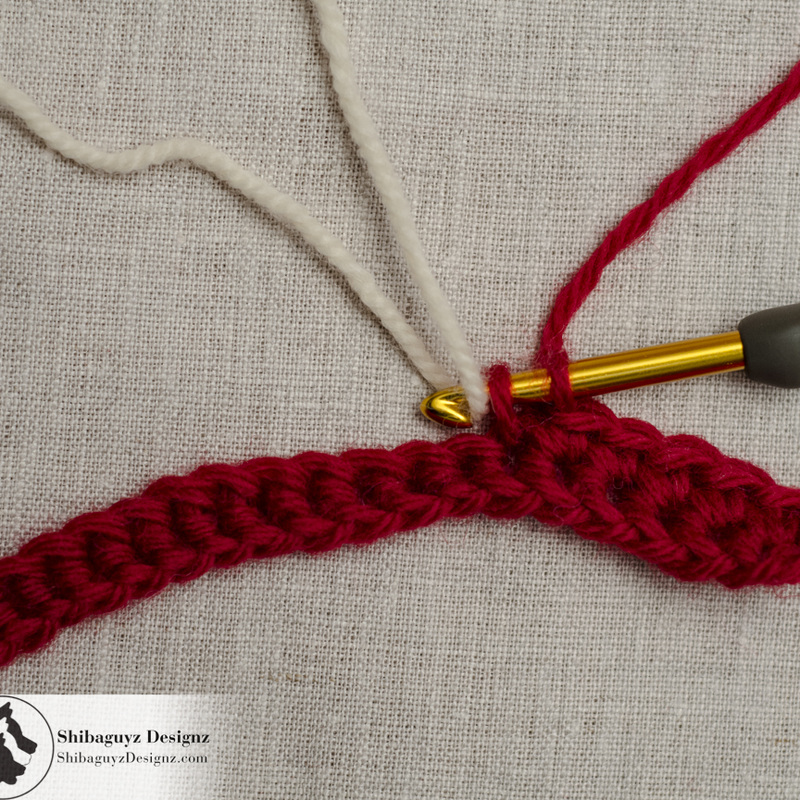
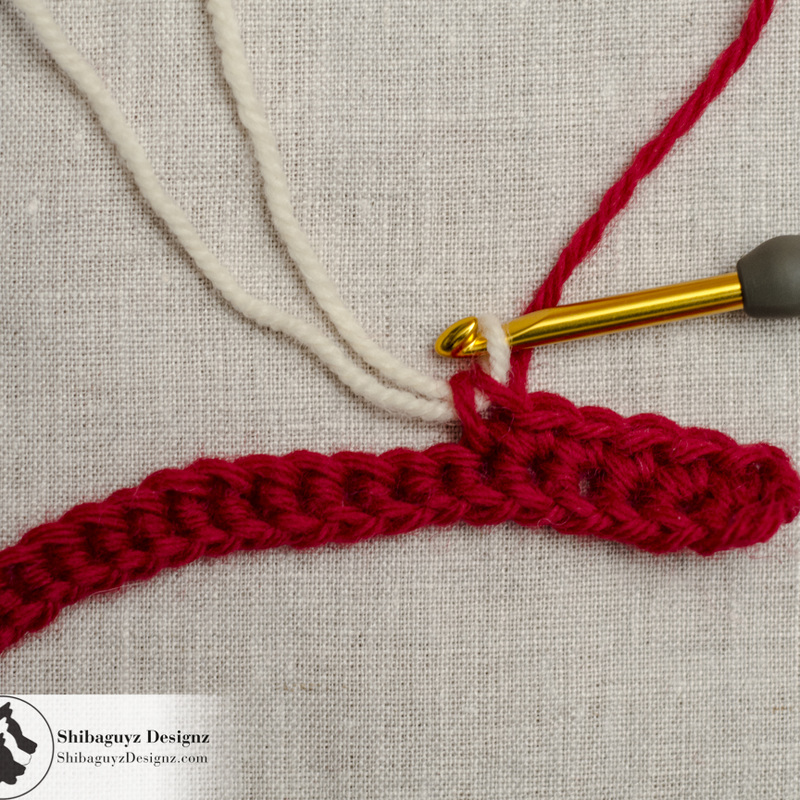
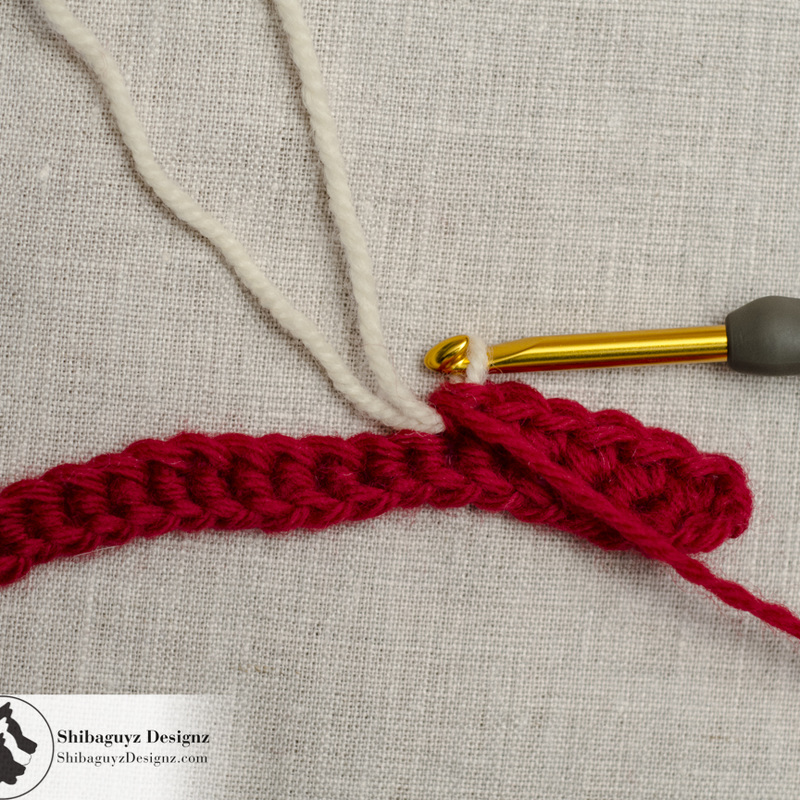
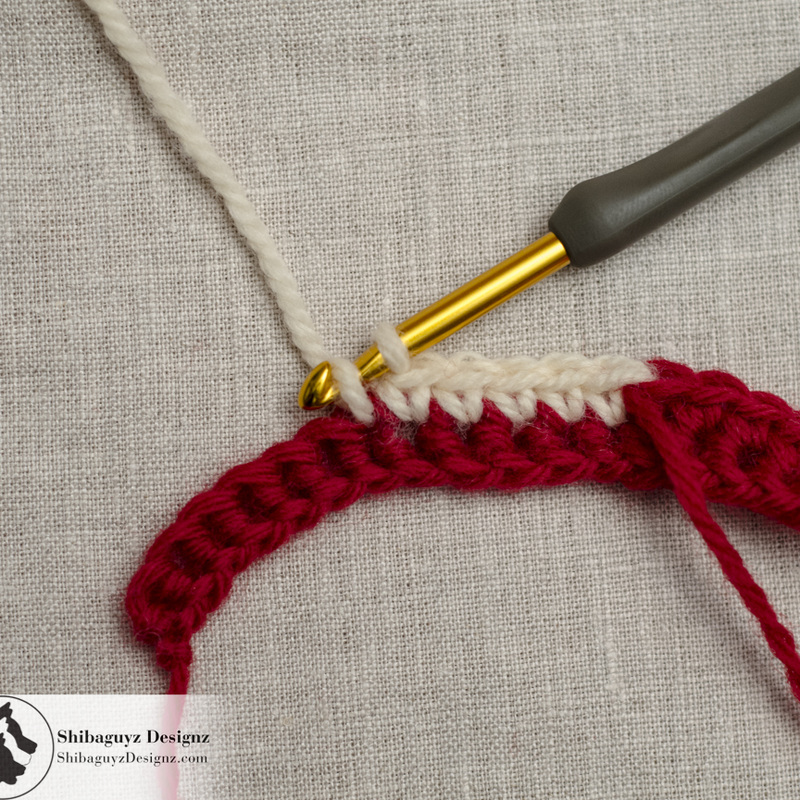
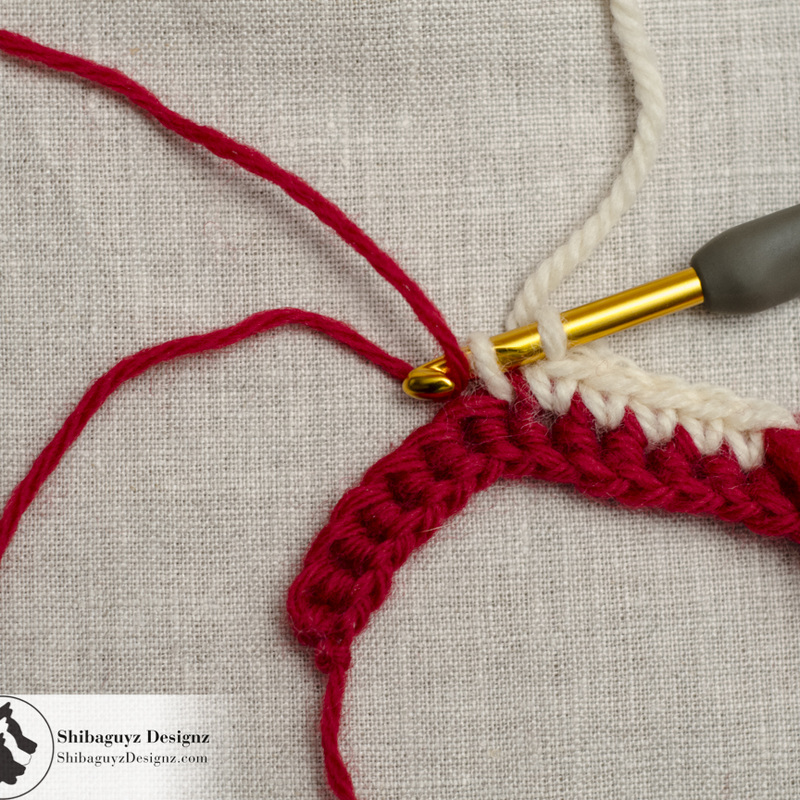
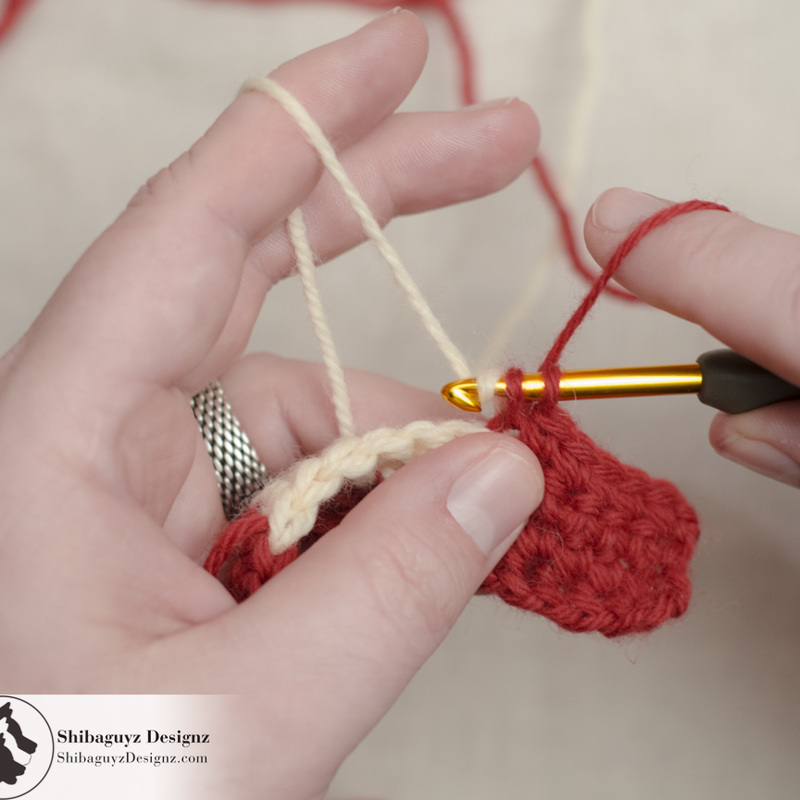
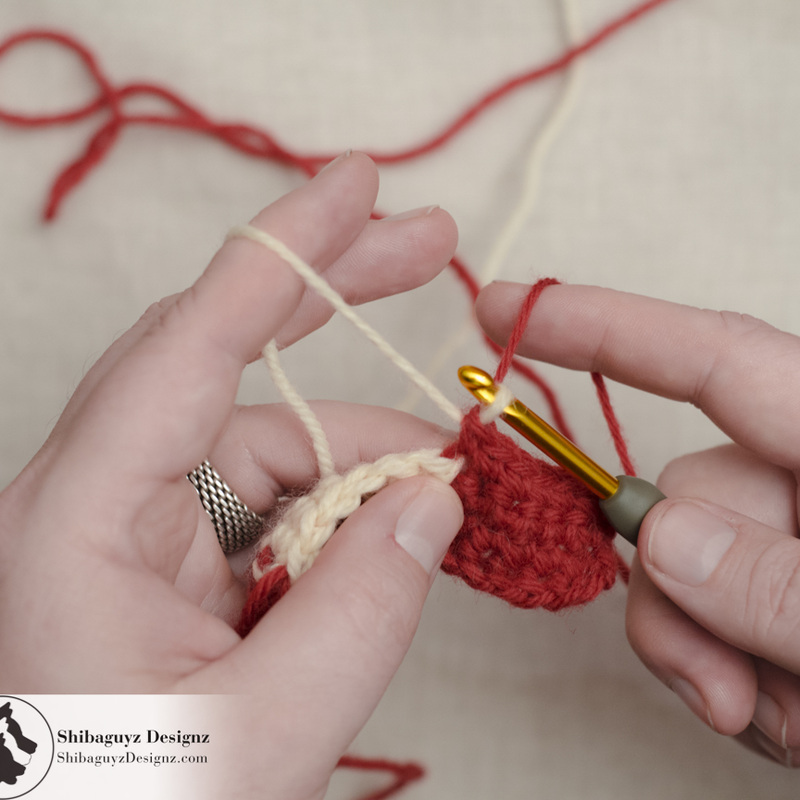
NOTE: Upon turning your work, you should take this opportunity to uncross your three lengths of yarn. This is a simple matter of turning your work then moving the two lengths of darker colored yarn to opposite sides of the length of lighter colored yarn… usually one over the length of lighter colored yarn and one under the same length of lighter colored yarn.

12. Row 2 – Here we are still working with the Second Length of darker colored yarn.

Just as in the beginning of Row 1, we make 5 Single Crochet stitches and prepare to change colors by working our 6th Single Crochet stitch right up to the STOP where you have two loops of the Second Length of darker colored yarn on your hook.

Here you can see we have moved the Second Length of darker colored yarn to the right-hand side of the stitch we are currently making and are ready to yarn over with the length of lighter colored yarn that is conveniently located behind our swatch.
Technique Tuesday - A free step-by-step photo tutorial for How To Work the Intarsia Crochet Colorwork Technique by Shibaguyz Designz

Technique Tuesday - A free step-by-step photo tutorial for How To Work the Intarsia Crochet Colorwork Technique by Shibaguyz Designz
13. Draw up a loop with the lighter colored yarn.

14. Snug up the Second Length of darker colored yarn and wrap it securely around the last Single Crochet stitch you just made. 
Technique Tuesday - A free step-by-step photo tutorial for How To Work the Intarsia Crochet Colorwork Technique by Shibaguyz Designz

Technique Tuesday - A free step-by-step photo tutorial for How To Work the Intarsia Crochet Colorwork Technique by Shibaguyz Designz
15. Work 5 Single Crochet stitches and prepare to change colors just like before.

Move the length of lighter colored yarn to the right-hand side of the stitch of the stitch you are making and…    

16. …with the First Length of darker colored yarn, yarn over and draw up a loop.
Technique Tuesday - A free step-by-step photo tutorial for How To Work the Intarsia Crochet Colorwork Technique by Shibaguyz Designz

Technique Tuesday - A free step-by-step photo tutorial for How To Work the Intarsia Crochet Colorwork Technique by Shibaguyz Designz
17. Snug up the length of lighter colored yarn, wrap it securely around the last Single Crochet stitch just made, and work 6 Single Crochet stitches with the First Length of darker colored yarn to the end of the row. Next? Yup… TURN!

18. Row 3 – Here I am reviving my role as hand model to demonstrate just what the switching around of these different lengths of yarn looks like in real life.

Still using the First Length of darker colored yarn, we have turned our work and have made 5 Single Crochet stitches and started our 6th Single Crochet stitch. Here, I am holding the First Length of darker colored yarn in my left hand and have the two loops of the 6th Single Crochet stitch on my hook. Notice in the background you can see the length of lighter colored yarn hanging from the back of my swatch.
Technique Tuesday - A free step-by-step photo tutorial for How To Work the Intarsia Crochet Colorwork Technique by Shibaguyz Designz

Technique Tuesday - A free step-by-step photo tutorial for How To Work the Intarsia Crochet Colorwork Technique by Shibaguyz Designz
19. Now I switch the First Length of darker colored yarn to my right hand…

20. …and I pick up the length of lighter colored yarn with my left hand.
Technique Tuesday - A free step-by-step photo tutorial for How To Work the Intarsia Crochet Colorwork Technique by Shibaguyz Designz

Technique Tuesday - A free step-by-step photo tutorial for How To Work the Intarsia Crochet Colorwork Technique by Shibaguyz Designz
21. Yarn over with the lighter colored yarn while still holding on to the First Length of darker colored yarn to keep everything nice and snug and maintain my stitch tension/gauge while changing colors.

22. Draw up a loop of the lighter colored yarn…
Technique Tuesday - A free step-by-step photo tutorial for How To Work the Intarsia Crochet Colorwork Technique by Shibaguyz Designz

Technique Tuesday - A free step-by-step photo tutorial for How To Work the Intarsia Crochet Colorwork Technique by Shibaguyz Designz
23. …and bring the First Length of darker colored yarn around to the front of my work wrapping it securely around the last Single Crochet stitch I just made.

Note: I hold the wrapped yarn in place with my thumb to keep it secure (and, frankly, to keep it the heck out of my way!) while I'm making the next Single Crochet stitch in the new color.

24. And now I've worked my first Single Crochet stitch in the lighter colored yarn. Note how I kept the now non-working length of yarn off to the side to keep my work nice and neat.

This switching around will take a little practice. I have an advantage since I tension my crochet yarn with my left hand and tension my knitting yarn with my right hand. I just engage both of those muscle memories at once. Still… it took practice the first time I tried it.
Technique Tuesday - A free step-by-step photo tutorial for How To Work the Intarsia Crochet Colorwork Technique by Shibaguyz Designz

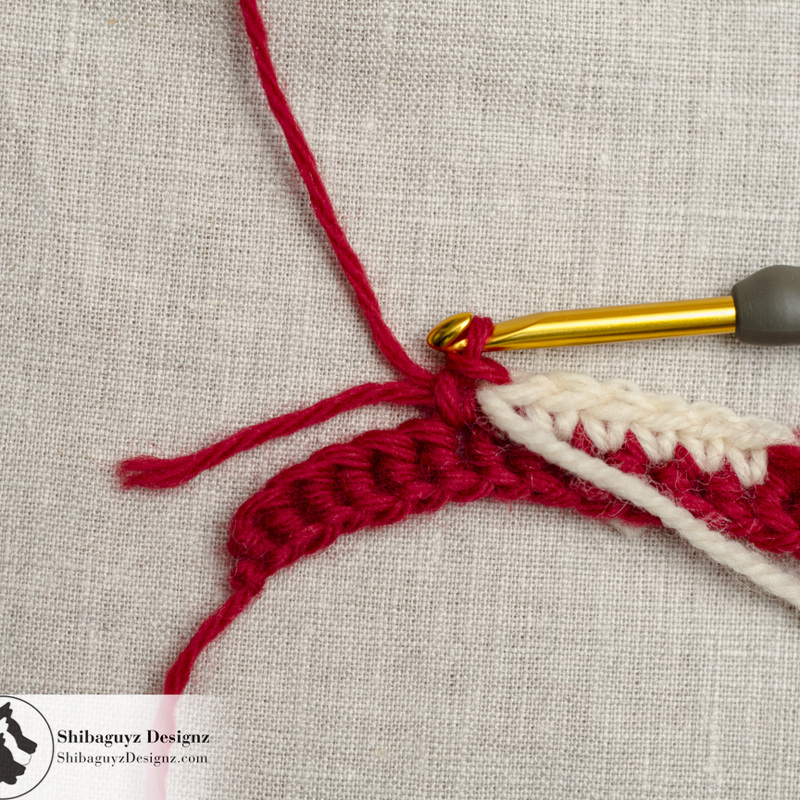
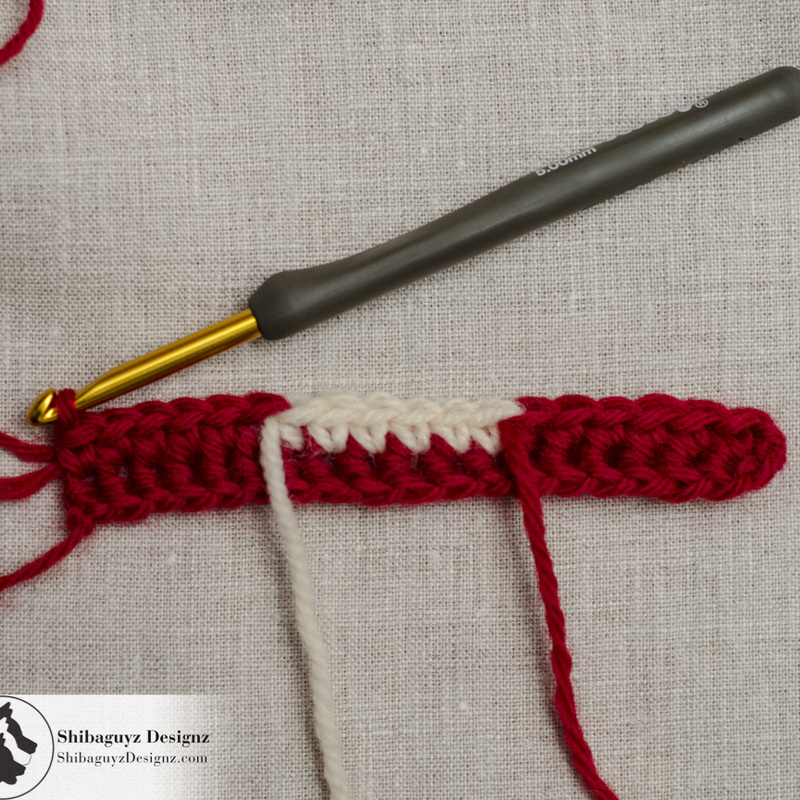
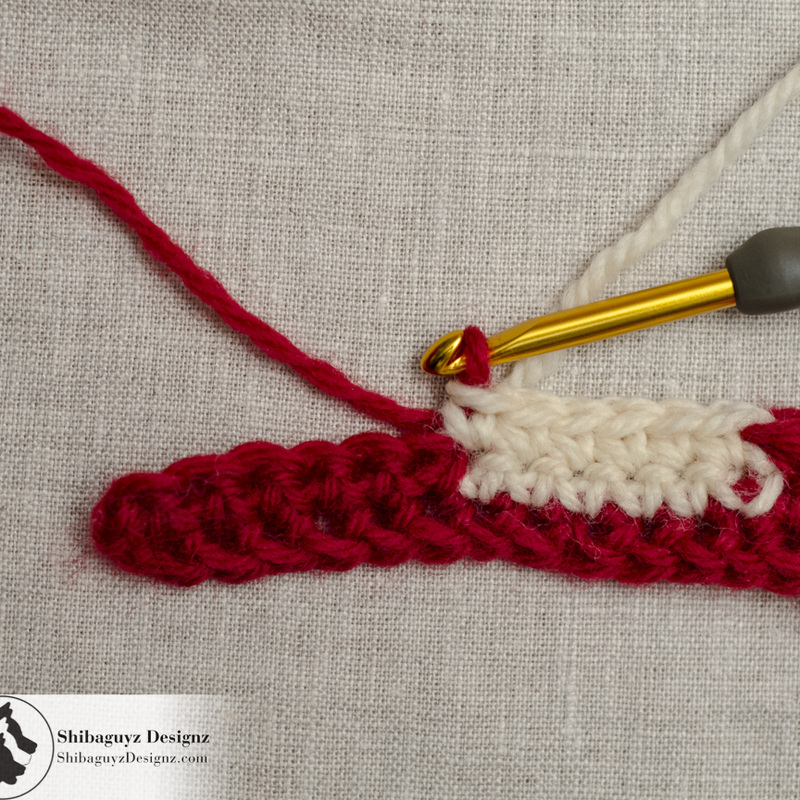
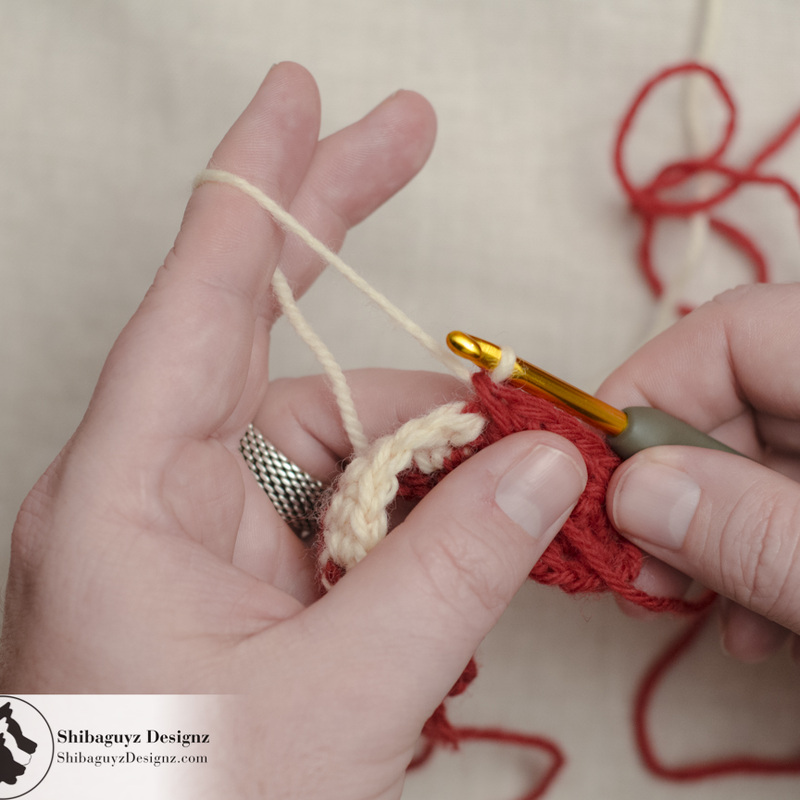
25. Keep repeating your color changes just as we have outlined here for a total of 12 Single Crochet rows.

Make that last row across the top (Row 13) by just continuing along with the First Length of darker colored yarn. If you were making a larger piece (Joey and Susie's dinosaur sweaters?) you would continue on from here with your yarn and simply weave in those ends you see in the photo of the back of the swatch.

When you have finished Row 13…


TAADAA!!


Here's the front of the finished Intarsia Crochet swatch…
Technique Tuesday - A free step-by-step photo tutorial for How To Work the Intarsia Crochet Colorwork Technique by Shibaguyz Designz
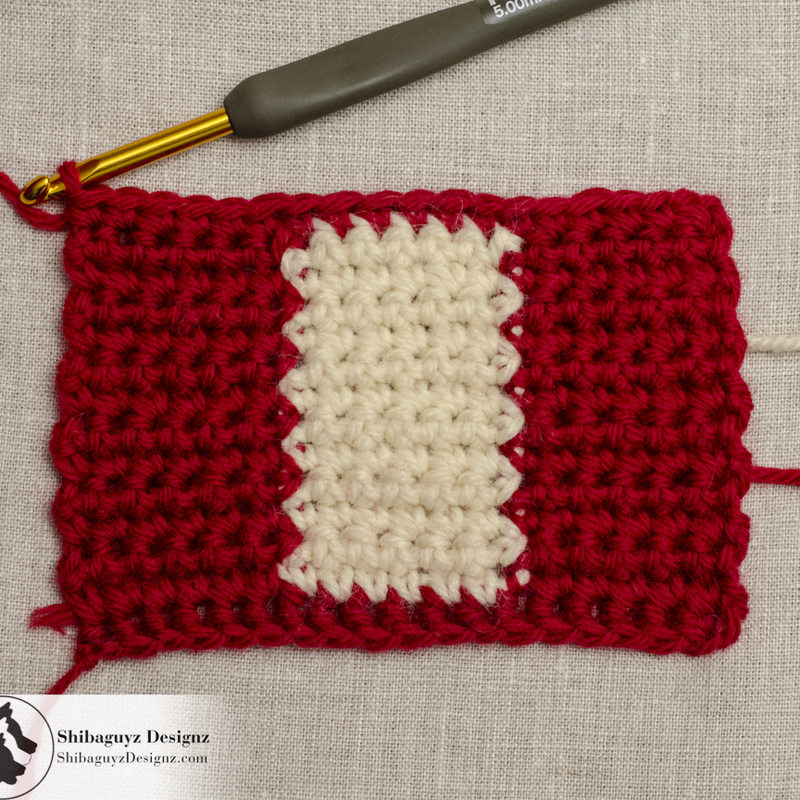
And here's the back of the finished Intarsia Crochet swatch…
Technique Tuesday - A free step-by-step photo tutorial for How To Work the Intarsia Crochet Colorwork Technique by Shibaguyz Designz
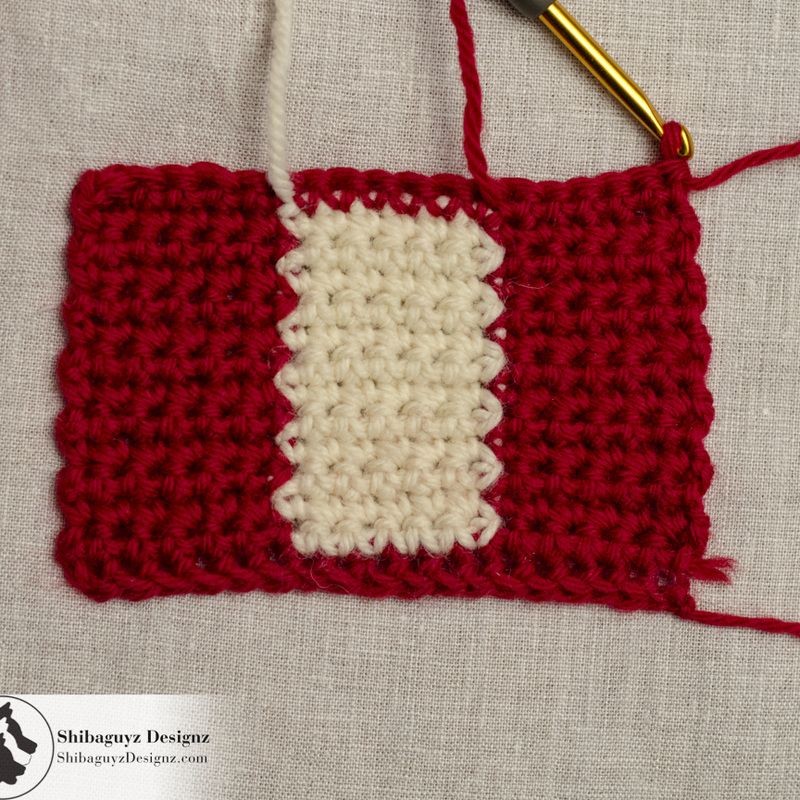
Granted… it's no dinosaur sweater (dang it… now I'm gonna have to make one of those for myself), but this introduction to Intarsia Crochet IS your gateway to dinosaurs, letters, number, pictures of your Aunt Mary, and any geometric shape you can dream up! We would highly recommend practicing quite a bit before attempting the crochet portrait of Aunt Mary… just sayin'…


A Final Word (or two…)
As with all new skillz, Intarsia Crochet colorwork will take some practice. Be patient, practice, and compare your work with the photos in this tutorial. You will get it and will soon be thinking up all kinds of creative ways to use Intarsia Crochet in your project! Dinosaur sweaters not your thing? Try using some colorblocking to liven up a solid-colored sweater or afghan pattern for a graphic touch that is VERY hot right now.

Experiment! As we said, this tutorial is just a gateway to your own exploration of colorblocking, spelling out your favorite team on a scarf or afghan, or… yes… a dinosaur sweater for me… I know y'all will jump right on that one…

And… hey… if you aren't happy with your experiment rip it out and go again! You'll get it!
 

Thanks for dropping by for another Technique Tuesday! Our aim is to build the skillz of our FAB fiber community here on the web and it's always FAB to hear from you all that what we are doing is helping you and your fiber friends.

Check back often or, better yet, click on that RSS Feed button over there in the right-hand column of the page you are on right now. That way you will always be up to date and never miss a thing!

Stitch On!
S&J


Oh hey… before you go… Here are a few more pages we thought you might be interested in.
Click on any of the photos below… enjoy!


And be sure to look us up on Facebook, Twitter, and Pinterest by clicking on one of these icons.

8 Comments
Cintia
9/6/2015 05:44:14 am

This is the best intarsia tutorial I've come across. Will definetly try this technique, I just wonder how hard it would be to make a super colorful piece, which is my thing...

Reply
Peggy
8/2/2016 10:06:33 pm

I recently started a corner-to-corner "graphghan" with lots of color changes and found this tutorial super helpful! Is it advisable to always bring the non-working yarn to the front when changing colors? I have seen some tutorials that say to always bring the non-working yarn to the wrong side of the finished piece, so that all the tails to be woven in will be on the same side at the end.

Reply
Karen
8/8/2016 11:31:30 am

Thank you!! This is exactly the technique I was looking for and your directions made it so clear! Thank you again!!!

Reply
Cheryl Taub
8/18/2016 04:14:17 pm

This was excellent, the best I've seen. Easy to understand and great photos. Thank you so much.

Reply
Anna
3/1/2017 05:11:58 am

I don't normally comment on websites, but I felt that I had to. I have been struggling through YouTube videos trying to learn the intarsia technique, but this was the first place that was finally clear enough for me to understand. In addition to that, your writing isn't monotonic and boring, but you add in enough humor to keep me interested and even smiling. I love this article! Thank you!

Reply
diane
1/14/2018 12:48:46 pm

Straight lines are good but I would love to know how you handle the intarsia when the stitches of the light color extend 4 or five stitches from the dark color and the pattern constantly changes the amount of the lighter color and darker color.

Reply
Elizabeth Bodner
12/5/2020 02:47:14 pm

That's my question too. Reducing stitche length or increasing the length is a problem. For some reason I cannot recognize the right side from t he wrong side. Loved your pic tutorial....

Reply
Diane
1/14/2018 07:16:35 pm

I tried using your tutorial, along with another tutorial, and it worked out really well. I appreciate the step by step, clear directions. Thank you!!

Reply

Your comment will be posted after it is approved.


Leave a Reply.

    Author

    Shannon and Jason

    RSS Feed

    Sign Up For Our Newsletter

    Leave us a tip to help us do what we do!

    BERNINA Ambassador Badge
    Daylight Company Lamps
    Shibaguyz Aurifil Thread Collection

    Archives

    September 2022
    June 2022
    February 2022
    June 2021
    November 2020
    September 2020
    June 2020
    May 2020
    April 2020
    March 2020
    January 2020
    February 2019
    December 2018
    November 2018
    August 2018
    July 2018
    May 2018
    April 2018
    March 2018
    February 2018
    January 2018
    December 2017
    November 2017
    October 2017
    September 2017
    August 2017
    July 2017
    March 2017
    February 2017
    January 2017
    November 2016
    October 2016
    September 2016
    July 2016
    June 2016
    May 2016
    April 2016
    March 2016
    February 2016
    November 2015
    August 2015
    July 2015
    June 2015
    May 2015
    April 2015
    March 2015
    February 2015
    January 2015
    December 2014
    November 2014
    October 2014
    September 2014
    August 2014
    July 2014
    April 2014
    March 2014
    January 2014

    www.dickblick.com
    Picture
    Picture

    RSS Feed

    Categories

    All
    Afghan
    Aurifil
    Books
    Boro
    Camp STITCHES
    Classes
    Cleaning
    Clip On
    Clover
    Cowl
    Craft
    Craftsy
    CraftU Classes
    Crochet
    Crochet Geometry
    Daylight
    Daylight Company
    Design
    Designer Crochet
    Digital Download
    Donate
    Download
    English Paper Piecing
    Event
    Free
    Giveaway
    Hand Cream
    Hooks
    Inspirations
    International Crochet Month
    Interview
    Interweave
    Knit
    Knitting
    Lamp
    Marcus
    Marcus Fabrics
    Men
    Menswear
    National Craft Month
    National Crochet Month
    Needles
    Online Classes
    Ottlite
    Pattern
    Patterns
    Paypal
    Photography
    Podcast
    Prize
    Product Review
    Project
    Quilt
    Quilting
    Recipe
    Rotary Cutter
    Sashiko
    Season Of Giving Away
    Sew Expo
    Sewing
    Shibaguyz
    Shibaguyz Designz
    Shibaguyz Designz Indie Maker Pattern
    Shibaguyz LIVE
    Shibaguyz Photography
    Shop
    Soak
    STITCHES Events
    Sweater
    Thread
    Tool School
    Tools Of The Trade
    Travel Lamp
    Tutorials
    Vogue Knitting LIVE
    Walkthrough
    Warm Up America
    Wash
    Weaving
    Women
    Yarn
    Zoom Loom

    www.dickblick.com

Stay current on the news and events from Shannon and Jason as well as exclusive offers and tutorials available only for our newsletter subscribers.

* indicates required
Email Format

  • Home
  • Blog
    • Tips
    • tutorials
  • Our Books
    • Contemporary Kogin-zashi
    • Boro & Sashiko, Harmonious Imperfection: The Art of Japanese Mending & Stitching
    • Complete Crochet Course
    • Designer Crochet
    • Crochet Geometry
  • All Shopping
    • Books and Digital Patterns
    • Sashiko Shop
    • Thread
    • Fabric
    • Stitchips
  • Classes
  • Sashiko
  • About
  • Contact and Subscribe
  • Sponsors