How To Make the First Double Crochet StitchTECHNIQUE First Double Crochet (First-dc) We've all seen the instructions at the beginning of a row of double crochet stitches that says: Ch 3, dc in next st. For me, this left a lot of questions in my mind. Which stitch was the "next st" they were referring to. Was the first stitch the "next stitch" or was the stitch after that first stitch the "next stitch"? Wait… no… that was right… I think… Do I make the chain 3 then make a Double Crochet in the FIRST stitch of the row only using the chain 3 to get to the height of the Double Crochet row? Do I make the chain 3 then SKIP the first stitch and THEN make a Double Crochet? Of course, that led to other questions: If I did count the chain 3 as my first stitch and, essentially, skipped the first stitch making my first actual Double Crochet in the second stitch of the row, where did I work the Double Crochet of the following row? In the chain 3 space that counted as my first double crochet or in the third chain stitch of the chain 3 space? I have to say I never really cared for any of these options. Here's why…
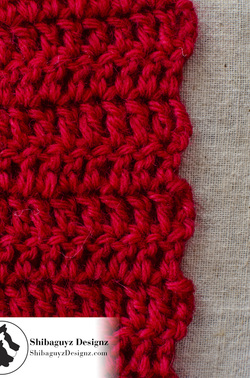
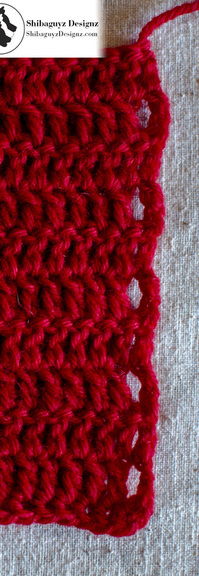
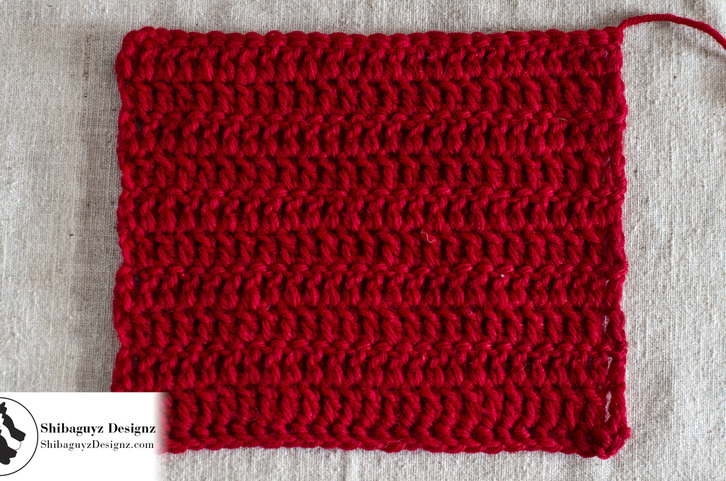
And never mind how wonky those raw edges look, don't even try working back into them for adding edging stitches or sewing into them for seaming garments. The bulky edges become even more bulky when you sew them together and do you sew into the chain 3 or the Double Crochet? Either way, bulk on top of bulk makes bulk bulky… bulk… ACK! And sewing into the chain 3 at the beginning of the swatch with the skipped first stitch makes the holes become larger and even more pronounced and now there are these weird looking lace holes up the side of my beautiful garment that I can't pass off as a "design element" so I just hope nobody looks too closely and forget it I'm not leaving it that way (RIP RIP RIP). GAH!!
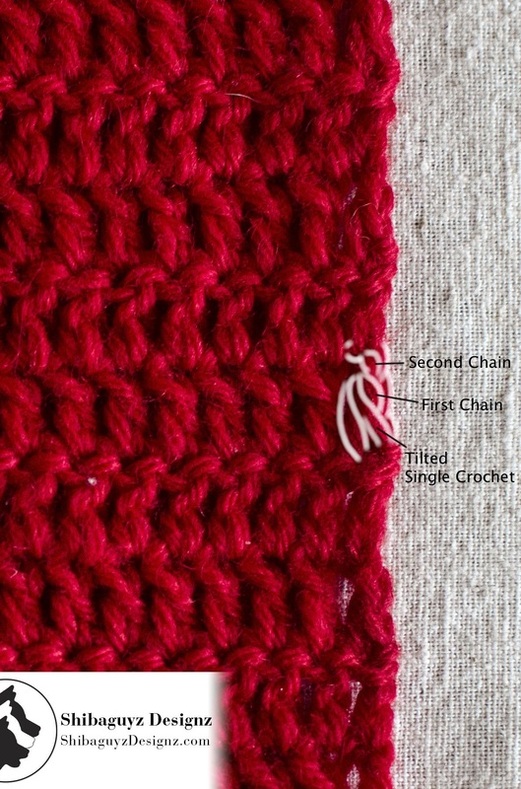
The criteria for our First Double Crochet stitch was simple: 1. Visually, the First Double Crochet stitch must closely mimic an actual Double Crochet stitch. 2. Gaps along the side of the finished fabric should be minimal to nonexistent. 3. The First Double Crochet stitch must hold its integrity when worked back in to for additional edging stitches or when sewn into for seaming. Not asking too much… just be a Double Crochet without actually being a Double Crochet. Right… Here's the solution I arrived that that meets all three of the criteria set forth at the beginning of my quest and that has been approved by both of the Shibaguyz. First Double Crochet (First-dc): Single crochet in first stitch, chain 2. Note: Use this stitch whenever the first stitch of a row is a Double Crochet. Check out this close up photo with my lovely hand-drawn breakdown of the parts of the First-dc stitch. VISUALLY, you can see that the First-dc matches an actual Double Crochet pretty closely. First, we work the single crochet into the first stitch WITHOUT working a chain 1 to step up to the height of the working row. This turns the single crochet just slightly on its side giving it the same lines as the base of a double crochet. Next, we work two chains. Note how the first chain VISUALLY mimics the first "yarn over and draw through 2 loops on hook" of a double crochet. It doesn't have the same wrap as a double crochet so it isn't as thick as a double crochet but visually it still works. The second chain is worked back into when we work the last stitch of the NEXT row giving it the same visual appearance as a double crochet. The obnoxious and frustrating GAPS are all but eliminated as well. Again, back to that slightly sideways single crochet. This closes the gap at the base of the stitch allowing the two chains to stand closer to the rest of the double crochets. Also, the fact that we are working into the second chain at the end of the next row snugs the stitches of the First-dc up nice and close. Look, ma! No gaps! Finally, the INTEGRITY of the First-dc holds up beautifully when we want to add an additional edging stitch or when sewn into for seaming garments, accessories, afghans, etc… It is easy to see the stitches that should be worked into with your hook for edging or your needle for sewing seams. Also, the stitches don't stretch out of shape when the final seam is sewn. More on our most-used edging and seaming technique coming soon. Good looking, no gaping holes, and integrity… there's a campaign slogan or life lesson there somewhere… I'm sure of it… As with all new techniques, give this one a go and get comfy with it. We have found folks like the look of the First Double Crochet after they have had some practice with it. Again, it is our go-to edging technique in all of our patterns. It's like we always say: Start Smart to Finish Fab! Thanks for joining us today for another Technique Tuesday. We hope you enjoy all of our tutorials and articles from Shibaguyz Designz and will share them with friends and come back often for more good stuff. Stitch On! S&J We hope you enjoy our articles and posts here on Shibaguyz Designz and hope you will share them with other stitchers. Take a minute to look around and check out our other posts as well as our patterns and books in our online shop. Here are a few suggestions for you we thought you might like. Just click on one of the photos below! Enjoy! We'd love to hear from you! Leave a comment to this post and catch up with us on Ravelry, Facebook, Twitter, and Pinterest by clicking on one of these icons.
10 Comments
Kelly
8/19/2014 02:08:12 pm
Fantastic idea, can't wait to incorporate it into my next piece! Thanks guys :)
Reply
Colleen
8/20/2014 07:51:33 am
I have crocheted most of my life and have struggled with the same questions you have stated here. Typically I just ch 2 and turn, leaving off the extra ch, but I really like the way your's looks. I will definitelly give it a go. Thanks for sharing your idea.
Reply
Rand
11/2/2014 10:17:03 pm
This is a wonderful solution to the age-old dilemma of first double crochets! Not only will I use it in my design and crochet work, I will include it in my course when I teach beginner crochet. Thank you for your explanation and fun-to-read article.
Reply
Sheila
11/14/2015 10:52:51 pm
Thank you! Thank you! Thank you! I am a fairly new crocheter, and iI have come across tutorials where they say to chain 2 then turn your work, and other ones that say to chain 3 then turn the work. WHY!? I struggle with inconsistencies when I'm learning something new. You have SAVED me! I so appreciate your explanation and will be following your lead when I dc.
Reply
tania
3/13/2016 03:50:22 am
just found your site and i will be returning regularly, thank you this is great and will be using it from now on
Reply
Amber Jaggers
12/11/2016 03:20:14 am
Can I work this "in the round" for a beanie? Where would I join the end of the row? Just join in the single crochet (SC)?
Reply
Sharon Ishika Ghose
6/9/2017 11:01:10 pm
(Don't have a website - but do have stuff I made on Pinterest)
Reply
Leave a Reply. |
AuthorShannon and Jason Leave us a tip to help us do what we do!
Archives
May 2024
Categories
All
|




 RSS Feed

