SHANNON & JASON
  • Home
  • Blog
    • Tips
    • tutorials
  • Our Books
    • Contemporary Kogin-zashi
    • Boro & Sashiko, Harmonious Imperfection: The Art of Japanese Mending & Stitching
    • Complete Crochet Course
    • Designer Crochet
    • Crochet Geometry
  • All Shopping
    • Books and Digital Patterns
    • Sashiko Shop
    • Thread
    • Fabric
    • Stitchips
  • Classes
  • Sashiko
  • About
  • Contact and Subscribe
  • Sponsors

 Shannon & Jason's Blog 

Technique Tuesday – Adding New Yarn In the Middle Of A Row

9/16/2014

7 Comments


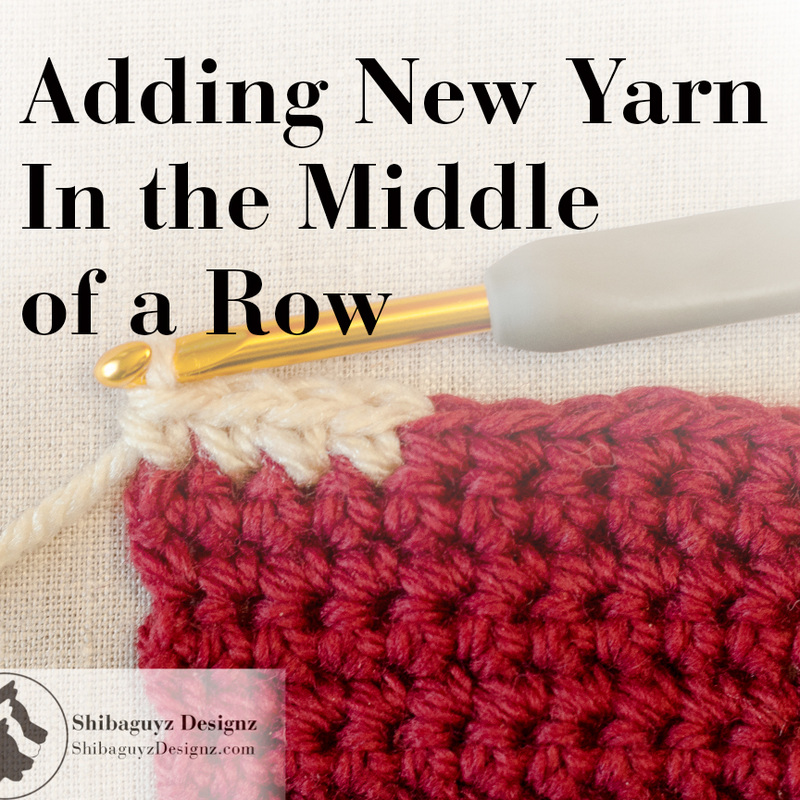
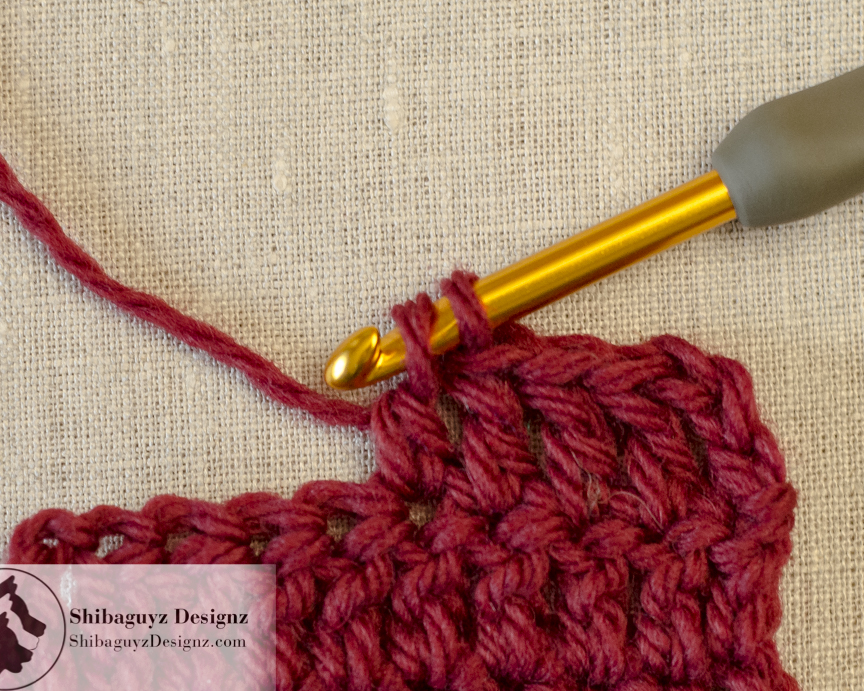
How To Add New Yarn In The MIddle Of A Row Of Crochet Stitches

Technique Tuesday Crochet and Knitting Tutorials by Shibaguyz Designz


Technique
Adding New Yarn In the Middle Of A Row


What is it?

There you are… happily hooking along on your crochet project and, suddenly, the feeder yarn that was so perfectly tensioned across your fingers and hook goes slack. NO!! You've been so engrossed in binge watching the X-Files that you didn't notice you were at the end of your skein of yarn. Whatever will you do now?? WHYYYYYY?!?!?

Okay… it's probably not all that dramatic but, if you've ever felt the end of a ball of yarn slip through your tensioning fingers while you weren't quite paying attention, if certainly feels like the onset of the wombat apocalypse.

Adding New Yarn in the Middle of a Row of Crochet Stitches - A step-by-step crochet photo tutorial by Shibaguyz Designz
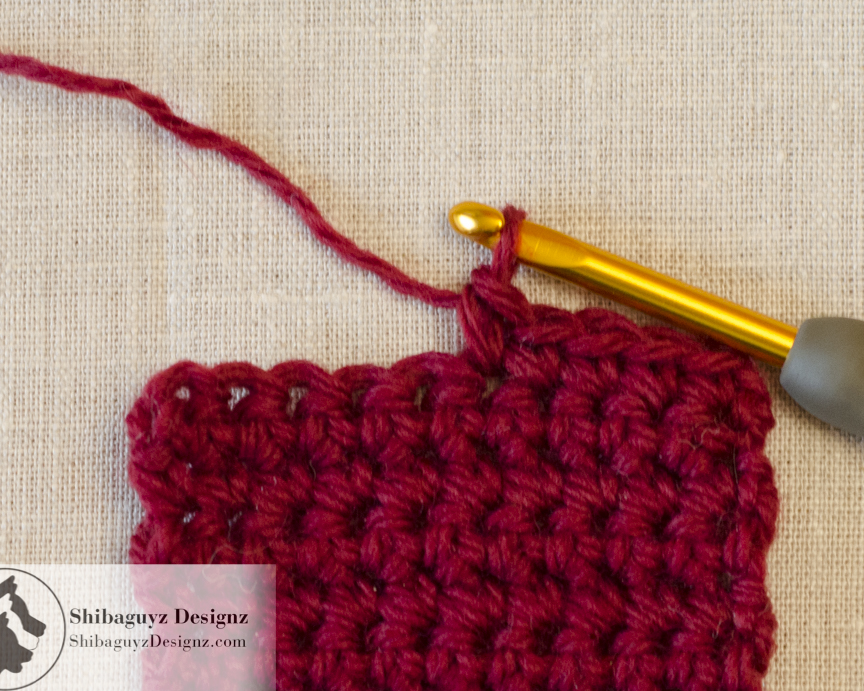
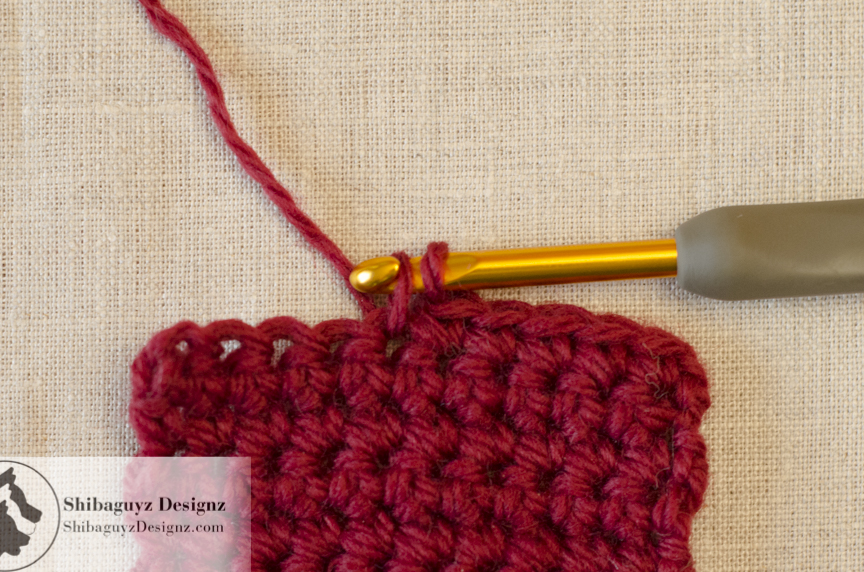
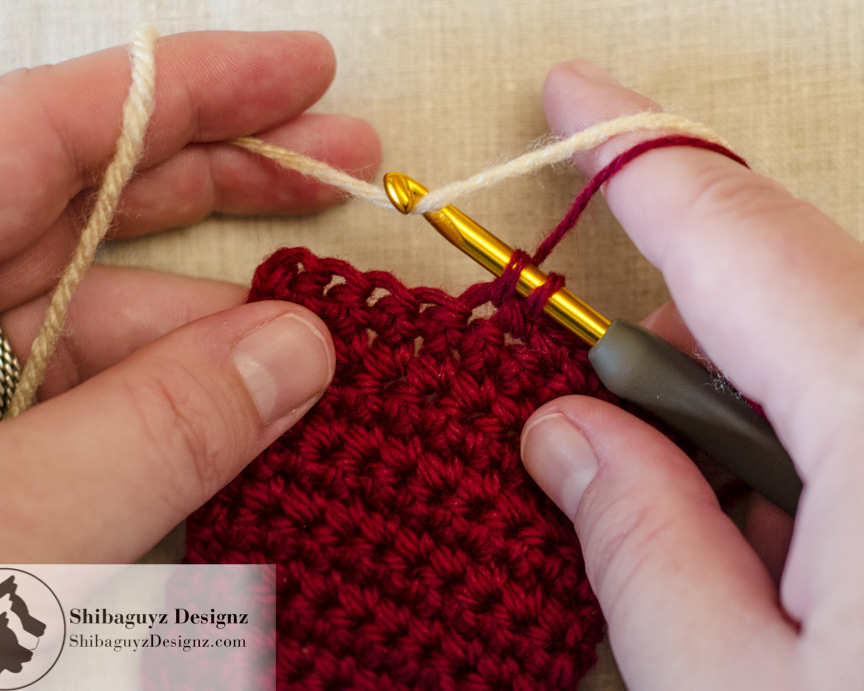
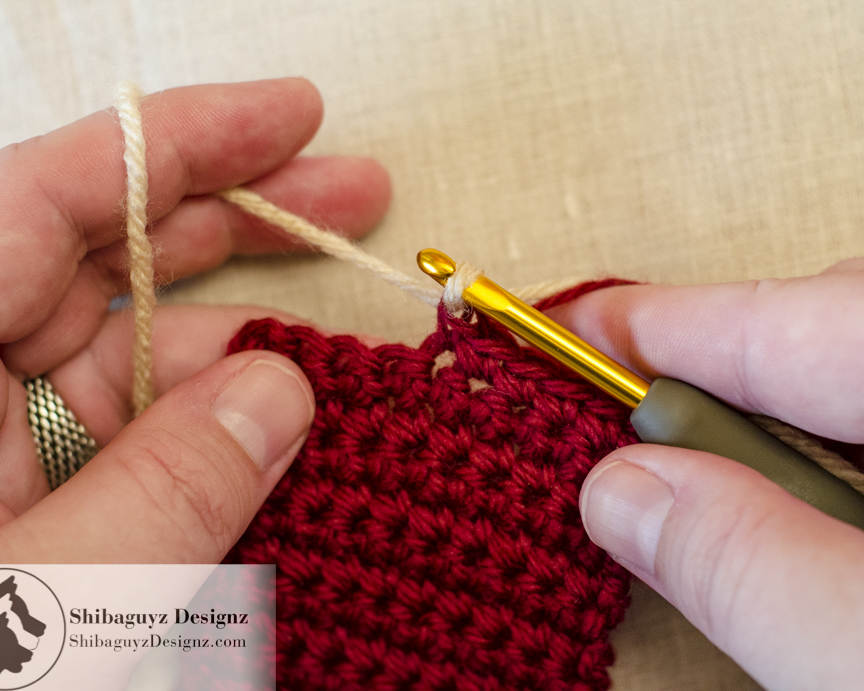
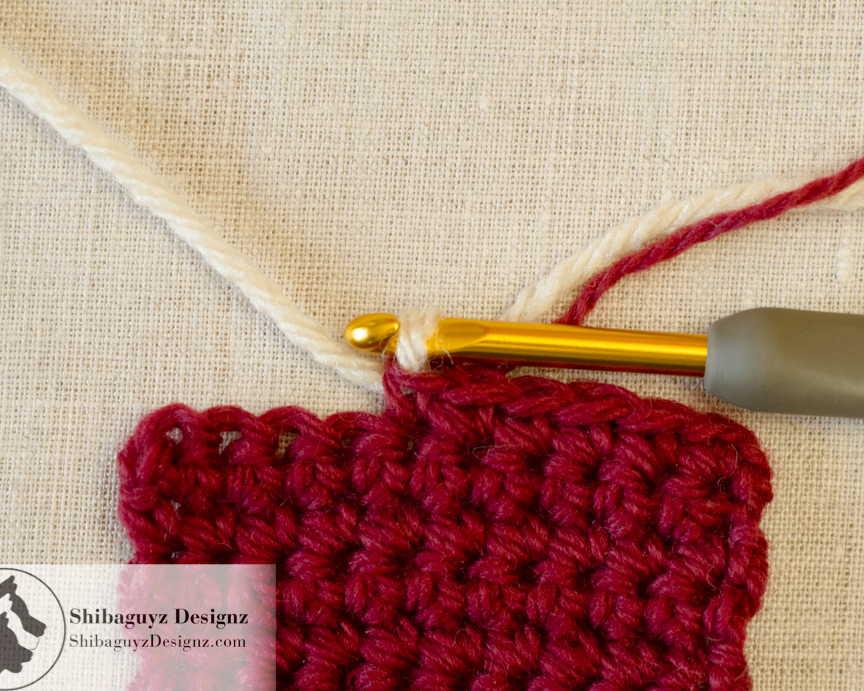
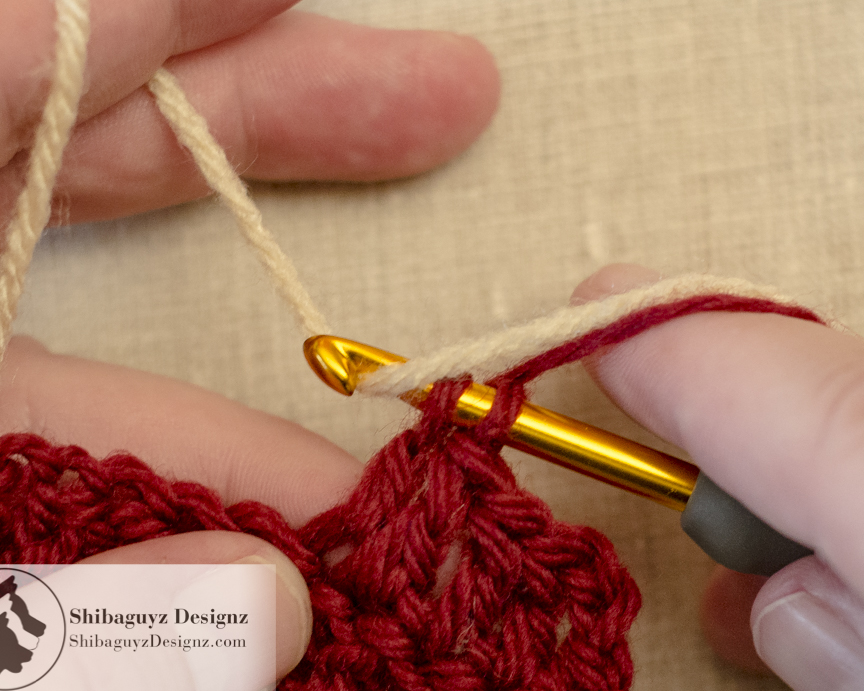
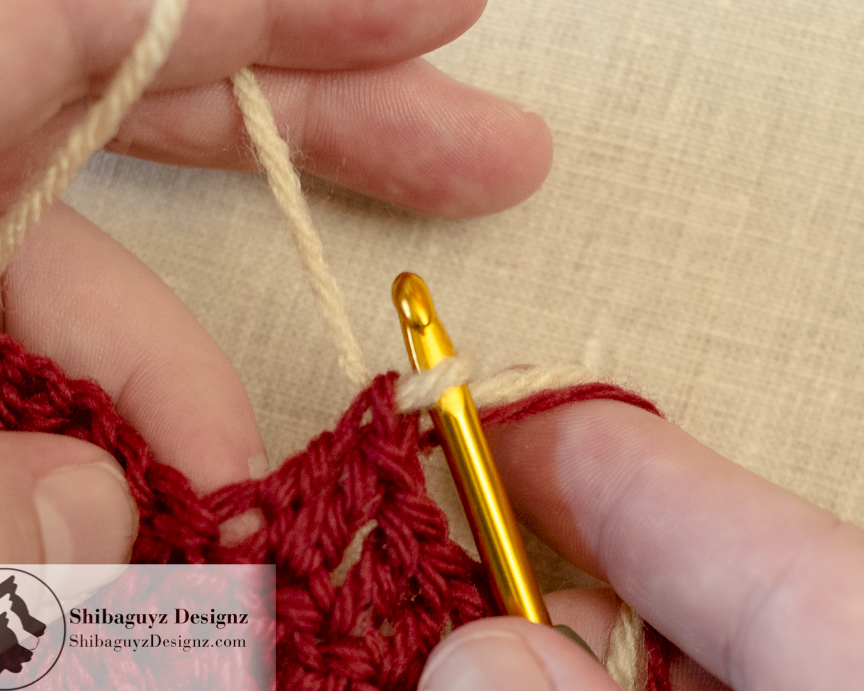
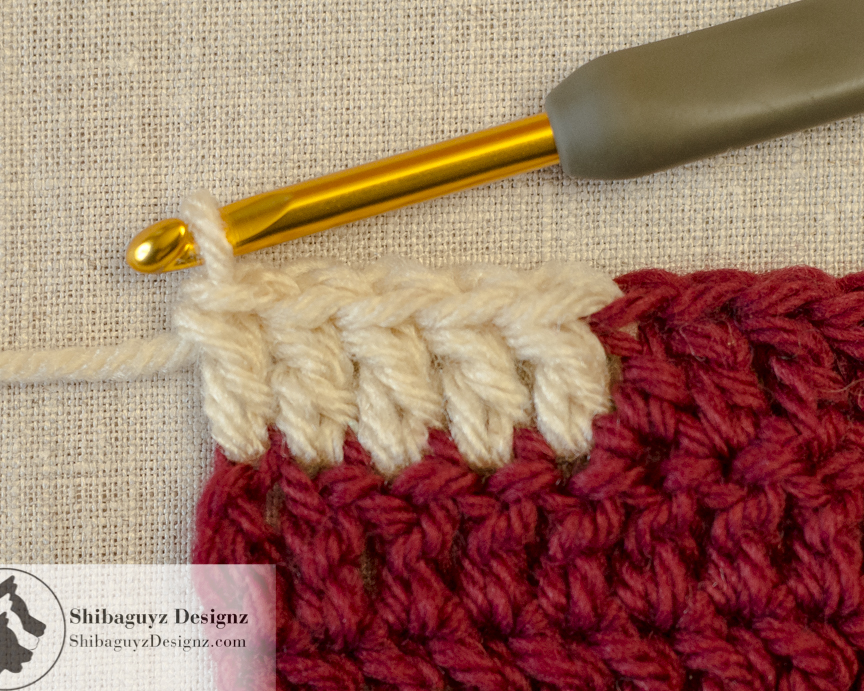
Now, my personal preference is to always change to a new working yarn at the ends of rows. Unfortunately, when I am working with a limited supply or with a particularly pricey yarn, that isn't an option.

Click "Read More" link below for the full post.
And we can't be the only ones who binge watch the X-Files… right??

Notice the title of this tutorial: Adding New Yarn In the Middle Of the Row. This could be adding a new yarn of the same color when you run out of a skein like we describe above OR "adding new yarn" could also mean that you want to change colors mid-row.

While we did use two colors to make the addition of the new yarn easy to see in this tutorial, today we are, specifically, talking about adding a new yarn from a new skein of the same color. Check back soon (next week?) for full-on color blocking and color changing tutorials. This, however, is a good place to start. Practice this little adding technique and you'll be way ahead of the game when we get to adding yarns of another color and working with them in pattern.

Okay… moving on to today's task: preventing an apocalyptic event with demented wombats with laser beam shooting eyes… hey… it could happen. Maybe too much X-Files?

First, we will demo with single crochet fabric, then we will move on to double crochet fabric. No matter what stitch you are working when you want/need to add new yarn, you will work your stitch up to the last "yarn over and draw through all loops on hook" before you add the new yarn to your row.

The principle is the same no matter how tall or short of a stitch you use and these two stitches will give you the skills you need for adding new yarn while making any stitches.


Break It Down

Here we've worked our single crochet row up to where we have run out of yarn. You'll want to leave about a 6" tail for weaving in securely so, if you've completely stitched your working yarn up to the last inch or two, frog back a few stitches to give you the needed 6" tail.

Adding New Yarn in the Middle of a Row of Crochet Stitches - A step-by-step crochet photo tutorial by Shibaguyz Designz

Adding New Yarn in the Middle of a Row of Crochet Stitches - A step-by-step crochet photo tutorial by Shibaguyz Designz

This next stitch is where we want to add our new yarn. We've worked up until the last "yarn over and draw through all loops on hook" of this single crochet stitch.


Note the feeder yarn on the left…
Here you can see I have moved the feeder yarn (now the end of my old ball of yarn) to my right hand and tensioned the old yarn along with the tail of the new yarn (the lighter colored yarn) with my fingers. 

This tensioning of the old and new tails together on my right hand allows me to keep everything neat and tidy maintaining consistent tension throughout my row thus creating an invisible join.

Note I have the NEW feeder yarn (light colored yarn) tensioned with my left hand.
Adding New Yarn in the Middle of a Row of Crochet Stitches - A step-by-step crochet photo tutorial by Shibaguyz Designz

Adding New Yarn in the Middle of a Row of Crochet Stitches - A step-by-step crochet photo tutorial by Shibaguyz Designz

Yarn over and draw through all loops on hook just like you would at the end of a regular single crochet stitch. Here you can see the new yarn loop coming up through the old yarn stitches.
And a flat photo of that new yarn loop without my big ol' fingers in the way.

New feeder yarn (light colored) on the left, two tails on the right.
Adding New Yarn in the Middle of a Row of Crochet Stitches - A step-by-step crochet photo tutorial by Shibaguyz Designz

Adding New Yarn in the Middle of a Row of Crochet Stitches - A step-by-step crochet photo tutorial by Shibaguyz Designz

Finish your row of single crochet like you normally would.

Look at those beautiful stitches! Not a bump or a jog in site. Aaaaahhhh… it's a beautiful thing…
Next, the double crochet example. Same principle: work your row up until the last "yarn over and draw through all loops on hook" of the double crochet stitch.    
Adding New Yarn in the Middle of a Row of Crochet Stitches - A step-by-step crochet photo tutorial by Shibaguyz Designz

Adding New Yarn in the Middle of a Row of Crochet Stitches - A step-by-step crochet photo tutorial by Shibaguyz Designz

Tension the tails of the old yarn and the new yarn with the fingers of the right hand and the feeder length of the new yarn (light colored yarn) with the fingers of the left hand as you yarn over.
Draw up the last loop of your double crochet with the new yarn maintaining consistent tension with the rest of your row. 

By the way, if your tension does go a little wonky here, it is an easy fix by giving a little tug on those loose tails over your right-hand fingers. Easy peasy fix…    
Adding New Yarn in the Middle of a Row of Crochet Stitches - A step-by-step crochet photo tutorial by Shibaguyz Designz

Adding New Yarn in the Middle of a Row of Crochet Stitches - A step-by-step crochet photo tutorial by Shibaguyz Designz
Finish your row of double crochet like you normally would then check out the beautiful, non-bumpy, invisible join.

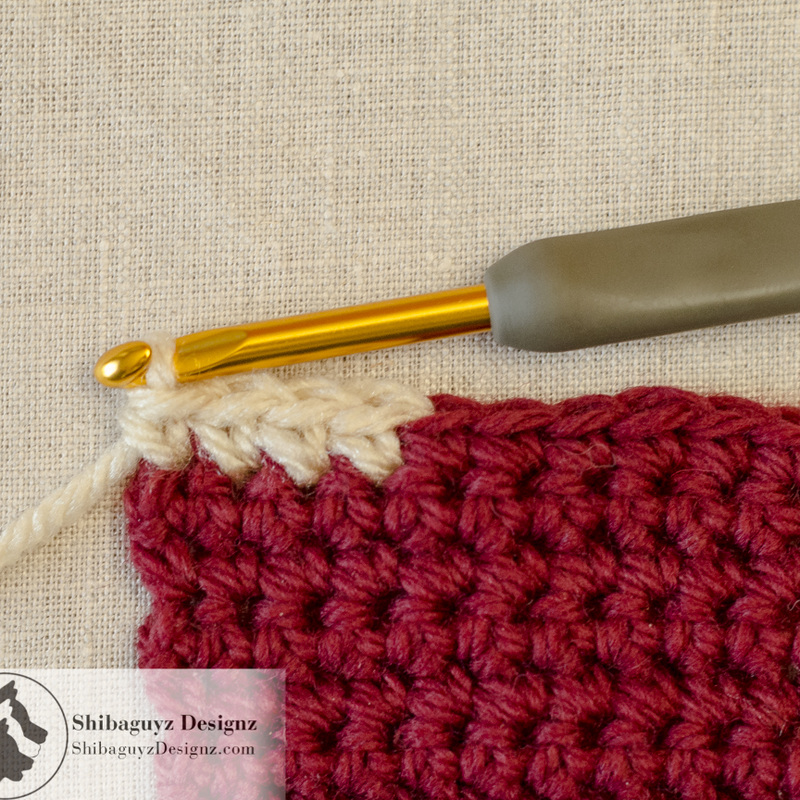
TAADAA!!


The first few times you practice this technique, use two colors of yarn like we did. It's just easier to keep track of which tail is which and where you need to keep tension with which fingers.

As with any technique, all it takes is practice for it to feel natural and easy for you.

As always, we recommend stitching up a few quick swatches like ours and, using our photo walk through to compare your stitches, to make sure your stitches are lining up correctly. If you aren't happy, rip 'em back out and go again!


Thanks for dropping by for another Technique Tuesday! We appreciate the comments y'all have left for us on here and on social media and we're happy to know we could help.

What other techniques would YOU like to see included in our Technique Tuesday articles?

Is there a particular technique that you've always wanted to learn but every time you try it just gives you fits so you throw your work across the room and stomp around and just go back to the other way of doing it even though it looks like a deranged wombat gnawed on it?

Yeah… we've been there too…

Let us hear from you in the comments section below to let us know what techniques you'd like to learn and maybe we'll feature yours in a future Technique Tuesday… because nobody likes their work to look like it's been gnawed on by a deranged wombat.

We hope you enjoy our articles and posts here on Shibaguyz Designz and hope you will share them with other stitchers. Here are a few of our articles and patterns we thought you might like to get you started. Just click on one of the photos below to open the link! Enjoy!

We'd love to hear from you! Leave a comment to this post and catch up with us on Ravelry, Facebook, Twitter, and Pinterest by clicking on one of these icons.


7 Comments
Pamela Clarke
8/22/2015 07:53:38 am

Hi Shibaguyz, I really appreciate and am learning from your fantastic tutoring via Technique Tuesday. Do you, or are you planning to, give tips on crochet pattern-writing? That's something I'd quite like to be able to do. Meantime, keep up the inspiring work!

Reply
Kat
4/3/2016 11:05:16 am

thank you so much! I am about 6 inches short of my last row before changing colours and didn't know what to do. Your directions are super easy to follow. Thanks again!😊

Reply
Jenna Armstrong
10/13/2016 08:37:10 am

Thanks for the tutorial. What do I do with the tails now?

Reply
Dana Taft
10/23/2016 05:20:35 pm

This post has been helpful except for what I'm to do with the tails. I'm new to crocheting so the more information the better.

Reply
sondra
5/10/2017 01:20:07 pm

great tutorial. loved that you used both single and double crochet. i am new to crochet and this was really helpful, but what do i do with the tails now?

Reply
Kathleen Lauman
6/7/2017 09:17:46 pm

I just changed both the same color and a different color using the instructions you presented. Fantastic results. Thank you so much.

Reply
Sharon Ishika Ghose
6/24/2017 09:32:02 pm

Thank you. Refresher - useful - especially about the Tension during
switching yarns. The "tails" - I weave them in at the end. Or is there a better way?

Reply


Leave a Reply.

    Author

    Shannon and Jason

    RSS Feed

    Sign Up For Our Newsletter

    Leave us a tip to help us do what we do!

    BERNINA Ambassador Badge
    Daylight Company Lamps
    Shibaguyz Aurifil Thread Collection

    Archives

    September 2022
    June 2022
    February 2022
    June 2021
    November 2020
    September 2020
    June 2020
    May 2020
    April 2020
    March 2020
    January 2020
    February 2019
    December 2018
    November 2018
    August 2018
    July 2018
    May 2018
    April 2018
    March 2018
    February 2018
    January 2018
    December 2017
    November 2017
    October 2017
    September 2017
    August 2017
    July 2017
    March 2017
    February 2017
    January 2017
    November 2016
    October 2016
    September 2016
    July 2016
    June 2016
    May 2016
    April 2016
    March 2016
    February 2016
    November 2015
    August 2015
    July 2015
    June 2015
    May 2015
    April 2015
    March 2015
    February 2015
    January 2015
    December 2014
    November 2014
    October 2014
    September 2014
    August 2014
    July 2014
    April 2014
    March 2014
    January 2014

    www.dickblick.com
    Picture
    Picture

    RSS Feed

    Categories

    All
    Afghan
    Aurifil
    Books
    Boro
    Camp STITCHES
    Classes
    Cleaning
    Clip On
    Clover
    Cowl
    Craft
    Craftsy
    CraftU Classes
    Crochet
    Crochet Geometry
    Daylight
    Daylight Company
    Design
    Designer Crochet
    Digital Download
    Donate
    Download
    English Paper Piecing
    Event
    Free
    Giveaway
    Hand Cream
    Hooks
    Inspirations
    International Crochet Month
    Interview
    Interweave
    Knit
    Knitting
    Lamp
    Marcus
    Marcus Fabrics
    Men
    Menswear
    National Craft Month
    National Crochet Month
    Needles
    Online Classes
    Ottlite
    Pattern
    Patterns
    Paypal
    Photography
    Podcast
    Prize
    Product Review
    Project
    Quilt
    Quilting
    Recipe
    Rotary Cutter
    Sashiko
    Season Of Giving Away
    Sew Expo
    Sewing
    Shibaguyz
    Shibaguyz Designz
    Shibaguyz Designz Indie Maker Pattern
    Shibaguyz LIVE
    Shibaguyz Photography
    Shop
    Soak
    STITCHES Events
    Sweater
    Thread
    Tool School
    Tools Of The Trade
    Travel Lamp
    Tutorials
    Vogue Knitting LIVE
    Walkthrough
    Warm Up America
    Wash
    Weaving
    Women
    Yarn
    Zoom Loom

    www.dickblick.com

Stay current on the news and events from Shannon and Jason as well as exclusive offers and tutorials available only for our newsletter subscribers.

* indicates required
Email Format
  • Home
  • Blog
    • Tips
    • tutorials
  • Our Books
    • Contemporary Kogin-zashi
    • Boro & Sashiko, Harmonious Imperfection: The Art of Japanese Mending & Stitching
    • Complete Crochet Course
    • Designer Crochet
    • Crochet Geometry
  • All Shopping
    • Books and Digital Patterns
    • Sashiko Shop
    • Thread
    • Fabric
    • Stitchips
  • Classes
  • Sashiko
  • About
  • Contact and Subscribe
  • Sponsors