|
I started off writing this post as the next section in our Blocking University series. What happened was the following tangent about swatching.
The first blocking we encounter in a project is blocking the swatch. That, of course, means you must first make a swatch. Yes… make a swatch… (This is where things started to go… in another direction…) Don't think I can't hear you rolling your eyes at me! Since this subject of swatching is tangential (if only slightly so) to our main course topic of blocking, we thought we should just get the issue out of the way first thing. (Mind you, at this point, I still thought I'd write a paragraph or two about swatching then get on with blocking.)
The Objections
Now, before you even say it, believe me, we've heard ALL (or a heck of a lot of) the reasons for, first, not making a swatch and, then, not blocking that swatch. Regarding objections to swatching, here are the ones we receive most frequently: "I'm busy and don't have time to waste making a swatch." "My yarn is too expensive and I don't want to waste it on a swatch." "I've been (crocheting and/or knitting) for (30 or 40 or 129 years)…" followed by “… and I never have to swatch!” or “… and I always make my gauge without swatching!” Since Swatchophobia seems to be a real and prevalent issue in the crochet and knitting community, let's just address this right up front so we can move on. Shall we? (Yes, I am fond of making up new words when it suits me…) (It was at this point that I just gave up and started writing the post as you read it now.)
The Answers
The answers are simple(ish): Busy I can certainly appreciate that you are a busy person and making a (cardigan, afghan, scarf, car cover) can be a big investment of your valuable time… I know it is for me as well. To be respectful of your time, let's make a swatch first – something that takes a short amount of time relative to making an entire (cardigan, afghan, scarf, car cover) – so you know how this stitch pattern is going to work with this yarn to make the fabric for your (cardigan, afghan, scarf, car cover).
$$$
I hear ya! Some of my favorite yarns are made from bison, yak, camel, silk, milk, rare sheep, or from the nose hairs of a Yeti species that lives on an island off the coast of South America. (Okay… that last one probably isn't true…) Thanks to Buffalo Wool Company, I've even had the privilege of working with yarn that was actually spun with gold in it (There's gold in that thar yarn!). Believe me, if I'm going to spend that much on yarn, I'm not going to waste one precious millimeter (that's really tiny for those non-metric speakers). To that end, let's swatch with this precious fiber and see how this Yeti/gold blend yarn is going to work with this stitch pattern BEFORE we spend the bulk of our retirement fund on enough to make a car cover for our Lamborghini Veneno Roadster (look it up… no kidding… GAH!!). Personally, if the yarn is really extravagant, I absolutely will not fasten off or break my yarn at the end of my swatch. I just leave the whole ball of yarn attached to the swatch. If I'm crocheting, I put a stitch marker in the last stitch. If I'm knitting, I will make an extra row or two and place the stitches on a stitch holder or my blocking wires. Either way, after I have my blocked gauge and know I'm happy with the finished fabric, I unravel (or frog, if you will) my swatch and use that yarn for sewing seams or for my foundation or cast on row. No waste and I can STITCH ON! knowing my FO will be exactly what I expected.
Years and Years
I would never challenge anyone's skillz as a crochet or knitting stitcher… but let me say this: I've have a hook or sticks in my hands off and on since before I could remember. I have completed a LOT of projects, stitched miles and miles of yarn, and designed a couple hundred patterns. I still swatch. Yarn and stitches don't always get along the same with different hook/needle sizes. And… get this… yarn changes!! No kidding… true story… A little story time… Recently, I was working on our new book and I pulled out one of my tried and true yarns from the shelf. I have used this yarn in dozens of designs and LOVE how it works up, how it lasts, and the fabrics it helps me produce. I swatched my fabric, calculated my yarn amount, and went about my merry way writing my pattern. When the yarn arrived at the studio, we shipped it off to the contractor who set about merrily making a gauge swatch. Several days later, we received an email and photos from this contractor who was very distressed that their gauge just was NOT coming out like mine and they had worked it three times and they stayed up all night and whywhywhy wasn't it working?!?
I had swatched from yarn that was four years old and while the company still produced the same yarn in the same color and weight, they had changed mills where the yarn was spun and the finished product was SLIGHTLY different. The WPI (wraps per inch) were still within the accepted guidelines for a DK weight yarn, but it stitched up differently and reacted differently when swatched. Had both myself and the contractor not swatched, we never would have known and the finished piece would have been disastrously wrongwrongwrong when we went to block and finish the garment. WHEW! Even with factory spun yarns, factors like slight variations like color, humidity, and even a change in the manufacturing process can exist that affect your final fabric.
The Bottom Line
Swatching is testing the fabric you are about to make your (garment/afghan/shawl/car cover) from.
When we are talking about and investment of time, money, effort, and emotions, it really isn't worth the gamble.
How Much To Swatch?
Nice and easy answer: As much as you need to. But like Tina says… We never do anything nice and easy… (Reference to Proud Mary by Tina Turner - Yes, you should take a dance break now.) When I started teaching our garment design classes, I was shocked to find that a lot of stitchers thought those measurements in the Gauge section of a pattern were how big they were supposed to make their swatches. Now that it has been pointed out to me, I totally see where the misconception comes from… but let's clear this up right away. Let's say your pattern gives a gauge of 12 sts and 10 rows = 4"/10cm. This gauge isn't tell you to make a 4x4" (10x10cm) swatch and measure it. Rather, it is telling you that, when you measure a 4"/10cm square section of your swatch, you should have 12 sts and 10 rows. Me? The minimum size swatch I make is about 6" (15.25cm) square. That said, I make my swatch as big as I need it to be. If the stitch pattern is fairly involved or if I need a larger swatch to work all of the stitches and rows in a pattern stitch to make it repeat a few times, then I make a larger swatch. If it is a fairly straightforward stitch pattern and I just need to see the fabric that will result from the combination of this particular stitch pattern and fiber, then I will aim for at least a 6" (15.25cm) square swatch. Think again about the correlation of your swatch to that bolt of fabric in the store: Swatch as much fabric as you need to determine the drape and feel of the fabric. If a 6" piece of fabric is enough for you, FAB! If not, go bigger. You are about to invest a lot of time and effort into this project… take the time to ensure you like the fabric first. Finally, when considering how much to swatch, swatch as much as you need in order to determine the feasibility of that particular stitch pattern with that particular yarn. You might LOVE the idea of Frost Flowers or basket weave cables for your cardigan but will you LOVE the actual work of making that stitch pattern over and over again on that hook or needle size with that yarn? Swatching has turned my head back to the drawing board a number of times when I decided that I just wasn't going to do that to myself.
Counting
Yes, there is a little math involved. Math in that you need to figure out your stitches and rows per inch. It's easy… here it is step-by-step. 3. Do the math – how many stitches and rows per inch does your pattern call for? Let's do a simple example using inches. Your pattern lists a gauge of 12 stitches and 10 rows for a 4" square. First, you take the number of stitches (12) and divide that number by the number of inches (4). 12 ÷ 4 = 3
This gives us 3 stitches per inch.
Next, you take the number of rows (10) and divide that number by the number of inches (4). 10 ÷ 4 = 2.5
This gives us 2.5 rows per inch.
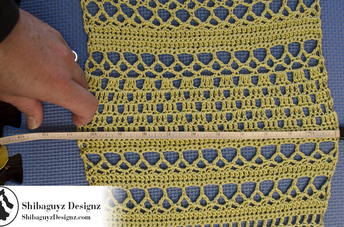
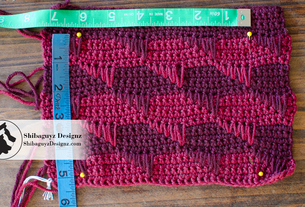
The gauge you need is 3 stitches and 2.5 rows per inch. 4. Count – Our example here calls for a gauge of 3 stitches and 2.5 rows per inch, lay your swatch out and mark out a square area with a measuring tape (In the photo you can see we have pinned out an area of 6 x 5".) then count the number of stitches and rows within that square. 5. Do the Math – Just one more time similar to Step 3. Let's say in our example we have 18 stitches and a little over 12 rows within our 6 x 5" area. First, you take the number of stitches (18) and divide that number by the number of inches (6). 18 ÷ 6 = 3
This gives us 3 stitches per inch.
Next, you take the number of rows (12-ish) and divide that number by the number of inches (5). 12 ÷ 5 = 2.4
This gives us about 2.4 rows per inch.
(Which, incidentally, is close enough to 2.5 for me to be a happy stitcher!) Your gauge is 3 stitches and 2.5 rows per inch. TAADAA!!
The Bottom Line (another one… I know…)
We are makers. We use our skills to craft garments and family heirlooms that will be passed on for generations. A carpenter measures twice and cuts once. A tailor takes exacting measurements and marks them out with precision and skill. Like them, we take pride in our work and in showing our craft. Thanks for joining us for this slightly tangential (yes, I like that word today) article on the subject of swatching. There is a LOT more that can and should be said on the subject but this is enough to get way ahead of the swatching game. Bookmark this post and share it with your friends so they can be one of us… one of us… one of us… (Obscure old horror film reference there.) And come back for the next in our Blocking University series of articles. Stitch On! S&J
We hope you enjoy our articles and posts here on Shibaguyz Designz and hope you will share them with other stitchers. Take a minute to look around and check out our other posts as well as our patterns and books in our online shop. Here are a few we thought you might like… click on the photos below to see our recommendations. Enjoy!
We'd love to hear from you! Leave a comment to this post and catch up with us on Ravelry, Facebook, and Pinterest by clicking on one of these icons.
8/7/2014 11:19:10 pm
Snap! (or should I say 'Swatch!'). Comments are closed.
|
AuthorShannon and Jason Leave us a tip to help us do what we do!
Archives
May 2024
Categories
All
|



 RSS Feed


